1 MS Access 2010, 2013, 2016 और 2019 ट्यूटोरियल का परिचय
एमएस एक्सेस ट्यूटोरियल में आपका स्वागत है। यह ट्यूटोरियल उपयोगकर्ता को तेजी से एमएस एक्सेस (अब से बस "एक्सेस") के साथ चलाने और चलाने के लिए डिज़ाइन किया गया है। एक्सेस के चार बुनियादी मॉड्यूल प्रदर्शित किए गए हैं:टेबल, फॉर्म, रिपोर्ट और प्रश्न। पहले एक व्यावसायिक उदाहरण पर चर्चा की जाती है जो एक साधारण डेटाबेस विकसित करने के लिए एक पृष्ठभूमि प्रदान करता है।
यह माना जाता है कि इस ट्यूटोरियल के उपयोगकर्ता Microsoft Windows XP/Vista/Win7/Win10, आदि और MS Excel के साथ काम करने में कुशल हैं। इसमें कीबोर्ड और माउस का उपयोग शामिल है। ट्यूटोरियल माइक्रोसॉफ्ट एक्सेस पर आधारित है जो माइक्रोसॉफ्ट ऑफिस प्रोफेशनल सूट का हिस्सा है जिसमें एमएस एक्सेल, एमएस वर्ड और एमएस पावरपॉइंट भी शामिल है।
इस ट्यूटोरियल में एमएस एक्सेस 2007, 2010, 2013, 2016 और 2019 को शामिल किया गया है जिसमें एक सामान्य इंटरफ़ेस (शीर्ष पर "रिबन बार") है जो पिछले संस्करणों से अलग है। यदि आप एमएस एक्सेस '97 या 2000 के साथ काम करने में रुचि रखते हैं, तो कृपया माइक्रोसॉफ्ट एक्सेस ट्यूटोरियल - कवरिंग एमएस एक्सेस '97 और 2000 वेब पेज पर जाएं।
ट्यूटोरियल रिलेशनल डेटाबेस . के संक्षिप्त अवलोकन के साथ शुरू होता है . आज उपयोग में आने वाले अधिकांश डेटाबेस प्रबंधन प्रणालियाँ उस पर आधारित हैं जिसे रिलेशनल डेटाबेस मॉडल कहा जाता है। एक्सेस एक रिलेशनल डेटाबेस मैनेजमेंट सिस्टम है। फिर हम एक व्यावसायिक उदाहरण का वर्णन करते हैं और उस डेटाबेस और एप्लिकेशन की रूपरेखा देते हैं जिसे हम विकसित करना चाहते हैं। आगे आने वाले अनुभागों में, हम आवेदन के लिए टेबल, डेटा एंट्री फॉर्म, रिपोर्ट और क्वेरी बनाने के लिए चरण-दर-चरण निर्देश देते हैं।
1.1 लक्षित दर्शक
यह ट्यूटोरियल एमएस एक्सेस डेटाबेस प्रबंधन प्रणाली के साथ शुरुआत करने वाले छात्रों के लिए है।
1.2 पूर्व-आवश्यक ज्ञान
यह ट्यूटोरियल मानता है कि छात्र पर्सनल कंप्यूटर और विंडोज 2000, विंडोज एक्सपी, विंडोज विस्टा या विंडोज 7 के बुनियादी संचालन से परिचित है। इस ट्यूटोरियल के लिए आवश्यक विशिष्ट कौशल हैं:
- माउस और कीबोर्ड का उपयोग
- उदाहरण के लिए हार्ड डिस्क और USB मेमोरी स्टिक (थंब ड्राइव) पर फ़ाइलें खोलना और सहेजना
- ड्राइव अक्षरों, हार्ड डिस्क, आदि के बीच अंतर सहित फ़ाइलों को सामान्य रूप से प्रबंधित करना।
- Windows प्रारंभ मेनू से प्रोग्राम चलाना
- विंडो को छोटा करना, बड़ा करना और उनका आकार बदलना
छात्र के पास एक USB मेमोरी स्टिक (थंब ड्राइव) या अन्य पोर्टेबल मेमोरी डिवाइस होनी चाहिए जो उनकी फ़ाइलों को संग्रहीत करने के लिए उपलब्ध हो जो इस ट्यूटोरियल के दौरान बनाई जाएंगी।
1.3 Apple Mac पर Microsoft Access चलाना
एक समस्या जो कुछ छात्रों का सामना कर सकती है वह यह है कि एमएस एक्सेस केवल विंडोज ऑपरेटिंग सिस्टम (जैसे विंडोज एक्सपी, विस्टा या विंडोज 7) के तहत चलता है। यदि आपके पास एक मैकबुक, आईमैक या अन्य ऐप्पल सिस्टम है जो मैकोज़ चला रहा है जो इंटेल सीपीयू का उपयोग करता है, तो कुछ संभावित विकल्प हैं जिन्हें आप आजमा सकते हैं। कई आधुनिक Apple कंप्यूटर जो Intel CPU का उपयोग करते हैं, Windows ऑपरेटिंग सिस्टम चला सकते हैं। ध्यान दें कि ऐसा करने के लिए आपको विंडोज ऑपरेटिंग सिस्टम की कानूनी रूप से लाइसेंस प्राप्त कॉपी की आवश्यकता होगी। इसे पूरा करने के दो मुख्य तरीके हैं:
- आप अपने Mac को MacOS X और Windows दोनों में "डुअल बूट" पर सेट कर सकते हैं। एक उत्पाद जो इसे सक्षम कर सकता है वह है Apple BootCamp सॉफ़्टवेयर।
- आप वर्चुअलबॉक्स जैसे "वर्चुअल" कंप्यूटर का उपयोग करके मैक ओएस एक्स के साथ विंडोज ओएस "साइड बाय साइड" चला सकते हैं
सामग्री की तालिका
- 1 एमएस एक्सेस ट्यूटोरियल का परिचय
- 1.1 लक्षित दर्शक
- 1.2 पूर्व-आवश्यक ज्ञान
- 1.3 Apple Mac पर Microsoft Access चलाना
- 2 रिलेशनल डेटाबेस और डेटाबेस एप्लिकेशन का संक्षिप्त अवलोकन
- 3 एक व्यावसायिक उदाहरण
- 4 माइक्रोसॉफ्ट एक्सेस शुरू करना
- 4.1 माइक्रोसॉफ्ट एक्सेस शुरू करने की समीक्षा
- 5 टेबल बनाना और देखना
- 5.1 डिज़ाइन दृश्य का उपयोग करके तालिका बनाना
- 5.2 व्यायाम:एक टेबल बनाना
- 5.3 तालिका में डेटा देखना और जोड़ना
- 5.4 अभ्यास:तालिका में डेटा जोड़ना
- 5.5 तालिकाओं के बीच संबंध बनाना
- 5.6 टेबल बनाने और देखने की समीक्षा
- 6 क्वेरी बनाना और चलाना
- 6.1 एकल तालिका प्रश्न
- 6.2 अभ्यास:एकल तालिका प्रश्न
- 6.3 एकाधिक तालिका प्रश्न
- 6.4 अभ्यास:एकाधिक तालिका प्रश्न
- 6.5 क्वेरी बनाने और चलाने की समीक्षा
- 7 डाटा एंट्री फॉर्म बनाना और चलाना
- 7.1 विज़ार्ड का उपयोग करके एकल तालिका प्रपत्र बनाना
- 7.2 व्यायाम:एकल तालिका प्रपत्र बनाना
- 7.3 डेटा एंट्री फॉर्म बनाने और चलाने की समीक्षा
- 8 रिपोर्ट बनाना और चलाना
- 8.1 विज़ार्ड का उपयोग करके एकल तालिका रिपोर्ट बनाना
- 8.2 अभ्यास:एकल तालिका रिपोर्ट बनाना
- 8.3 रिपोर्ट बनाने और चलाने की समीक्षा
- 9 मास्टर/विवरण फ़ॉर्म बनाना और चलाना (सबफ़ॉर्म के साथ फ़ॉर्म)
- 10 स्विचबोर्ड बनाना और चलाना
- 11 नेविगेशन फॉर्म बनाना और चलाना
- 11.1 व्यायाम:नेविगेशन फॉर्म को संशोधित करना
- 11.2 नेविगेशन फॉर्म को डिफ़ॉल्ट के रूप में सेट करना
- 12 ट्यूटोरियल सारांश और उन्नत विषय
अगला पेज रिलेशनल डेटाबेस का संक्षिप्त परिचय देता है।
2 रिलेशनल डेटाबेस और डेटाबेस एप्लिकेशन का संक्षिप्त अवलोकन
1960 और 1970 के दशक के दौरान लागू किए गए पहले डेटाबेस या तो फ्लैट डेटा फ़ाइलों या पदानुक्रमित या नेटवर्क डेटा मॉडल पर आधारित थे। डेटा संग्रहीत करने के ये तरीके अपेक्षाकृत कठोर संरचना के कारण अपेक्षाकृत अनम्य थे और यहां तक कि सबसे नियमित प्रसंस्करण करने के लिए अनुप्रयोगों के कार्यक्रमों पर भारी निर्भरता थी।
1970 के दशक के अंत में, रिलेशनल डेटाबेस मॉडल जो अकादमिक अनुसंधान समुदाय में उत्पन्न हुआ, IBM DB2 और Oracle जैसे व्यावसायिक कार्यान्वयन में उपलब्ध हो गया। संबंधपरक डेटा मॉडल संबंधों . में संग्रहीत डेटा को निर्दिष्ट करता है जिनके कुछ रिश्ते हैं उनमें से (इसलिए नाम रिलेशनल )।
Sybase, MySQL, Oracle, IBM DB2, MS SQL Server और MS Access जैसे रिलेशनल डेटाबेस में, डेटा को टेबल में स्टोर किया जाता है। एक या अधिक स्तंभों . से बना है (एक्सेस कॉलम को फ़ील्ड कहता है ) प्रत्येक कॉलम में संग्रहीत डेटा एक डेटा प्रकार का होना चाहिए जैसे चरित्र (कभी-कभी "स्ट्रिंग" कहा जाता है), संख्या या दिनांक। तालिका के प्रत्येक स्तंभ से मानों के संग्रह को रिकॉर्ड . कहा जाता है या एक पंक्ति तालिका में।
विभिन्न तालिकाओं में समान स्तंभ हो सकते हैं। इस सुविधा का उपयोग दो तालिकाओं के बीच संबंध को स्पष्ट रूप से निर्दिष्ट करने के लिए किया जाता है। एक तालिका में स्तंभ A में प्रदर्शित होने वाले मान दूसरी तालिका के साथ साझा किए जाते हैं।
स्थानीय बैंक के संबंधपरक डेटाबेस में तालिकाओं के दो उदाहरण नीचे दिए गए हैं:
ग्राहक तालिका
| CustomerID | <थ>पहला नाम <थ>अंतिम नामसड़क का पता | शहर | राज्य | ज़िप | ||
|---|---|---|---|---|---|---|
| संख्या | चरित्र | चरित्र | चरित्र | चरित्र | चरित्र | चरित्र |
| 1001 | यूसुफ | स्मिथ | 123 लेक्सिंगटन | स्मिथविल | KY | 91232 |
| 1002 | अल्बर्टा | जोन्स | 12 डेविस एवेन्यू. | स्मिथविल | KY | 91232 |
| 1003 | नाथनियल | कुल्हाड़ी | 443 ग्राइंडर एल.एन. | ब्रॉडविल | GA | 81992 |
| 1004 | पॉलिना | बिल्डर | 661 पार्कर रोड. | स्ट्रीटविल | GA | 81990 |
खाता तालिका
| CustomerID | खाता संख्या | खाता प्रकार | तारीख खोली गई | <थ>बैलेंस|
|---|---|---|---|---|
| संख्या | संख्या | चरित्र | तारीख | संख्या |
| 1001 | 9987 | जांच की जा रही है | 10/12/1989 | 4000.00 |
| 1001 | 9980 | बचत | 10/12/1989 | 2000.00 |
| 1002 | 8811 | बचत | 01/05/1992 | 1000.00 |
| 1003 | 4422 | जांच की जा रही है | 12/01/1994 | 6000.00 |
| 1003 | 4433 | बचत | 12/01/1994 | 9000.00 |
| 1004 | 3322 | बचत | 08/22/1994 | 500.00 |
| 1004 | 1122 | जांच की जा रही है | 11/13/1988 | 800.00 |
ग्राहक तालिका में 7 कॉलम (ग्राहक आईडी, प्रथम नाम, अंतिम नाम, सड़क का पता, शहर, राज्य और ज़िप) और डेटा की 4 पंक्तियाँ (या रिकॉर्ड) हैं। लेखा तालिका में डेटा की 7 पंक्तियों के साथ 5 कॉलम (ग्राहक आईडी, खाता संख्या, खाता प्रकार, दिनांक खोलने और शेष राशि) हैं।
प्रत्येक स्तंभ तीन बुनियादी डेटा प्रकारों . में से एक के अनुरूप है :वर्ण, संख्या या तिथि। किसी स्तंभ का डेटा प्रकार उस स्तंभ में संग्रहीत किए जा सकने वाले डेटा मानों के प्रकार को इंगित करता है।
- नंबर - केवल संख्याओं को संग्रहीत कर सकता है, संभवतः एक दशमलव बिंदु के साथ। सकारात्मक या नकारात्मक हो सकता है।
- चरित्र - संख्याओं, अक्षरों और विराम चिह्नों को संग्रहीत कर सकता है। एक्सेस इस डेटा प्रकार को टेक्स्ट कॉल करता है ।
- तारीख - केवल तारीख और समय डेटा संग्रहीत कर सकता है।
कुछ डेटाबेस कार्यान्वयन में अन्य डेटा प्रकार मौजूद होते हैं जैसे छवियां (चित्रों या अन्य डेटा के लिए)। हालांकि, उपरोक्त तीन डेटा प्रकारों का सबसे अधिक उपयोग किया जाता है।
ध्यान दें कि दो तालिकाएँ स्तंभ CustomerID साझा करती हैं और ग्राहक तालिका में CustomerID स्तंभ के मान खाता तालिका में CustomerID स्तंभ के मान समान हैं। यह रिश्ता हमें यह निर्दिष्ट करने की अनुमति देता है कि ग्राहक नाथनियल एक्स उसके पास चेकिंग और बचत खाता दोनों हैं जो एक ही दिन:1 दिसंबर 1994 को खोले गए थे।
ऐसे रिश्ते को दिया जाने वाला दूसरा नाम है मास्टर/विवरण . मास्टर/विवरण संबंध में, एक एकल मास्टर रिकॉर्ड (जैसे ग्राहक 1003, नाथनियल एक्स) से जुड़े कई विवरण रिकॉर्ड (दो खाते) हो सकते हैं।
एक मास्टर/विस्तार संबंध में, बिना किसी विवरण के मास्टर रिकॉर्ड मौजूद होना संभव है। हालांकि, मेल खाते मास्टर रिकॉर्ड के बिना विवरण रिकॉर्ड होना असंभव है। उदाहरण के लिए, हो सकता है कि ग्राहक के पास खाता संबंधी कोई भी जानकारी हो। हालांकि, किसी भी खाते की जानकारी होनी चाहिए एक ही ग्राहक के साथ जुड़े रहें।
प्रत्येक तालिका में कुंजी . नामक एक विशेष स्तंभ भी होना चाहिए जिसका उपयोग तालिका में पंक्तियों या अभिलेखों को विशिष्ट रूप से पहचानने के लिए किया जाता है। कुंजी कॉलम (या कॉलम) में मान कभी भी डुप्लिकेट नहीं किए जा सकते हैं। उपरोक्त तालिकाओं में, CustomerID ग्राहक तालिका की कुंजी है जबकि खाता संख्या खाता तालिका की कुंजी है।
3 एक व्यावसायिक उदाहरण
इस खंड में, हम एक व्यावसायिक उदाहरण की रूपरेखा तैयार करेंगे जिसका उपयोग पूरे ट्यूटोरियल में उदाहरणों के आधार के रूप में किया जाएगा। संगठनों में, व्यवसाय का विश्लेषण करने और उपयुक्त डेटाबेस संरचना (टेबल और कॉलम) निर्धारित करने का काम आमतौर पर सिस्टम एनालिस्ट द्वारा किया जाता है। . एक सिस्टम विश्लेषक इस बारे में जानकारी एकत्र करेगा कि व्यवसाय कैसे संचालित होता है और एक मॉडल . बनाएगा डेटा भंडारण आवश्यकताओं के बारे में। इस मॉडल से, एक डेटाबेस प्रोग्रामर डेटाबेस टेबल बनाएगा और फिर बाकी डेटाबेस एप्लिकेशन को विकसित करने के लिए एप्लिकेशन डेवलपर्स के साथ काम करेगा।
इस ट्यूटोरियल के लिए, हम एक साधारण बैंकिंग व्यवसाय पर विचार करेंगे। बैंक में कई ग्राहक हैं जो एक या अधिक खाते खोलते और बनाए रखते हैं। प्रत्येक ग्राहक के लिए, हम उनके नाम और पते का रिकॉर्ड रखते हैं। हम उन्हें एक अद्वितीय CustomerID भी प्रदान करते हैं। हम इस विशिष्ट पहचानकर्ता को सुविधा और सटीकता दोनों के लिए असाइन करते हैं। किसी एक ग्राहक का पूरा नाम और पता देखने के बजाय उनके CustomerID का उपयोग करके उनकी पहचान करना बहुत आसान है। इसके अलावा, बैंक के लिए एक ही नाम के दो ग्राहक होना संभव है (जैसे, बिल स्मिथ)। ऐसे मामलों में, अद्वितीय CustomerID का उपयोग हमेशा उन्हें अलग बताने के लिए किया जा सकता है।
इसी तरह, सभी खातों को एक अद्वितीय खाता संख्या सौंपी जाती है। एक खाता या तो एक चेकिंग खाता या एक बचत खाता हो सकता है। बचत खाते पर ब्याज मिलता है लेकिन केवल जमा और निकासी की अनुमति है। खातों की जाँच करने पर ब्याज नहीं मिलता है। हम उस तारीख को बनाए रखते हैं जब खाता खोला गया था। यह हमें अपने ग्राहकों को ट्रैक करने में मदद करता है और विपणन उद्देश्यों के लिए उपयोगी हो सकता है। अंत में, हम खाते की वर्तमान शेष राशि को बनाए रखते हैं।
पिछले खंड में, हमने ग्राहक तालिका और लेखा तालिका के लिए संरचना और कुछ नमूना डेटा दिया था। इनका उपयोग हमारे बैंकिंग एप्लिकेशन के डेटा संग्रहण भाग का समर्थन करने के लिए किया जाएगा।
डेटाबेस एप्लिकेशन
किसी भी डेटाबेस एप्लिकेशन में, प्रत्येक तालिका में डेटा प्राप्त करने और बाद में डेटा को पुनः प्राप्त करने और संशोधित करने के लिए एक साधन की आवश्यकता होती है। तालिकाओं में डेटा प्राप्त करने का प्राथमिक तरीका डेटा प्रविष्टि प्रपत्रों का उपयोग करना है। डेटा को तालिकाओं से वापस प्राप्त करने या तालिकाओं में डेटा प्रदर्शित करने के प्राथमिक तरीके क्वेरी या रिपोर्ट का उपयोग करना है। एक संपूर्ण डेटाबेस एप्लिकेशन में, सभी फॉर्म और रिपोर्ट एक नेविगेशन फॉर्म में एक साथ जुड़े होते हैं - एक एकल पृष्ठ जिसमें एप्लिकेशन के प्रत्येक भाग के लिंक होंगे। एक बड़े डेटाबेस एप्लिकेशन में दर्जनों डेटा एंट्री फॉर्म और रिपोर्ट हो सकते हैं।
इस ट्यूटोरियल के लिए, हम प्रत्येक तालिका के लिए एक डेटा प्रविष्टि प्रपत्र, प्रत्येक तालिका के लिए एक क्वेरी और प्रत्येक तालिका के लिए एक रिपोर्ट तैयार करेंगे।
निम्नलिखित अनुभागों में, हम पहले परिचय देंगे कि एक्सेस कैसे शुरू करें और एक नया डेटाबेस कैसे बनाएं।
4 माइक्रोसॉफ्ट एक्सेस शुरू करना
अधिकांश विंडोज़ प्रोग्रामों की तरह, विंडोज़ डेस्कटॉप के निचले बाएँ कोने में स्टार्ट मेन्यू को नेविगेट करके एक्सेस को निष्पादित किया जा सकता है।
एक्सेस शुरू करने के लिए, स्टार्ट बटन पर क्लिक करें, फिर प्रोग्राम्स मेनू पर, फिर माइक्रोसॉफ्ट ऑफिस मेनू पर जाएं और अंत में माइक्रोसॉफ्ट एक्सेस मेनू आइटम पर क्लिक करें। एमएस ऑफिस प्रोफेशनल मेनू नीचे दिखाया गया है।
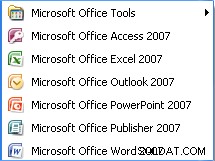
ध्यान दें कि आपके द्वारा उपयोग किए जा रहे पीसी पर एमएस ऑफिस कैसे स्थापित किया गया था, इसके आधार पर मेनू की यह व्यवस्था भिन्न हो सकती है।
एक्सेस के चलने के बाद, एक प्रारंभिक स्क्रीन प्रदर्शित होगी:
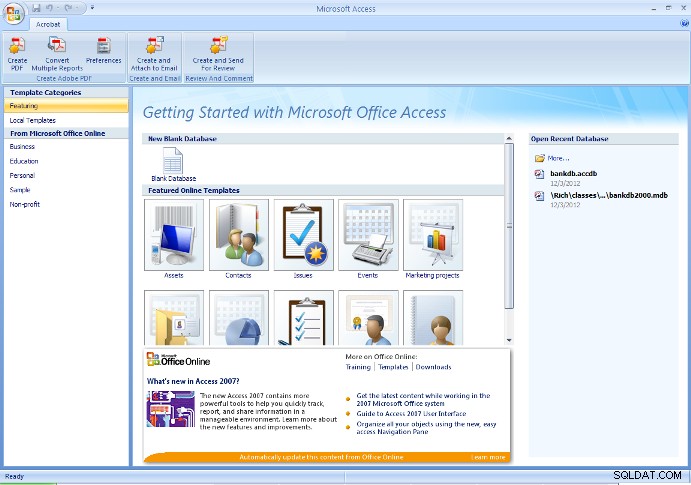
इस प्रारंभिक स्क्रीन से, उपयोगकर्ता एक नया डेटाबेस बना सकता है (या तो खाली या डेटाबेस विज़ार्ड के साथ बनाई गई कुछ तालिकाओं के साथ), या एक मौजूदा डेटाबेस खोल सकता है।
सामान्य तौर पर, पहली बार जब कोई प्रोजेक्ट शुरू करता है, तो एक नया, रिक्त डेटाबेस बनाया जाना चाहिए। उस बिंदु के बाद, मौजूदा डेटाबेस खोलें . का उपयोग करें पहले बनाए गए डेटाबेस को फिर से खोलने का विकल्प।
चेतावनी - यदि आपने पहले एक डेटाबेस बनाया है, और फिर उसी नाम का उपयोग करके इसे फिर से बनाएँ, तो आप अपने द्वारा किए गए किसी भी कार्य को अधिलेखित कर देंगे।
इस ट्यूटोरियल के प्रयोजनों के लिए, यदि आप पहली बार इन चरणों से गुजर रहे हैं, तो एक नया, रिक्त डेटाबेस बनाने का विकल्प चुनें, जैसा कि ऊपर दिए गए चित्र में दिखाया गया है।
एक्सेस 2007 में, ऊपरी बाएँ कोने में गोल कार्यालय बटन पर क्लिक करें और ड्रॉप डाउन मेनू से नया चुनें। फ़ाइल का नाम भरें Bankdb.accdb के रूप में और नीचे दिए गए चित्र के अनुसार डेटाबेस बनाने के लिए क्रिएट बटन पर क्लिक करें।
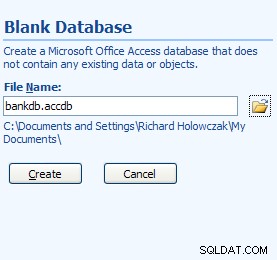
एक्सेस 2007 के लिए नई डेटाबेस स्क्रीन
उपरोक्त फ़ाइल नाम में, bankdb इस विशेष डेटाबेस के लिए चुना गया नाम है और .accdb Microsoft डेटाबेस 2007, के लिए दिया गया फ़ाइल नाम एक्सटेंशन है। 2010 और 2013 फ़ाइलें।
यह सलाह दी जाती है कि डेटाबेस का नाम (उपरोक्त उदाहरण में बैंकडीबी) अपेक्षाकृत छोटा रखें और डेटाबेस के नाम पर रिक्त स्थान या अन्य विराम चिह्नों का उपयोग न करें। साथ ही, डेटाबेस का नाम डेटाबेस की सामग्री को प्रतिबिंबित करना चाहिए।
एक बार नया डेटाबेस बन जाने के बाद, निम्नलिखित मुख्य एक्सेस स्क्रीन दिखाई देगी:
एमएस एक्सेस 2007 के लिए स्क्रीन लेआउट पिछले संस्करणों से काफी अलग है। स्क्रीन के शीर्ष पर अधिकांश टैब को फिर से व्यवस्थित किया गया है। इसके अलावा, एक नया डेटाबेस बनाने के बाद डिफ़ॉल्ट मुख्य स्क्रीन स्वचालित रूप से एक नई तालिका बनाने के लिए डिज़ाइन दृश्य पर स्विच हो जाती है।
निम्न टैब स्क्रीन के शीर्ष पर दिखाई देंगे:
- होम टैब - फ़ॉन्ट बदलने, क्वेरी करने, डेटा कॉपी/पेस्ट/कट करने आदि के लिए नियंत्रण।
- टैब बनाएं - टेबल, फॉर्म, रिपोर्ट आदि बनाने के लिए नियंत्रण।
- बाहरी डेटा टैब - अन्य डेटा स्रोतों से एमएस एक्सेस में डेटा लोड करने के लिए नियंत्रण।
- डेटाबेस टूल टैब - डेटाबेस के प्रबंधन के लिए नियंत्रण (सुरक्षा, स्विचबोर्ड, आदि)
- डिज़ाइन टैब - यह एक नई टेबल, फॉर्म, रिपोर्ट आदि डिजाइन करते समय दिखाई देगा।
ध्यान दें कि एक्सेस 2007, 2010 और 2013 के लिए इंटरफेस सभी समान हैं, हालांकि आपके द्वारा उपयोग किया जाने वाला संस्करण इस ट्यूटोरियल में शामिल चित्रों से थोड़ा अलग दिखाई दे सकता है।
4.1 माइक्रोसॉफ्ट एक्सेस शुरू करने की समीक्षा
माइक्रोसॉफ्ट एक्सेस शुरू करने के लिए:
- कार्य पट्टी खोलने के लिए स्टार्ट बटन का उपयोग करें:प्रोग्राम -> एमएस ऑफिस -> माइक्रोसॉफ्ट एक्सेस
- नया डेटाबेस बनाने के लिए, रिक्त डेटाबेस चुनें और डेटाबेस के लिए एक नया फ़ाइल नाम निर्दिष्ट करें। नए डेटाबेस के लिए वर्णनात्मक नाम का उपयोग करना सुनिश्चित करें। नया डेटाबेस बनाने के लिए OK बटन पर क्लिक करें।
- मौजूदा डेटाबेस खोलने के लिए, मौजूदा डेटाबेस खोलें चुनें , हाइलाइट करें अधिक फ़ाइलें… और ओके बटन पर क्लिक करें। फिर ड्राइव पर नेविगेट करें, हार्ड डिस्क या यूएसबी ड्राइव पर मौजूदा डेटाबेस फ़ाइल को हाइलाइट करें और डेटाबेस को खोलने के लिए फिर से ओके बटन पर क्लिक करें।
एक्सेस से बाहर निकलने के लिए, फ़ाइल मेनू (या कार्यालय मेनू) को नीचे खींचें और बाहर निकलें मेनू आइटम का चयन करें।
5 टेबल बनाना और देखना
टेबल्स एक्सेस में डेटा स्टोरेज की मुख्य इकाइयाँ हैं। याद रखें कि तालिका एक या अधिक स्तंभों से बनी होती है (या फ़ील्ड ) और तालिकाओं के बीच संबंध दर्शाने के लिए दिया गया स्तंभ एक से अधिक तालिकाओं में प्रकट हो सकता है।
पहले चर्चा किए गए व्यावसायिक उदाहरण से, हमने निष्कर्ष निकाला कि ग्राहकों के बारे में डेटा संग्रहीत करने के लिए दो तालिकाएं पर्याप्त होंगी और उनके बैंक खाते . अब हम एक्सेस में इन दो तालिकाओं को बनाने के लिए चरण-दर-चरण निर्देश देते हैं।
एक्सेस में टेबल बनाने के कई तरीके हैं। एक्सेस विज़ार्ड प्रदान करता है जो टेबल और कॉलम के लिए नामों का सुझाव देकर टेबल बनाने में उपयोगकर्ता का मार्गदर्शन करता है। तालिका बनाने का दूसरा मुख्य तरीका डिज़ाइन दृश्य . का उपयोग करना है कॉलम (फ़ील्ड) और उनके डेटा प्रकारों को मैन्युअल रूप से परिभाषित करने के लिए।
विज़ार्ड का उपयोग करते समय टेबल बनाने का एक तेज़ तरीका है, उपयोगकर्ता का कॉलम नामों (फ़ील्ड) और डेटा प्रकारों पर कम नियंत्रण होता है। इस ट्यूटोरियल में, हम डिज़ाइन व्यू . का उपयोग करके तालिका बनाने के चरणों का वर्णन करेंगे . छात्रों को टेबल बनाएं विज़ार्ड का उपयोग करके स्वयं प्रयोग करने के लिए प्रोत्साहित किया जाता है।
5.1 डिज़ाइन दृश्य का उपयोग करके तालिका बनाना
डिज़ाइन व्यू का उपयोग करके एक्सेस में तालिका बनाने के लिए, निम्न चरणों का पालन करें:
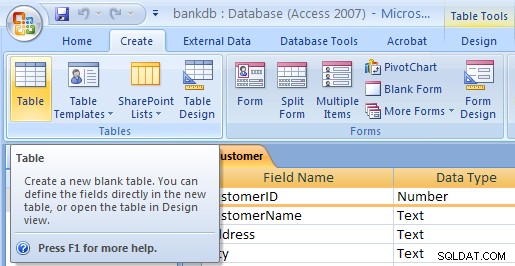
- एक्सेस 2007, 2010 और 2013 में, नई तालिका बनाएं टैब पहले से ही हाइलाइट किया जाना चाहिए और तालिका 1 नामक एक नई तालिका बनाई जानी चाहिए। अगर ऐसा नहीं है, तो बनाएं . पर क्लिक करें टैब पर क्लिक करें और तालिका . पर क्लिक करें चिह्न। फिर देखें को नीचे खींचें मेनू और डिज़ाइन दृश्य choose चुनें .

- टेबल डिज़ाइन व्यू दिखाई देगा। फ़ील्ड का नाम भरें , डेटा प्रकार और विवरण तालिका में प्रत्येक कॉलम/फ़ील्ड के लिए। CustomerID फ़ील्ड नीचे भरा गया है:
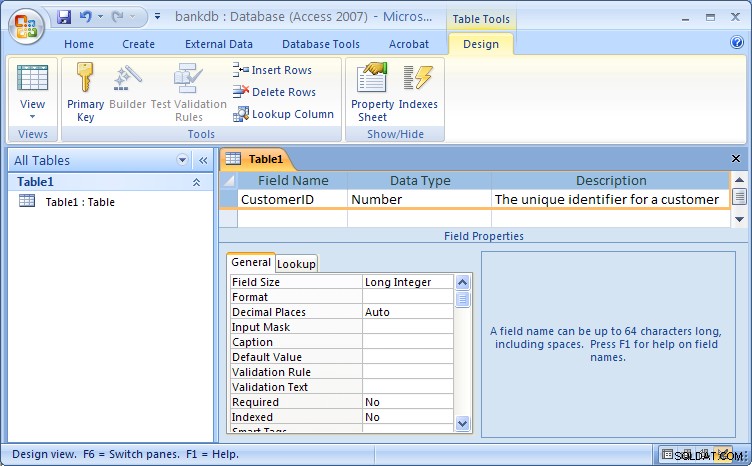
एक्सेस 2007 के लिए टेबल डिज़ाइन व्यूध्यान दें कि तालिका के लिए दिया गया डिफ़ॉल्ट नाम तालिका1 है . बाद के चरण में, हम इस तालिका के लिए एक उपयुक्त नाम निर्दिष्ट करेंगे।
फ़ील्ड के लिए जानकारी इस प्रकार भरें:
फ़ील्ड का नाम डेटा प्रकार <थ>विवरणग्राहक आईडी संख्या ग्राहक के लिए अद्वितीय पहचानकर्ता प्रथम नाम पाठ ग्राहक का पहला नाम अंतिम नाम पाठ ग्राहक का अंतिम नाम सड़क का पता पाठ ग्राहक का गली का पता शहर पाठ ग्राहक का शहर राज्य पाठ ग्राहक का गृह राज्य ज़िप पाठ ग्राहक का पिन कोड नई तालिका परिभाषा के साथ डिज़ाइन दृश्य को दर्शाने वाला एक चित्र नीचे दिया गया है:

अगला चरण तालिका के लिए कुंजी को परिभाषित करना और तालिका को सहेजना है।
- अब जबकि तालिका के लिए सभी फ़ील्ड परिभाषित कर दिए गए हैं, एक प्राथमिक कुंजी परिभाषित की जानी चाहिए। याद रखें कि प्राथमिक कुंजी का उपयोग तालिका में रिकॉर्ड की विशिष्ट पहचान करने के लिए किया जाएगा (इस मामले में एक ग्राहक)। ग्राहक आईडी को हाइलाइट करें फ़ील्ड और बटन बार पर प्राथमिक कुंजी बटन पर क्लिक करें
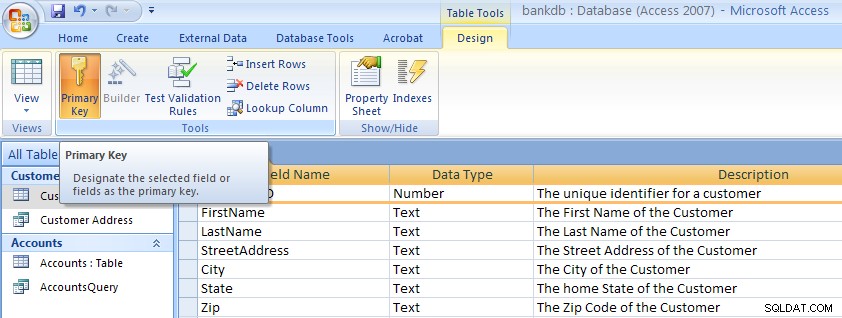 ध्यान दें कि बाईं ओर फ़ील्ड नाम के आगे एक छोटी कुंजी दिखाई देती है। नोट:प्राथमिक कुंजी निकालने के लिए , प्राथमिक कुंजी को बंद करने के लिए बस इस प्रक्रिया को दोहराएं।
- अंतिम चरण के रूप में, तालिका को सहेजा जाना चाहिए। Office मेनू को नीचे खींचें और इस रूप में सहेजें मेनू आइटम चुनें। एक संवाद बॉक्स दिखाई देगा जहां नई तालिका का नाम निर्दिष्ट किया जाना चाहिए। ध्यान दें कि एक्सेस एक डिफ़ॉल्ट नाम देता है जैसे तालिका1 या तालिका2 . तालिका के नाम के साथ बस इस डिफ़ॉल्ट नाम पर टाइप करें। इस उदाहरण के लिए, तालिका को नाम दें:ग्राहक इसके बाद OK बटन पर क्लिक करें।
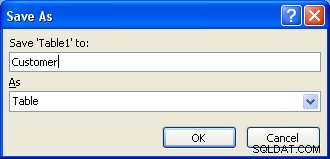
इस बिंदु पर, नई ग्राहक तालिका बनाई और सहेजी गई है।
एमएस एक्सेस में फ़ील्ड (कॉलम) के नामकरण के बारे में एक नोट
किसी तालिका के लिए फ़ील्ड (कॉलम) को परिभाषित करते समय, फ़ील्ड नामों का उपयोग करना महत्वपूर्ण होता है जो कॉलम की डेटा सामग्री की स्पष्ट समझ देते हैं। उदाहरण के लिए, क्या फ़ील्ड CNO ग्राहक संख्या या कंटेनर संख्या दर्शाता है?
एक्सेस में फ़ील्ड नाम 64 वर्णों तक लंबे हो सकते हैं और इसमें रिक्त स्थान हो सकते हैं। हालांकि, फ़ील्ड नामों और तालिका नामों में रिक्त स्थान के उपयोग को दृढ़ता से हतोत्साहित किया जाता है . यदि आप फ़ील्ड नामों को पढ़ने में आसान बनाना चाहते हैं, तो शब्दों को अलग करने के लिए अंडरस्कोर वर्ण का उपयोग करने पर विचार करें। हालांकि, सुनिश्चित करें कि अंडरस्कोर के पहले या बाद में कोई स्पेस दिखाई नहीं देता है।
निम्न तालिका फ़ील्ड नाम देने के कुछ अलग तरीकों को सारांशित करती है:
| विवरण | खराब | <थ>अच्छा|
|---|---|---|
| ग्राहक के लिए विशिष्ट पहचानकर्ता | सीआईडी | CustomerID या Customer_ID |
| उत्पाद का विवरण | पीडीईएससी | उत्पाद विवरण |
| कर्मचारी के घर का टेलीफोन नंबर | कर्मचारी_होम_टेलीफोन_नंबर | होमफ़ोन |
| बैंक खाता संख्या | बीए# | खाता संख्या |
5.2 व्यायाम:एक टेबल बनाना
खाते बनाएं ग्राहक तालिका बनाने के लिए उपयोग किए गए समान चरणों का पालन करके तालिका।
- बनाएँ टैब पर क्लिक करें और फिर तालिका . पर क्लिक करें बटन।
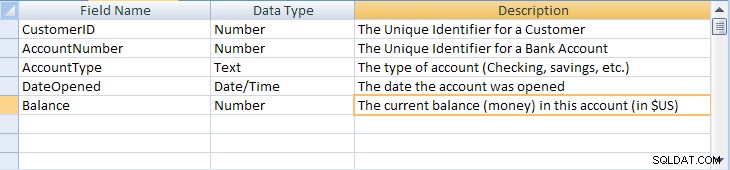
- दृश्य मेनू को नीचे खींचें और डिज़ाइन चुनें। टेबल डिज़ाइन व्यू दिखाई देगा। फ़ील्ड का नाम भरें , डेटा प्रकार और विवरण खाता तालिका में प्रत्येक कॉलम/फ़ील्ड के लिए।
फ़ील्ड का नाम डेटा प्रकार <थ>विवरणग्राहक आईडी संख्या ग्राहक के लिए अद्वितीय पहचानकर्ता खाता संख्या संख्या बैंक खाते के लिए विशिष्ट पहचानकर्ता खाता प्रकार पाठ खाते का प्रकार (चेकिंग, बचत, आदि) तारीख खोली गई तारीख खाता खोलने की तिथि बैलेंस संख्या इस खाते में वर्तमान शेष राशि (पैसा) ($US में) नई तालिका परिभाषा के साथ डिज़ाइन दृश्य को दर्शाने वाला एक चित्र नीचे दिया गया है:
- खाता तालिका के लिए प्राथमिक कुंजी परिभाषित करें। खाता संख्या . पर क्लिक करें दाएं . के साथ फ़ील्ड माउस बटन पर क्लिक करें और पॉप-अप मेनू से प्राथमिक कुंजी चुनें।
- फ़ाइल मेनू को नीचे खींचकर और सहेजें मेनू आइटम को चुनकर नई खाता तालिका सहेजें। तालिका का नाम भरें:खाते फिर OK बटन पर क्लिक करें।
ध्यान दें कि एमएस एक्सेस में टेबल को बेहतर बनाने और अलंकृत करने के लिए कई अतिरिक्त कदम उठाए जा सकते हैं जिसमें डिफ़ॉल्ट मान निर्दिष्ट करना, लुकअप मान बनाना और एक विशिष्ट पैटर्न का पालन करने के लिए डेटा इनपुट को मास्क करना शामिल है। इस वर्तमान ट्यूटोरियल के लिए विवरण महत्वपूर्ण नहीं हैं, लेकिन यदि रुचि है, तो यहां लिंक किए गए उन्नत एमएस एक्सेस टेबल डिज़ाइन पृष्ठ देखें।
5.3 तालिका में डेटा देखना और जोड़ना
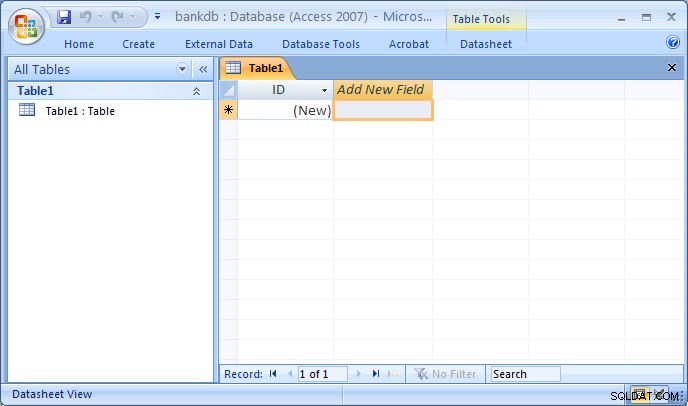
एक साधारण स्प्रेडशीट जैसे डिस्प्ले का उपयोग करके डेटा को टेबल में जोड़ा, हटाया या संशोधित किया जा सकता है। एकल तालिका के डेटा के इस दृश्य को सामने लाने के लिए, तालिका के नाम को हाइलाइट करें और फिर तालिका के नाम पर डबल-क्लिक करें।
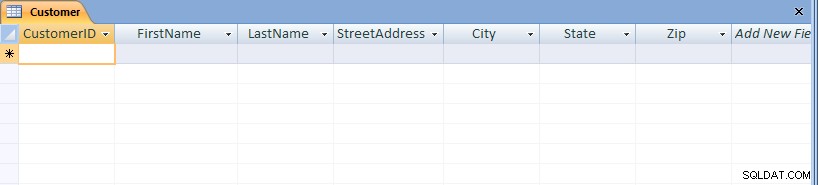
ग्राहक तालिका के इस दृश्य में, नीचे दिए गए चित्र में दिखाया गया है, फ़ील्ड (कॉलम) विंडो के शीर्ष पर दिखाई देते हैं और पंक्तियाँ या रिकॉर्ड नीचे दिखाई देते हैं। यह दृश्य एक स्प्रैडशीट के डिज़ाइन के समान है।
नोट विंडो के निचले भाग में रिकॉर्ड्स की संख्या प्रदर्शित होती है। इस मामले में, चूंकि तालिका अभी बनाई गई थी, केवल एक खाली रिकॉर्ड दिखाई देता है।
तालिका में डेटा जोड़ने के लिए, बस प्रत्येक फ़ील्ड (कॉलम) के लिए मान टाइप करें। किसी रिकॉर्ड के भीतर फ़ील्ड के बीच जाने के लिए Tab कुंजी दबाएं। रिकॉर्ड के बीच जाने के लिए ऊपर और नीचे तीर कुंजियों का उपयोग करें। नीचे दिए गए अनुसार डेटा दर्ज करें:
| CustomerID | <थ>पहला नाम <थ>अंतिम नामसड़क का पता | शहर | राज्य | ज़िप | ||
|---|---|---|---|---|---|---|
| 1001 | यूसुफ | स्मिथ | 123 लेक्सिंगटन | स्मिथविल | KY | 91232 |
| 1002 | अल्बर्टा | जोन्स | 12 डेविस एवेन्यू. | स्मिथविल | KY | 91232 |
| 1003 | नाथनियल | कुल्हाड़ी | 443 ग्राइंडर एल.एन. | ब्रॉडविल | GA | 81992 |
| 1004 | पॉलिना | बिल्डर | 661 पार्कर रोड. | स्ट्रीटविल | GA | 81990 |

नया डेटा सहेजने के लिए, Office मेनू को नीचे खींचें और सहेजें चुनें.
तालिका में अन्य रिकॉर्ड पर नेविगेट करने के लिए, स्क्रीन के नीचे नेविगेशन बार का उपयोग करें:
मौजूदा डेटा को संशोधित करने के लिए, बस रुचि के रिकॉर्ड पर नेविगेट करें और उपयुक्त फ़ील्ड पर टैब करें। मौजूदा डेटा को बदलने के लिए तीर कुंजियों और डिलीट या बैकस्पेस कुंजियों का उपयोग करें।
किसी रिकॉर्ड को हटाने के लिए, पहले रुचि के रिकॉर्ड पर नेविगेट करें। फिर संपादन मेनू को नीचे खींचें और मेनू आइटम हटाएं चुनें।
तालिका को बंद करने के लिए और एक्सेस मुख्य स्क्रीन पर लौटने के लिए, फ़ाइल मेनू को नीचे खींचें और मेनू आइटम बंद करें चुनें।
5.4 अभ्यास:तालिका में डेटा जोड़ना
इस अभ्यास के लिए, खाता तालिका खोलें और खंड 2 में दिखाए गए सात खातों के लिए डेटा जोड़ें। खाता प्रकार फ़ील्ड में डेटा के कैपिटलाइज़ेशन सहित डेटा को ठीक उसी तरह दर्ज करना सुनिश्चित करें जैसा कि दिखाया गया है। उदाहरण के लिए, बचत या बचत के बजाय बचत टाइप करें।
ध्यान दें कि तिथियां दर्ज करते समय, वर्ष के लिए पूर्ण चार अंक टाइप करें। डिफ़ॉल्ट रूप से, एक्सेस वर्ष के सभी 4 अंक प्रदर्शित करता है (एक्सेस का पुराना संस्करण केवल दो अंक प्रदर्शित करता है)।
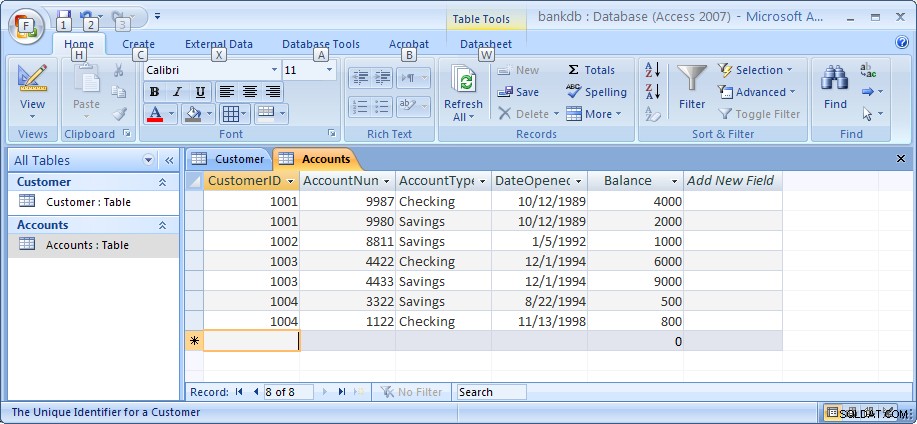
जब आप कर लें तो डेटा को सहेजना सुनिश्चित करें। नीचे दिया गया आंकड़ा खाता तालिका और डेटा को दिखाता है जैसा कि इस अभ्यास के पूरा होने पर दिखना चाहिए।
इस बिंदु पर ट्यूटोरियल में, हमने दो टेबल, ग्राहक और खाते बनाए हैं, और प्रत्येक में डेटा जोड़ा है। बाद के अनुभागों में, हम कवर करेंगे कि टेबल में डेटा पर क्वेरी और रिपोर्ट कैसे करें और एक्सेस विजार्ड्स का उपयोग करके उपयोगकर्ता के अनुकूल डेटा एंट्री फॉर्म कैसे बनाएं।
नोट:एमएस एक्सेस एडवांस्ड टेबल डिज़ाइन पर मेरा ट्यूटोरियल इस लिंक पर पाया जा सकता है। इस ट्यूटोरियल के बाकी हिस्सों को पूरा करने के बाद आप इसे देखना चाहेंगे।
5.5 तालिकाओं के बीच संबंध बनाना
याद रखें कि रिलेशनल डेटाबेस की मुख्य विशेषताओं में से एक यह तथ्य है कि सभी टेबल एक दूसरे से संबंधित हैं। बैंक डेटाबेस में अब तक, ग्राहक तालिका दोनों तालिकाओं में प्रदर्शित होने वाले CustomerID फ़ील्ड के आधार पर खाता तालिका से संबंधित है। एक्सेस के पास संबंध स्क्रीन का उपयोग करके इस संबंध को स्पष्ट करने का एक साधन है। एक्सेस इस जानकारी का उपयोग रिपोर्ट, फ़ॉर्म और क्वेरीज़ डिज़ाइन करते समय करता है जिन्हें प्रदर्शित करने के लिए एक से अधिक तालिका की आवश्यकता होती है।
आरंभ करने के लिए, सुनिश्चित करें कि खाता तालिका और ग्राहक तालिका दोनों बंद हैं। यदि तालिका वर्तमान में खोली गई है, तो पहुँच किसी भी संबंध के निर्माण को रोक देगी। किसी तालिका को बंद करने के लिए, या तो तालिका के ऊपर टैब में तालिका के नाम पर राइट-क्लिक करें और बंद मेनू आइटम चुनें, या तालिका के ठीक ऊपर छोटे X पर क्लिक करें।

इसके बाद, डेटाबेस टूल्स टैब पर क्लिक करके रिलेशनशिप स्क्रीन प्रदर्शित करें और फिर नीचे दिखाए अनुसार रिलेशनशिप बटन पर क्लिक करें। 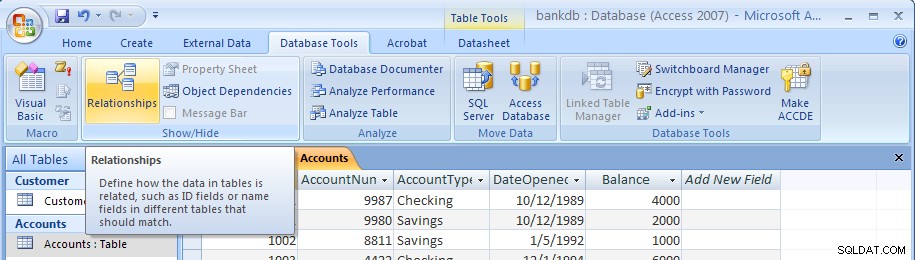
रिक्त संबंध स्क्रीन इस प्रकार दिखाई देगी:
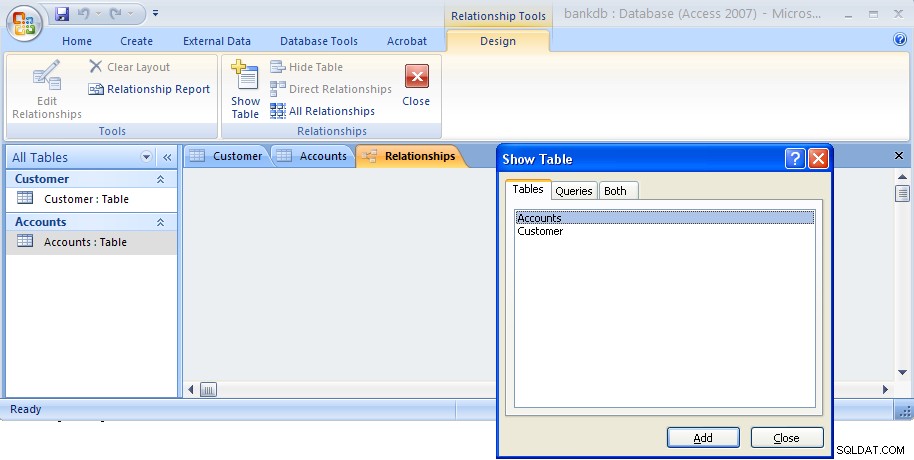
शो टेबल डायलॉग बॉक्स डिफ़ॉल्ट रूप से दिखाई देगा। ग्राहक तालिका और खाता तालिका दोनों को हाइलाइट करें जैसा कि नीचे दिखाया गया है और फिर जोड़ें बटन पर क्लिक करें।

फिर इस डायलॉग बॉक्स को बंद करने के लिए क्लोज बटन पर क्लिक करें। संबंध स्क्रीन अब नीचे प्रदर्शित दो तालिकाओं के साथ फिर से दिखाई देगी:
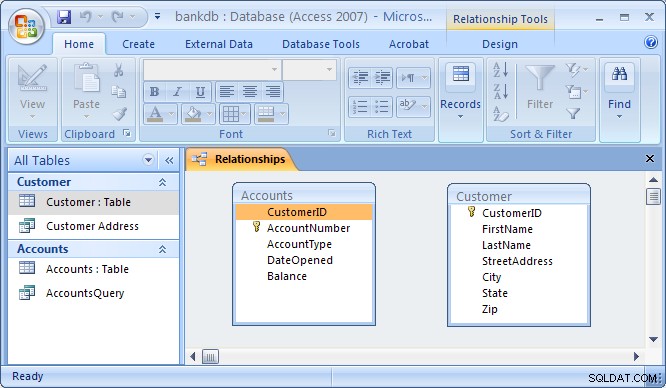
संबंध बनाने के लिए ग्राहक तालिका को खाता तालिका से जोड़ने के लिए, ग्राहक तालिका में ग्राहक आईडी फ़ील्ड पर क्लिक करें और इसे खाता तालिका पर ग्राहक आईडी फ़ील्ड के ऊपर खींचें। माउस बटन को छोड़ने पर, संबंध संपादित करें संवाद बॉक्स नीचे जैसा दिखाई देगा:
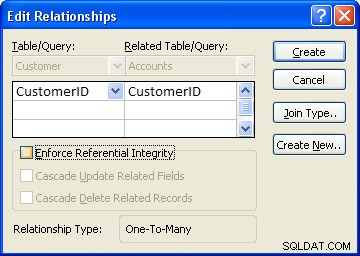
संबंध प्रकार को निर्धारित करने के लिए एक्सेस अपना सर्वश्रेष्ठ प्रयास करेगा (लगभग हमेशा यह एक-से-अनेक का चयन करेगा ) For this example, Access knows that CustomerID is a key of the Customer table so it chooses this field as the “One” side. This makes the Accounts table the “Many” side as One customer may have Many accounts.
One additional step to be taken is the check off the box labeled “Enforce Referential Integrity”. This option puts constraints into effect such that an Accounts record can not be created without a valid Customer record, and Access will also prevent a user from deleting a Customer record if a related Accounts record exists. At this point, click on the Create button to create the relationship. The Relationships screen should reappear with the new relationship in place as follows:
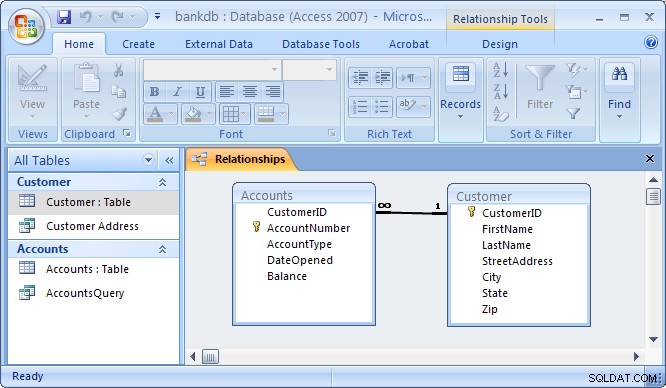
Note the symbols “1” (indicating the “One” side) and the infinity symbol (indicating the “Many” side) on the relationship. Close the relationships screen and select Yes to save the changes to the Relationships layout.
If the relationship does not appear in the above fashion, highlight it and press the delete key to delete it. Then go back to the table design view and make certain that the CustomerID field is designated as the key of the Customers table. Then go back to the Relationships screen and try to recreate the relationship.
5.6 Review of Creating and Viewing Tables
Creating a new table requires the following steps:
- Click on the Tables tab on the Access main screen
- Click on the New button.
- Choose the Design View and click the OK button.
- Fill in the name, data type and description of each of the fields in the table.
- Designate a primary key by clicking on one of the fields with the right mouse button and then choose Primary Key from the pop-up menu.
- Save the table by pulling down the File menu and choosing Save.
- Close the new table by pulling down the File menu and choosing Close.
To change the design of an existing table (e.g., to add, change or delete a field):
- Click on the Tables tab on the Access main screen
- Highlight the name of the table to be modified and click on the Design button.
- Make the necessary changes.
- Save the table by pulling down the File menu and choosing Save.
- Close the table by pulling down the File menu and choosing Close.
To add, delete or change data in an existing table:
- Click on the Tables tab on the Access main screen
- Highlight the name of the table to be modified and click on the Open button.
- Make the necessary changes to the data.
- Save the table data by pulling down the File menu and choosing Save.
- Close the table by pulling down the File menu and choosing Close.
To create or edit relationships between tables:
- Pull down the Tools menu and select the Relationships menu item.
- To display tables, right click and choose Add Tables
- To create new relationships, drag a key field from one table and drop it on the associated field in another table
- To edit an existing relationship, double click on the relationship line.
- To delete an existing relationship, click on the relationship line and press the delete key.
6 Creating and Running Queries
Queries are a fundamental means of accessing and displaying data from tables. Queries can access a single table or multiple tables. Examples of queries for our bank database might include:
- Which Customers live in Georgia ?
- Which Accounts have less than a $500 balance ?
- What is the total amount of money deposited by each Cusomter?
- Which Checking account has the largest balance?
Queries can be used to carry out other tasks such as for creating formatted reports and data entry forms, and for exporting subsets of data to Excel or another software program.
In this section, we show how to use the Access Wizards to create queries for a single table and for multiple tables.
6.1 Single Table Queries
In this section, we demonstrate how to query a single table. Single table queries are useful to gain a view of the data in a table that:
- only displays certain fields (columns) in the output
- sorts the records in a particular order
- performs some statistics on the records such as calculating the sum of data values in a column or counting the number of records, or
- filters the records by showing only those records that match some criteria. For example, show only those bank customers living in GA.
Creating a query can be accomplished by using either the query design view or the Query wizard. In the following example, we will use the query wizard to create a query.
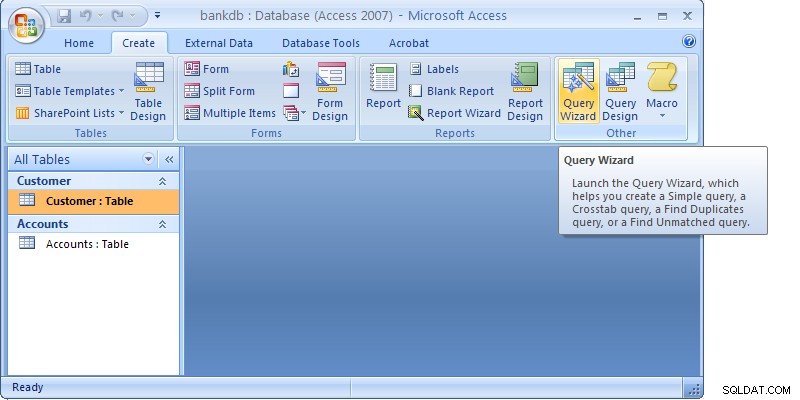
To create a new query, click on the Create tab. Then click on the Query wizard button.
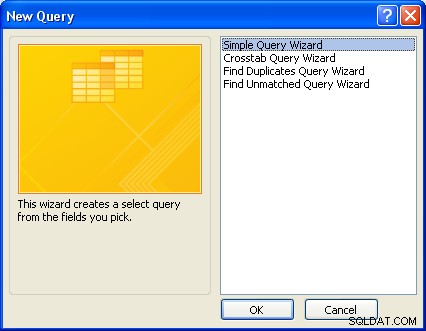
When the Query wizard appears, highlight the Simple Query Wizard selection and click on the OK button.
The first step in the Simple Query wizard is to specify the table for the query and which fields (columns) should be displayed in the query output. Three main sections of this step are:
- Tables/Queries – A pick list of tables or queries you have created.
- Available Fields – Those fields from the table that can be displayed.
- Selected Fields – Those fields from the table that will be displayed.
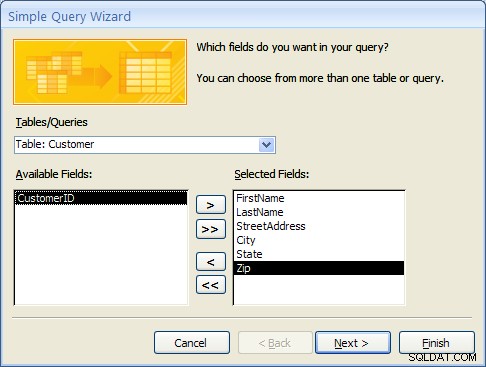
For this example, pull down the Tables/Queries list and choose the Customer table. Notice that the available fields change to list only those fields in the Customer table. This step is shown below:

From the list of Available fields on the left, move the FirstName, LastName, StreetAddress, City and State fields over to the Selected Fields area on the right. Highlight one of the fields and then click on the right arrow button  in the center between the two areas. Repeat this for each of the four fields to be displayed. When done with this step, the wizard should appear as below:
Click on the Next button to move to the next and final step in the Simple Query wizard.
In the final step, give your new query a name. For this example, name the query:Customer Address
At this point, the wizard will create the new query with the option to either:
- Open the query to view information – that is, the wizard will execute the query and show the data.
- Modify the query design – the wizard will switch to the Design View to allow further modification of the query.
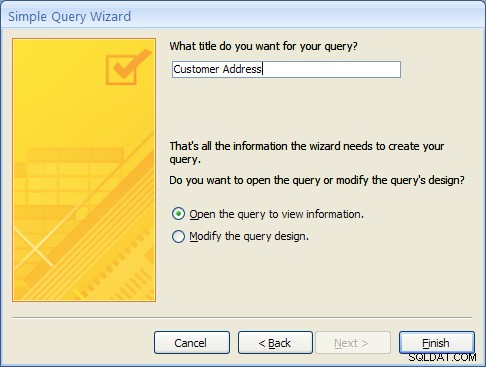
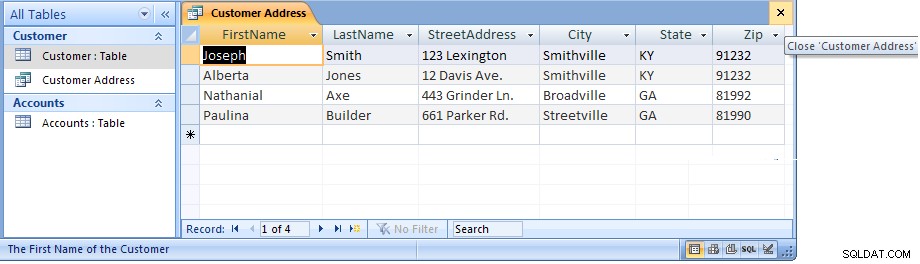
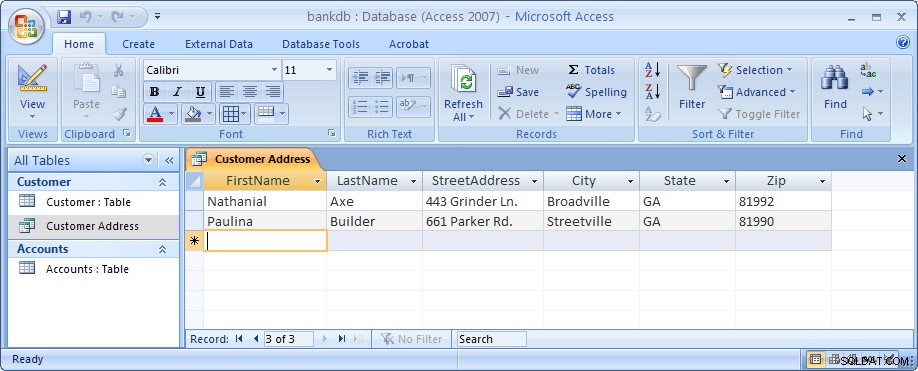
For this example, choose Open the query to view information and click on the Finish button. When this query executes, only the customer’s name, address, city and state fields appear, however, all of the rows appear as shown in the figure below:

Close this query by clicking on the X in the upper right corner of the query results as shown in the figure below:
The Access main screen showing the Queries tab should appear. Note the new query Customer Address appears under the Customers table.
6.1 Single Table Queries (Continued)
In the following example, we will modify the Customer Address query to only display customers in a certain state. To accomplish this, we will make use of the Query Design View.
Open up the Customer Address query in the design view by right-clicking on the name of the query. Then select the Design View menu item as shown below.
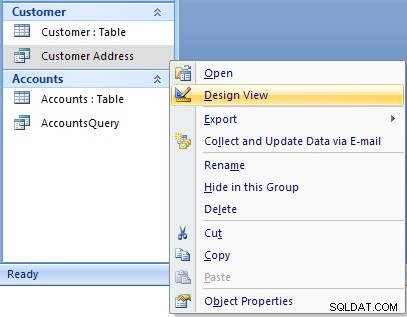
The design view will appear as in the figure below:
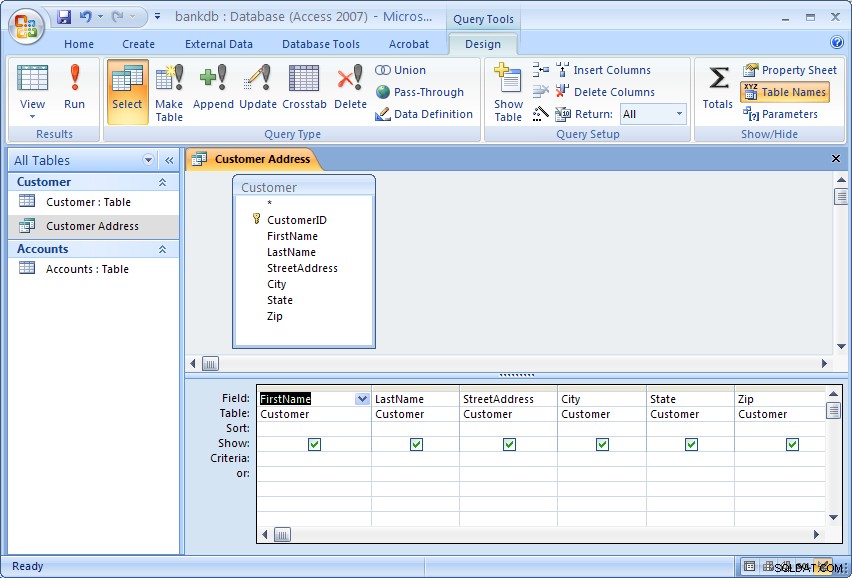
The Query Design view has two major sections. In the top section, the table(s) used for the query are displayed along with the available fields. In the bottom section, those fields that have been selected for use in the query are displayed.
Each field has several options associated with it:
- Field – The name of the field from the table
- Table – The table the field comes from
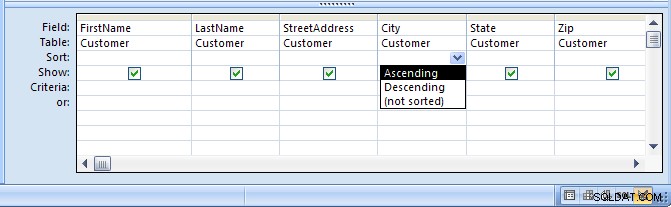
- Sort – The order in which to sort on this field (Ascending, Descending or Not Sorted)
- Show – Whether or not to display this field in the query output
- Criteria – Indicates how to filter the records in the query output.
For this example, we will filter the records to only display those customers living in the State of Georgia (GA). We will also sort the records on the City field.
To sort the records on the City field, click in the Sort area beneath the City field. Choose Ascending from the list as shown in the figure below:
To filter the output to only display Customers in Georgia, click in the Criteria area beneath the State field and type the following statement: ='GA'
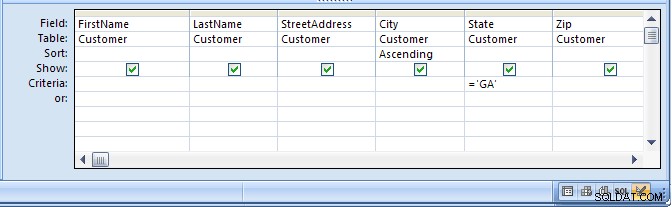
The ='GA' statement tells Access to only show those records where the value of the State field is equal to ‘GA’. Note the use of single quotes to surround the characters.
Run the query by clicking on the Run button (with the large red exclamation point). The output is shown in the figure below:
Finally, save and close this query to return to the Access main screen.
6.2 Exercise:Single Table Queries
For this exercise, use the Simple Query wizard to create a query on the Accounts table showing just the AccountNumber, AccountType and Balance fields.
- From the Access main screen, click on the Create tab. Then click on the Query Wizard button.
- Choose the Simple Query wizard option and click on the OK button.
- Under Table/Queries:choose the Accounts table. Then move the AccountNumber, AccountType and Balance fields over to the Selected fields area. Then click the Next button.
- In the next panel, you will be asked to choose between a detail or summary query. Choose detailed query and click on the Next button.
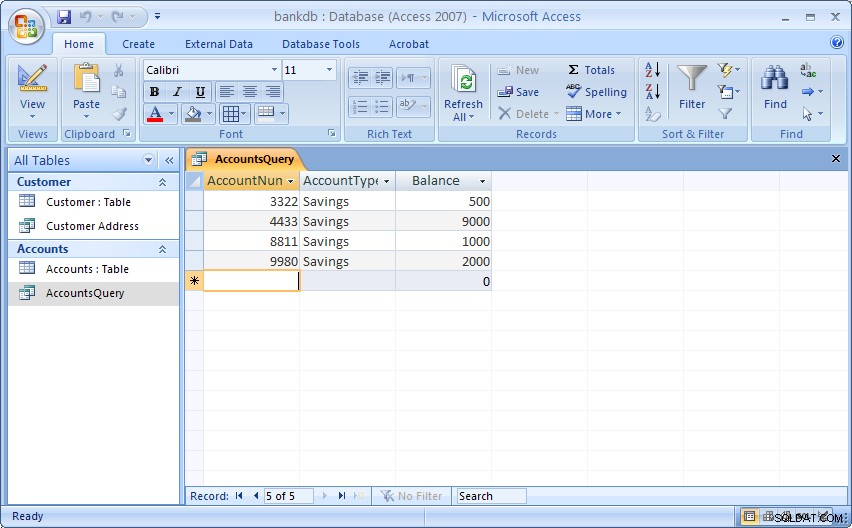
- Name the new Query :AccountsQuery and click on the Finish button.
The output is shown below:

Close this query by pulling down the Office menu and choosing Close.
In the next part of the exercise, we will modify the query to sort the output on the account number and only display the Savings accounts.
- From the Queries tab on the Access main screen, highlight the AccountsQuery and click on the Design button.
- Change the Sort order for the AccountNumber field to Ascending.Add the following statement to the Criteria:are under the AccountType field:=‘Savings’
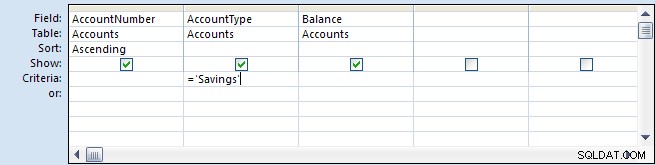
- Run the query by double-clicking on the AccountsQuery name. The output is shown below:
- Finally, save and close the query to return to the Access main screen.
6.3 Multiple Table Queries
Up to this point, queries involving only one table have been demonstrated. It is almost a given that queries will need to involve more than one table. For this example, assume that a manager would like to see a list of all of the customers and the type of account(s) that each one maintains at the bank. Such a query requires data from both the Customers table as well as the Accounts table. In such queries, Access will rely on the Relationships established between tables to guide how the data will be assembled to satisfy the query.
Before proceeding with these next instructions, make certain the One-to-Many relationship between the Customers and Accounts table has been created (see section 5.5 Creating Relationships for a review of this process).
To start the process of creating a multiple table query, highlight the Create tab and click on the Query Wizard button to create a new query. Select the “Simple Query Wizard” option as was done previously.
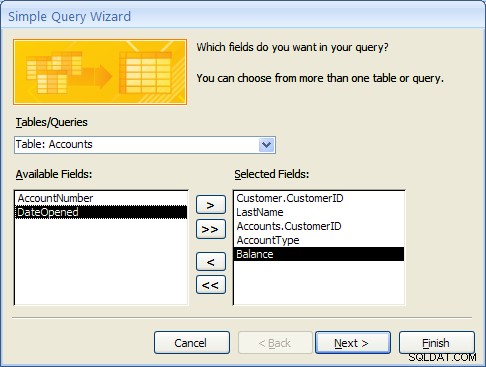
When the simple query wizard appears, select the CustomerID and LastName fields from the Customers table, then switch the Tables/Queries selection to the Accounts table and select the CustomerID, AccountType and Balance fields from the Accounts table. The result from this step is down below:
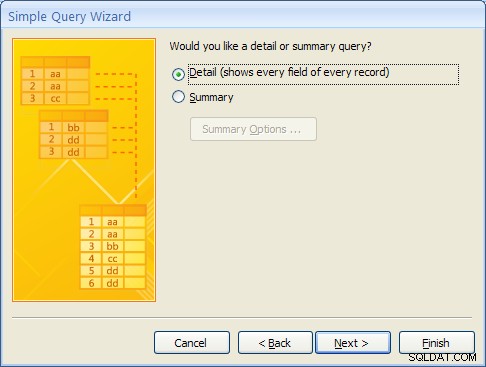
Click the Next button to continue. In the next step of the wizard, an option will appear to provide some level of Summary. For this example, leave the default at “Detail …” as shown below and then click on the Next button.
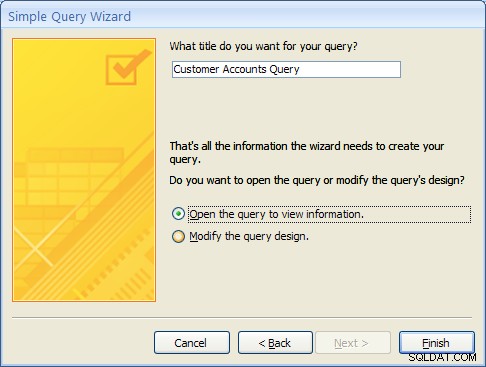
In the final step of the wizard, name the query “Customer Accounts Query” and click on the Finish button. The multiple table query results should appear as follows:
MS Access knows how to line up (or “join”) the accounts table to the Customer table for this query due to the relationship that was created when the tables were first defined.
As with single table queries demonstrated previously, one can change the query definition in design view by adding filters (e.g., show account information for all customers in ‘GA’).
6.4 Exercise:Multiple Table Queries
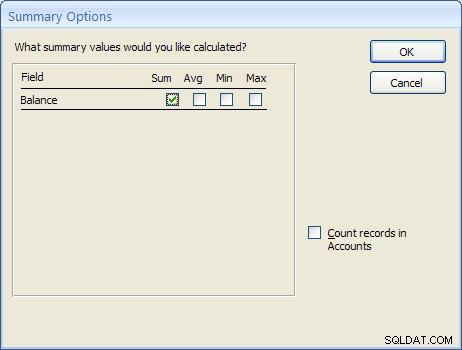
For this exercise, create a new query called “Accounts Summary Query” that joins the Customers table (include the CustomerID and LastName fields) with the Accounts table (include the Balance field only). In the second step of the wizard, click on the Summary choice (instead of Details) and then click on the Summary Options… button. Check off all of the Summary option boxes such as Sum , AVG , Min and Max as shown in the figure below:
The resulting query should appear as follows:
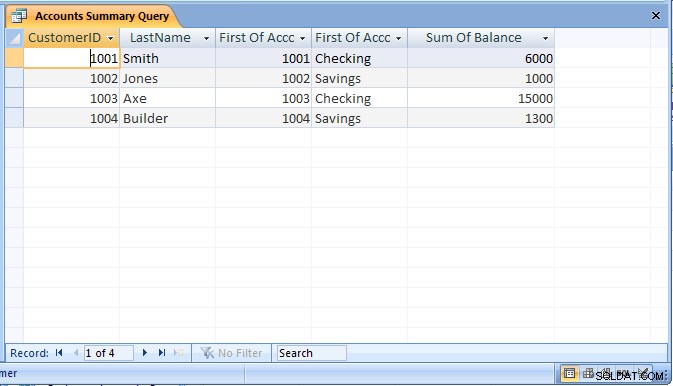
Be sure to save the query as “Accounts Summary Query”.
6.5 Review of Creating and Running Queries
In this section, the basic steps for creating and running queries were introduced. The query wizard can be used to create simple queries that access a single table. It is also possible to then modify the query to sort or filter the records.
Creating a query using the query wizard:
- From the Access main screen, click on the Queries tab. Then click on the New button.
- From the Queries tab on the main Access screen, click on the New button and choose the Simple Query wizard option.
- Under Table/Queries:choose the appropriate table for the query and then indicate which fields in the table will appear in the query output.If querying more than one table, change the Table/Queries:selection to display additional tables and select the necessary fields.
- If the table contains numeric fields, either detailed or summary information may be specified for the query.
- Finally, name the new query and click on the Finish button.
As a final note, Forms and Reports can be created based on existing queries.
7 Creating and Running a Data Entry Form
Data entry forms are the primary means of entering data into tables in the database. In a previous section, we described how to add data to a table using a spreadsheet-like view of the data. Data entry forms offer a more user-friendly interface by adding labels for each field and other helpful information.
Access provides several different ways of creating data entry forms. These include:
- Creating the forms by hand using a Design View
- Creating a default form based on all of the fields available in a table or a query
- Creating a form based on a number of different wizards that walk the user through the forms creation process.
As with queries, a data entry form can be based on a single table or it can work on multiple tables at the same time.
In this section, we cover the basic steps for using a wizard to create a data entry form based on a single table. After this exercise, a multiple-table form is demonstrated.
7.1 Creating a Single Table Form using the Wizard
In this example, we will create a simple data entry form for the Customer table. To begin the process, click on the Create tab on the Access main screen. As with the other components in Access, there are buttons for creating a New form, Open an existing form and Design an existing form. For this example, click on the New button to create a new form.
Several buttons for creating a new form will appear. For this tutorial, choose the Form wizard.
In the first step of the Form wizard, we need to specify the fields from the Customer table that will appear on the form. In this case, we want all of the fields to appear. Move each of the fields from the Available Fields side over to the Selected Fields side as in the following figure. Then click on the Next button.

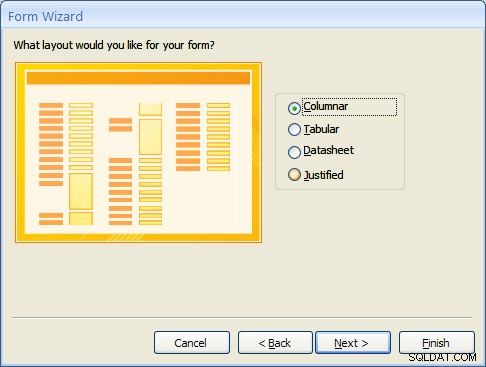
Forms can have several different layouts or arrangement of the labels and fields on the screen.
- Columnar – Places the labels to the left of each field. This is similar to a paper form. This layout is suitable for viewing data one record at a time.
- Tabular – Places the field labels at the top of the screen and the records are displayed below. This is similar to how a spreadsheet would display the data and is suitable for displaying multiple records of data at a time.
- Datasheet – The data appears in the same fashion as when viewing or adding data to a table.
- Justified – Places the labels above each field with the fields spread out on the form. This is suitable for viewing a single record at a time as with the columnar layout.
For this example, choose the columnar layout as shown in the figure below and click on the Next button.
At this point, MS Access 2007 and 2010/2013 versions are a bit different. Access 2007 will show several sample display styles that determine how the form will appear, including elements such as fonts, colors and the background used in the form. Access 2010 and 2013 skips this step in this wizard and provides styles that can be applied to the form in Design mode. For this example, for MS Access 2007, select the Office style as shown below and click on the Next button.

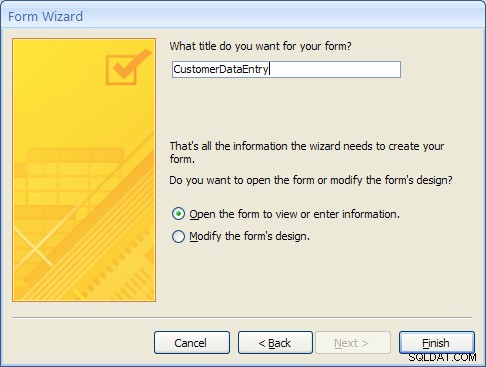
As a final step, give this new form the name:CustomerDataEntry and then click on the Finish button as shown below:
The new form will be created by the wizard and then opened. It should appear as in the figure below:
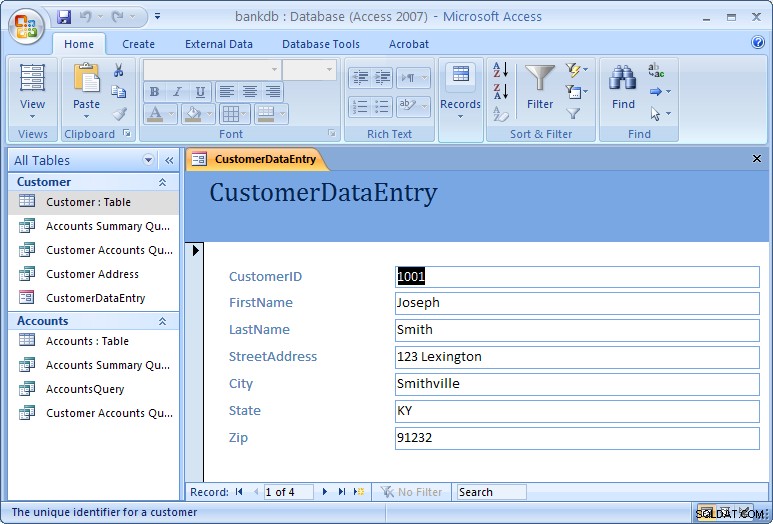
Use the tab key to navigate between fields in the form. To move to the next or previous record, use the record navigation bar at the bottom of the form:
The buttons on the navigation bar perform the following functions:
 | Go to the first record. |
 | Go to the previous record. |
 | Go to the next record. |
 | Go to the last record.  Go past the last record to add a new record. Go past the last record to add a new record. |
To close the form and return to the Access main screen, pull down the File menu and choose Close.
To open the form at any time, highlight the form name under the Forms tab on the Access main screen and click on the Open button.
One quick final note on forms. When the form is created, MS Access looks at how the table is designed and creates the form based on the properties of the table. If you make any changes to the table, you will need to re-create the form again in order to see those table changes reflected in the form. One example where this might happen is is if you change a column in your table from a text box to a combo box, or if you add or remove any columns from your table.
7.2 Exercise:Creating a Single Table Form
For this exercise, we will create a data entry form for the Accounts table created in a previous exercise.
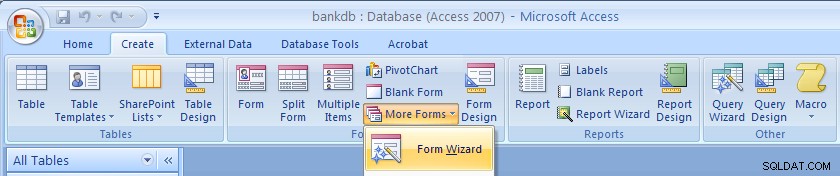
- Click on the Create tab on the Access main screen and then click on the More Forms… button and the “Forms Wizard” to create a new form.
- Select the Accounts table and all of the available fields and click on the Next button.
- Choose a Tabular layout and click on the Next button.
- For Access 2007 choose the Office style and click on the Next button.
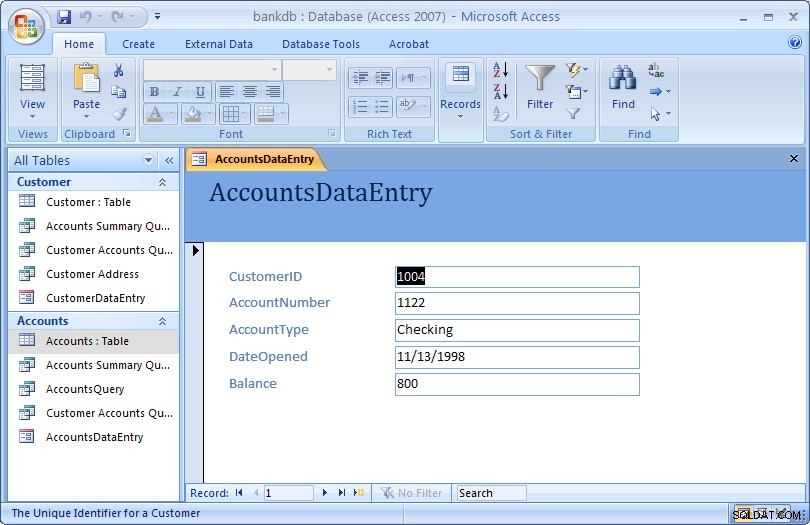
- Name the form:AccountsDataEntry Then click on the Finish button to create, save and view the new form.
The new form is shown in the figure below:
Close the form and return to the Access main screen, by pulling down the File (or Office) menu and choosing Close.
7.3 Review of Creating and Running a Data Entry Form
The basic steps for creating a simple data entry form are:
- Choose a table and a form wizard
- Specify the fields (columns) that will appear in the form
- Specify the layout for the form
- Specify the style (fonts/colors, etc.) for the form
- Save, create and run the new form
In this section we covered the basic steps required to create and run a data entry form. Access provides wizards which are adept at building simple forms with a minimal amount of work. More advanced work on forms would concentrate on using the Design View to change a form’s appearance and to add or remove fields and labels once a form is created. A more advanced tutorial on MS Access Forms Design is linked here.
8 Creating and Running a Report
Reports are similar to queries in that they retrieve data from one or more tables and display the records. Unlike queries, however, reports add formatting to the output including fonts, colors, backgrounds and other features. Reports are often printed out on paper rather than just viewed on the screen. They can also be attached to e-mail and exported and posted as web pages.
As with data entry forms, there are a number of ways to create reports in MS Access:
- A report can be created “by hand” in Design view
- A default report can be created automatically based on all of the firleds for a given table.
- A report can be created using the Create Report wizard.
In this section, we cover how to create simple reports using the Report wizard.
8.1 Creating a Single Table Report using the Wizard
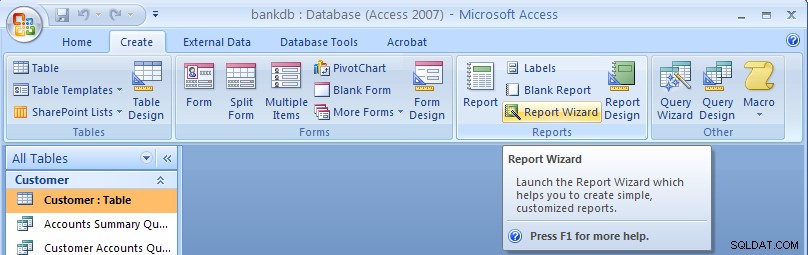
In this example, we will create a simple report for a single table using the Report wizard. As with the Queries and Forms, we begin by selecting the Create tab from the Access main screen.
To create a new report, click on the Report Wizard button.
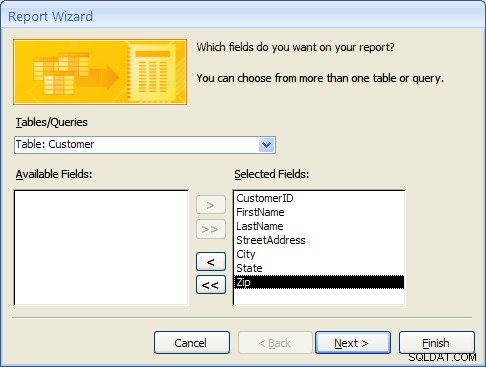
In the next step of the Report wizard, is used to specify the fields from the Customer table that will appear on the report. In this case, we want all of the fields to appear. Move each of the fields from the Available Fields side over to the Selected Fields side as in the following figure. Then click on the Next button.
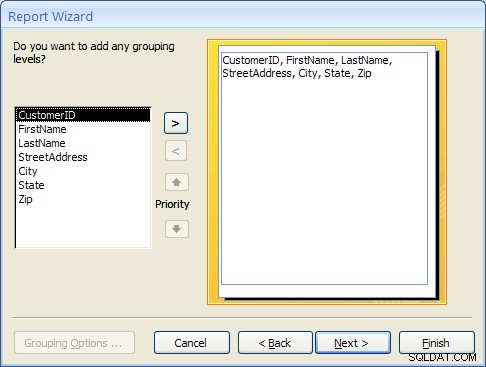
In the next step, we have the opportunity to add Grouping Levels to the report. A grouping level is where several records have the same value for a given field and we only display the value for the first records. In this case, we will not use any grouping levels so simply click on the Next button as shown below.
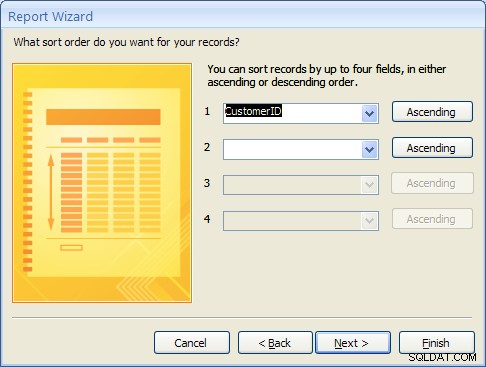
In the next step, the sorting order of the report can be specified. For this example, we will sort the records on the CustomerID field. To achieve this, pull down the list box next to the number 1:and choose the CustomerID field as shown in the figure below. Then click on the Next button.
8.1 Creating a Single Table Report using the Wizard (Continued)
The next step is to specify the layout of the report. The three options are:
- Columnar – Places the labels to the left of each field. This is similar to a paper form.
- Tabular – Places the field labels at the top of the report page and the records are displayed below. This is similar to how a spreadsheet would display the data.
- Justified – Places the labels above each field with the fields spread out on the report page.
Generally, reports use the tabular layout. For this example, choose Tabular layout and set the page Orientation to Landscape so that all of the fields will fit across one page. This is shown in the figure below. Click on the Next button to continue.

In the next step, the style of the report can be selected. For this example, choose the Office style and click on the Next button to continue.

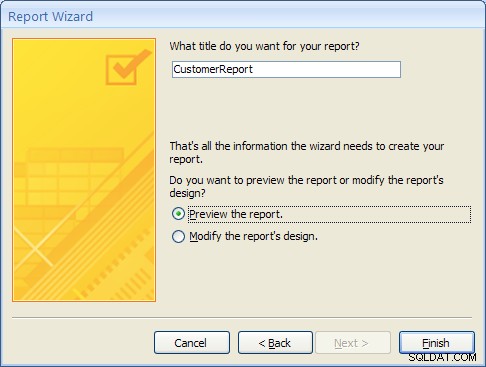
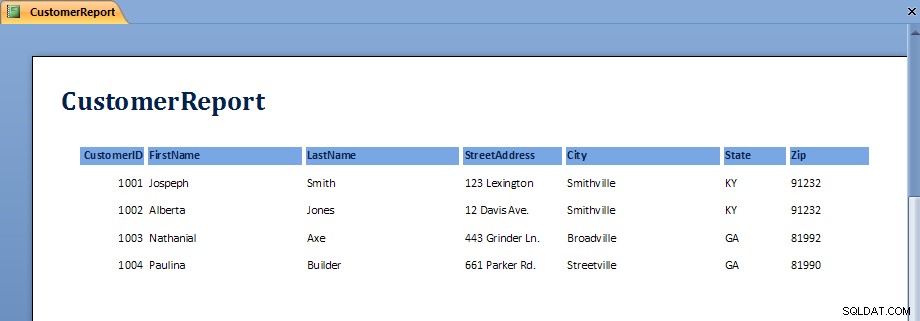
Finally, give a name for the new report:CustomerReport and then click on the Finish button to create, save and display the new report.
The output from the report is shown in the figure below. Note that on some screens, the last field, Zip, may not display without scrolling over to the right.
Once the report is displayed, it can be viewed, printed or transferred into Microsoft Word or Microsoft Excel. The button bar across the top of the screen has the following functions:
 | Print the report |
 | Zoom into a region of the report |
 | Display the report as one, two or multiple pages |
 | Zoom into or out of the report |
 | Transfer the report into MS Word |
 | Close the report |
To close the report and return to the Access main screen, click on the Close button.
8.2 Exercise:Creating a Single Table Report
For this exercise, we will create a report showing all of the Accounts information.
- From the Access main screen, click on the Create tab and Click on the Report wizard.
- Select all of the fields in the Accounts table by moving them all over to the Selected Fields side and then click Next
- Group the report by CustomerID by clicking on the CustomerID field and then clicking on the right arrow button. This is shown in the following figure:
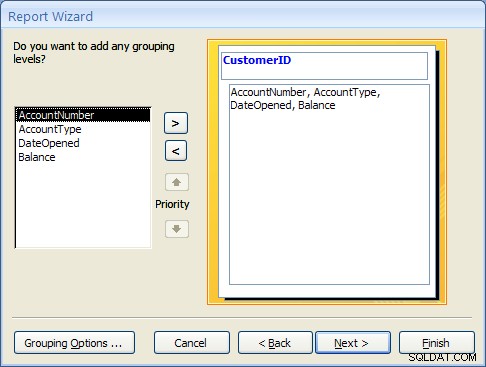
Click on the Next button to continue. - Choose to sort the report on the AccountNumber field. Note that a new button will appear called Summary Options.
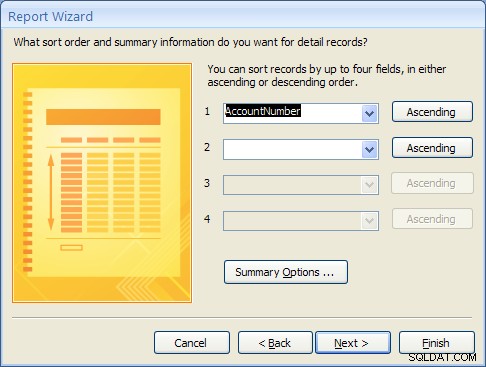
Click on the Summary Options button. Choose the Balance field and select the Sum option. Choose the option to show both Detail and Summary data. Then click on the OK button.

Click on the Next button. - Choose a Block layout and click on the Next button.
- Choose the Corporate style and the click on the Next button.
- Finally, name the report:AccountsReport and click on the Finish button to create, save and run the report.
The output from the AccountsReport is shown below:
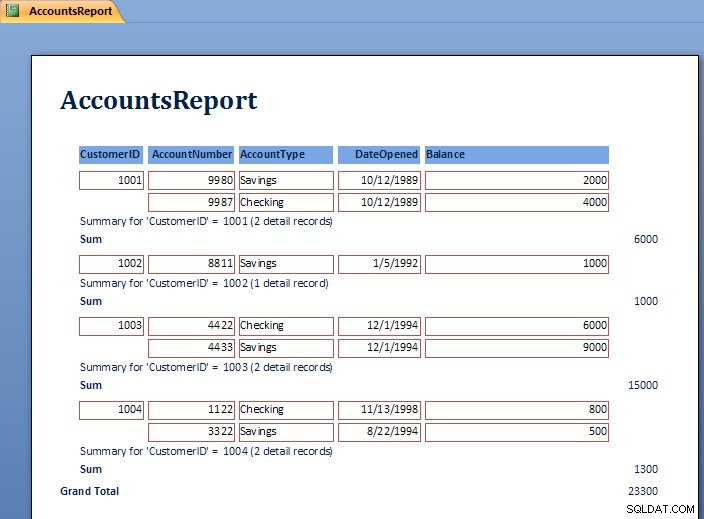
Note the Grouping at the level of the CustomerID and the Sum for each customer’s balances.
To close the report and return to the Access main screen, pull down the File menu and choose Close.
8.3 Review of Creating and Running a Report
As can be seen in the report exercise, there are many ways to create reports to show summation, sorting and layout of the data. Further study of Reports will show how to modify the layout using the Design View. Students are encouraged to work with the Report wizards to create different styles and types of reports.
9 Creating and Running a Master/Detail Form
Master/Detail forms are used to display data from two tables at the same time. MS Access calls the “details” a “subform”. The forms are linked according to the relationship between the tables. Recall that in the example database, the CustomerID is used to link the Customer table (Master) to the Accounts table (Detail). In this section a master / detail form for the Customer and Accounts tables will be created.
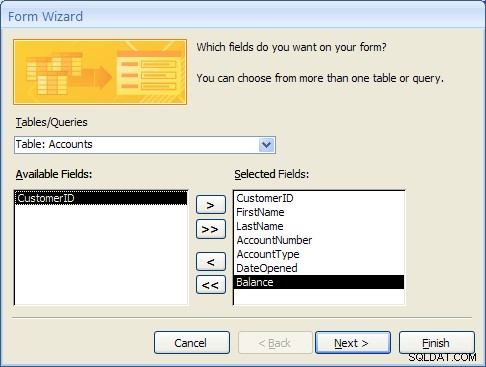
- From the Access main screen, click on the Create tab and Click on the “More Forms…” section and finally the “Forms Wizard”.Select the Customer table first and move the CustomerID, FirstName and LastName fields to the Selected Fields list.Next, select the Accounts table and move the AccountNumber, AccountType, DateOpened and Balance fields to the Selected Fields list as shown below.
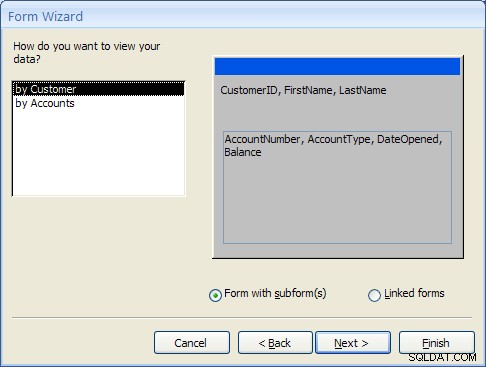
Click the Next… button to move to the next step. - At this point MS Access detects that this form will involve data from two different tables. The first prompt asks how the form should be organized at the top or “Master” level. The “by Customer” selection should be highlighted.The second prompt asks how the forms should be created. For this example, select “Form with Subform(s)” as shown below and click the Next… button to move to the next step.
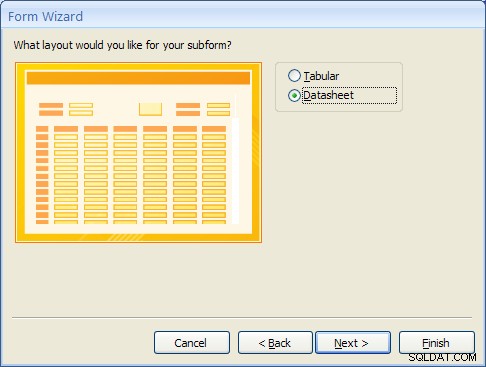
- The Subform is the form that will display the detailed data from the Accounts table. Selecting the “Datasheet” layout will make it easy for the user to view the multiple accounts a Customer may have. Select “Datasheet” and click the Next… button to move to the next step.
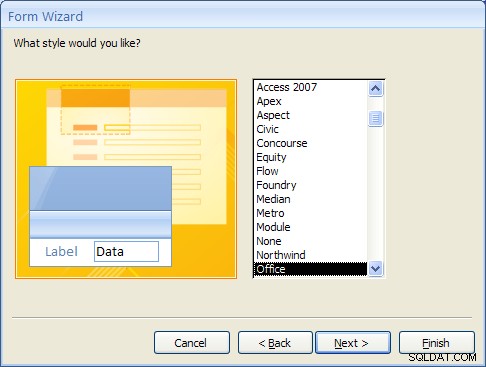
- For Access 2007, select the Office style and click the Next… button to move to the next step. (This step will not appear in MS Access 2010 or 2013).
- Finally, give the main form the name “CustomerMasterForm” and the Subform the name “Accounts Subform”.
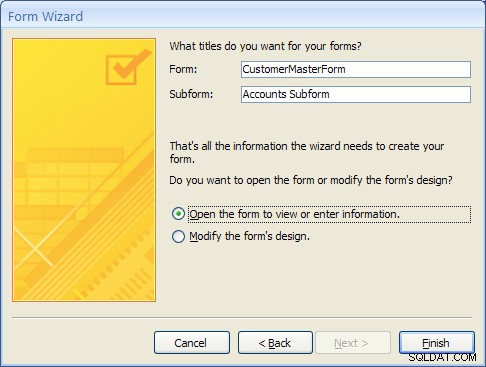
- After clicking on the Finish button the new Master/Detail form will appear as shown below.
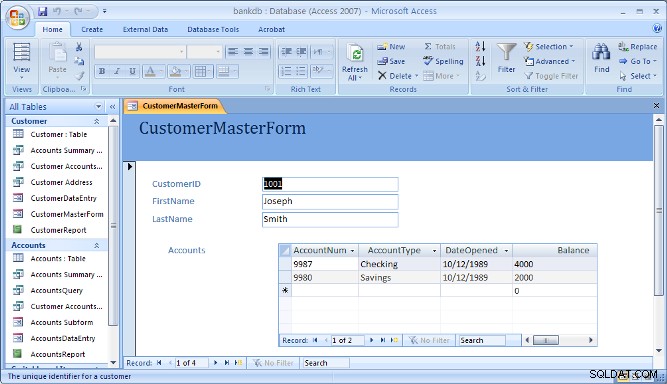
Note that the navigation bar at the bottom of the form is used to navigate through the records in the Master (or top) part of the form.
10 Creating and Running a Switchboard
A Switchboard is a type of form that displays a menu of items that a user can click on to launch data entry forms, reports, queries and other actions in the database. A switchboard is typically created after all of the forms and reports for a database application have been completed. It can be used to guide the user to an appropriate set of forms and reports.
Note that starting with Access 2010, Switchboards are not available by default (you will need to add this to the ribbon bar manually using the Options). Access 2010 and 2013 make use of the Navigation Forms.
In this section, a default switchboard will be created.
- From the Access main screen, click on the Database Tools tab and Click on the Switchboard Manager as shown in the figure below.

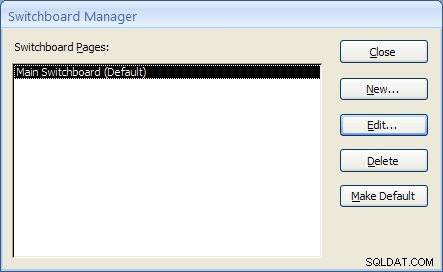
If this is the first switchboard made for this database, you will be prompted to create a new one as shown below. Click the Yes button.

- The Switchboard manager will appear as shown below:
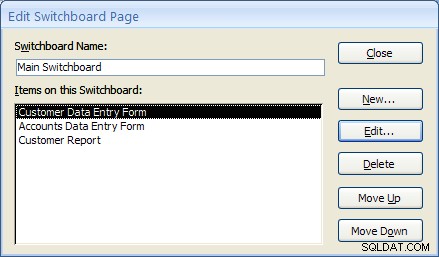
- Click on the Edit menu to edit the “Main Switchboard”. The Edit Switchboard Page will appear as shown below:
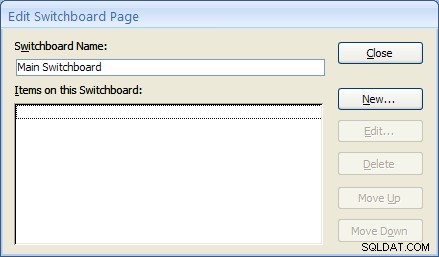
- Add a new switchboard item by clicking on the New… button. The Edit Switchboard Item form will appear as shown below. Fill in the fields as follows:
Text: Customer Data Entry Form Command: Select Open Form in Edit Mode from the drop down list. Form: Select the “CustomerDataEntry” form from the drop down list. 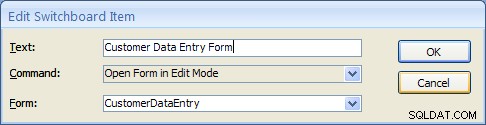
Click on the OK button to save this new Switchboard item.
- Repeat the above step two more times to add Switchboard items for the Accounts DataEntry form and the Customer Report.
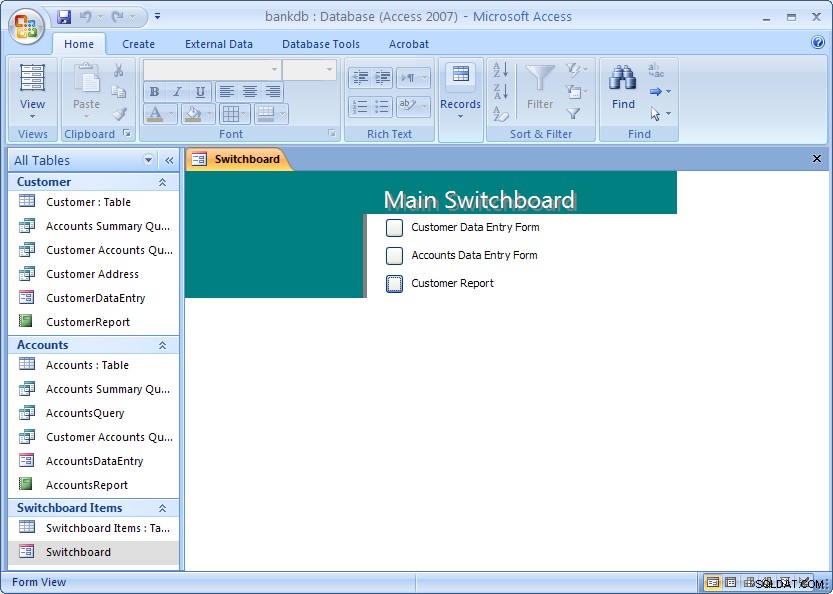
Once completed, click the Close button. Then click the Close button once more to close the Switchboard manager. - From the main MS Access screen look for a new section labeled Switchboard items. To view the switchboard, double-click on name “Switchboard”.
The next section covers creating a Navigation Form which is the recommended navigation screen for MS Access 2007, 2010 and newer versions.
11 Creating and Running a Navigation Form
MS Access 2010 introduced a new form called a Navigation Form. Navigation forms take the place of Switchboards but provide much the same functionality. Namely, they are designed to give the user the ability to run forms and reports without having to hunt through all of the different menus and lists objects. Typically a database application will have one main Navigation form that will appear when the database is opened.
In this section, the basic steps for creating and running a Navigation Form in MS Access 2010 will be demonstrated.
A Navigation Form is another type of form in MS Access 2010 and 2013
- To get started, click on the Create tab on the Access 2010 or 2013 ribbon bar. Under the section for Forms look for the item labeled Navigation Form. Note that this may be located on the button labeled Other Forms.
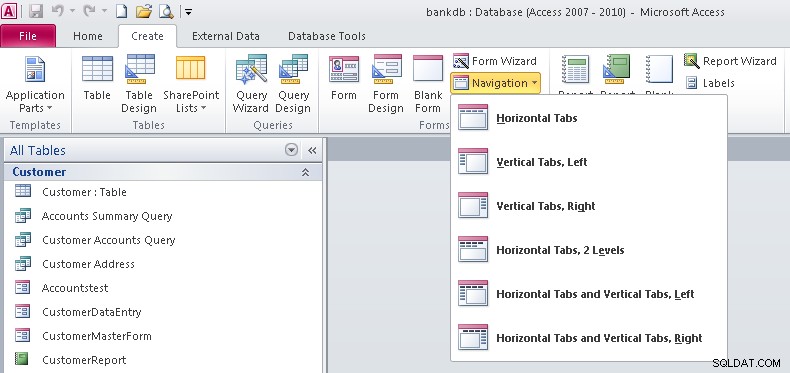
- Note that there are 6 different default styles of Navigation Forms. Each one places the buttons in a different configuration on the screem. Buttons can be aligned across the top, either side or some combination.For this tutorial select the Horizontal Tabs configuration which appears as the first item on the list.
- At this point a new Navigation Form will be created with a row of tabs across the top. The first tab will be labeled [Add New]
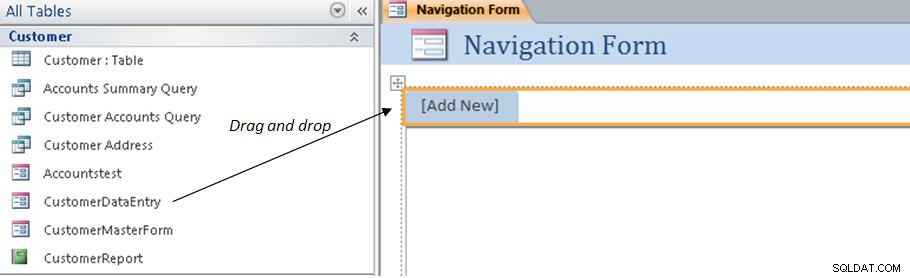
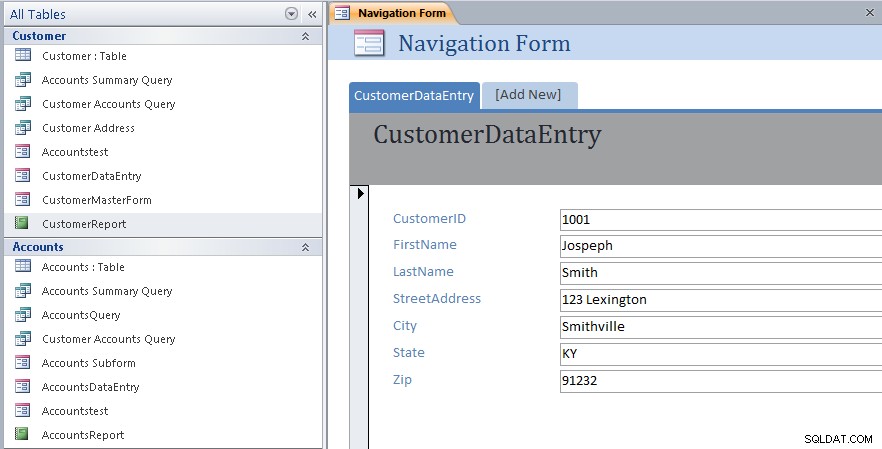
- To add items to the Navigation form, drag the items from the list on the left over to the spot on the Navigation Form labeled [Add New]. This is shown by the arrow in the above figure. For example, drag over the CustomerDataEntry form to the Navigation Form. The result is shown below.
- Next drag and drop the CustomerMasterForm as shown below.

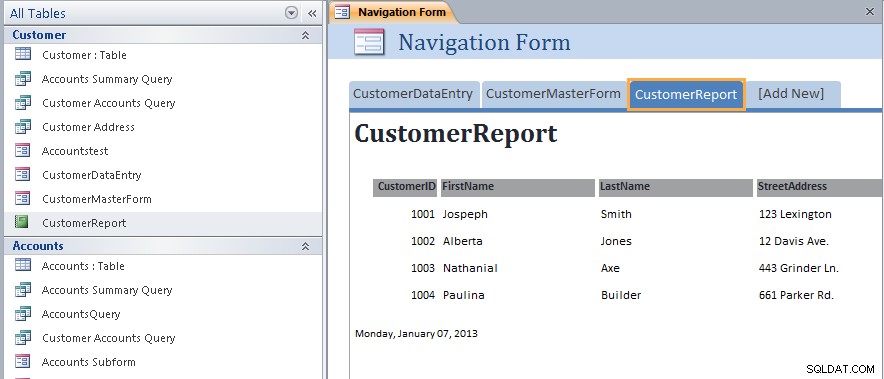
- Next drag and drop the CustomerReport as shown below.
- At this point we have created a new navigation Form and added three items along the top of the page. Save the Navigation Form by right-clicking on the name of the form and choosing Save as shown below:
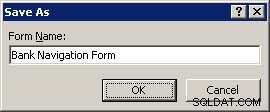
- Name the Navigation Form:Bank Navigation Form and click the OK button.
- Close up the Navigation Form by right-clicking again on the name of the form and choosing Close menu item.At this point the new Navigation Form has been created and saved. The next step will be to view the Navigation Form and navigate the different forms and reports linked to it.
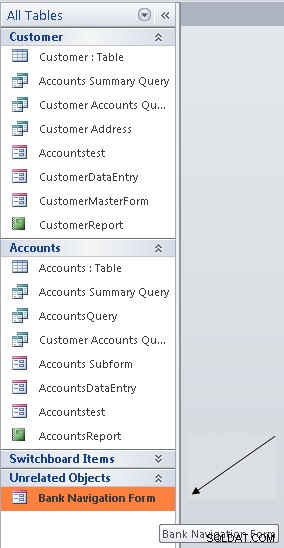
- To view the Navigation Form, look for the Unrelated Objects group on the left side of the screen. Double click on the Bank Navigation Form item as shown below:
The Navigation Form will appear: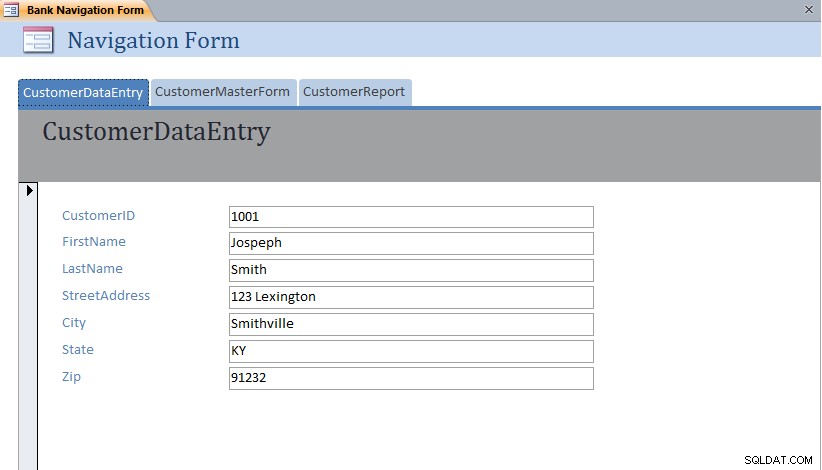 Note that each form or report can be displayed simply by clicking on the different tabs across the top of the Navigation Form.
11.1 Exercise:Modifying a Navigation Form
For this exercise, edit the Bank Navigation Form in Layout View and add the following new items to the Navigation Form:
- AccountsDataEntry
- AccountsReport
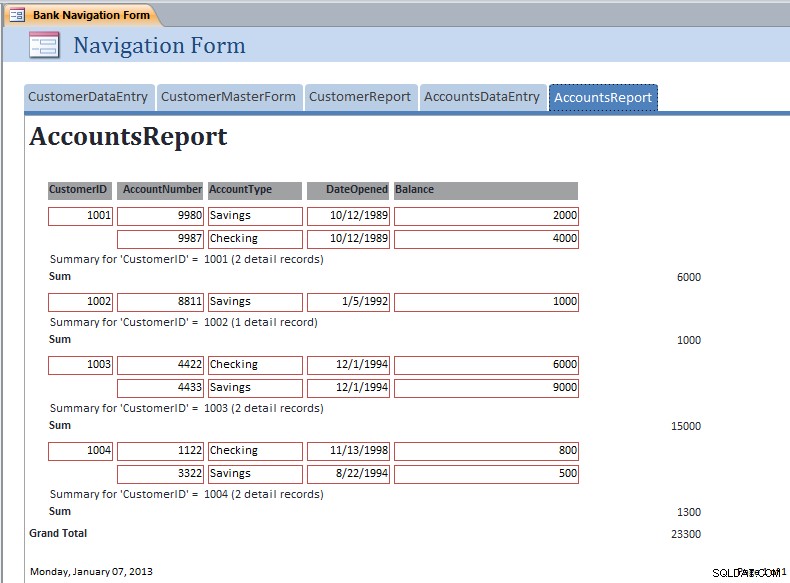
The resulting Navigation Form should appear as below with the AccountsReport opened:
11.2 Setting the Navigation Form as the Default
MS Access 2007 and 2010 (as well as earlier versions) have the ability to set a default form that will open up automatically once the MS Access data file is opened. This is especially useful for end users so that they always see the same form when they open up the database.
To set the Default Form, pull down the File menu and select the Options menu item.

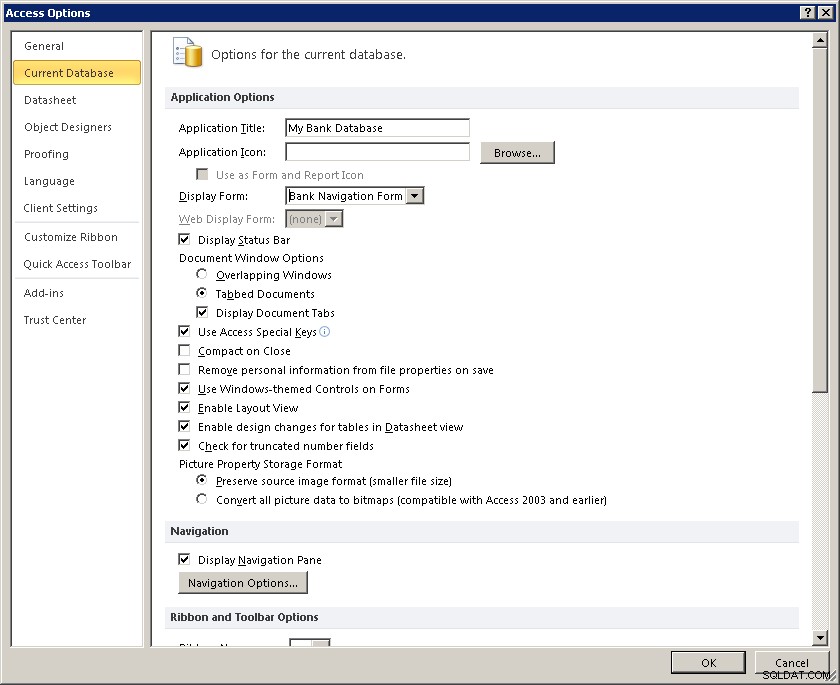
The Database Options form will appear. Click on the Current Database item on the left hand side.
Under the Application Options heading, look for the Display Form:prompt and set this to the Bank Navigation Form as shown below:
Click on the OK button to close up the Database Options screen.
The next time this database (bankdb.accdb) is opened, the Bank Navigation Form will open up.
12 Tutorial Summary
In this tutorial, we have covered the basics for creating an Access database including tables with data, queries to retrieve data, forms to enter data and reports to display and summarize data.
Students are encouraged to further their Access knowledge and skills by working through more advanced tutorials such as Advanced Access Database Table Design and Advanced Access Forms Design, and by reading the on-line help and Access documentation.
You may also be interested in this tutorial that covers up-sizing the Access database to Microsoft SQL Server using the Microsoft SQL Server Migration Assistant.