SQL डेटाबेस का उपयोग करने वाले एप्लिकेशन बनाना एक सामान्य प्रोग्रामिंग कार्य है। SQL डेटाबेस हर जगह हैं और Python में इसका बहुत अच्छा समर्थन है। GUI प्रोग्रामिंग में, PyQt मजबूत और क्रॉस-प्लेटफ़ॉर्म SQL डेटाबेस समर्थन प्रदान करता है जो आपको लगातार अपने डेटाबेस बनाने, कनेक्ट करने और प्रबंधित करने की अनुमति देता है।
डेटाबेस अनुप्रयोगों के निर्माण की प्रक्रिया में आपकी मदद करने के लिए PyQt का SQL समर्थन अपने मॉडल-व्यू आर्किटेक्चर के साथ पूरी तरह से एकीकृत है।
इस ट्यूटोरियल में, आप सीखेंगे कि कैसे:
- PyQt के SQL समर्थन का उपयोग करें मज़बूती से किसी डेटाबेस से कनेक्ट करने के लिए
- SQL क्वेरी निष्पादित करें PyQt का उपयोग कर डेटाबेस पर
- PyQt के मॉडल-व्यू आर्किटेक्चर का उपयोग करें डेटाबेस अनुप्रयोगों में
- विभिन्न PyQt विजेट का उपयोग करके डेटा प्रदर्शित और संपादित करें
इस ट्यूटोरियल के उदाहरणों के लिए SQL भाषा के बुनियादी ज्ञान की आवश्यकता है, विशेष रूप से SQLite डेटाबेस प्रबंधन प्रणाली के बारे में। Python और PyQt के साथ GUI प्रोग्रामिंग का कुछ पिछला ज्ञान भी सहायक होगा।
मुफ़्त बोनस: पायथन मास्टरी पर 5 विचार, पायथन डेवलपर्स के लिए एक नि:शुल्क पाठ्यक्रम जो आपको रोडमैप और मानसिकता दिखाता है कि आपको अपने पायथन कौशल को अगले स्तर तक ले जाने की आवश्यकता होगी।
PyQt को SQL डेटाबेस से कनेक्ट करना
किसी एप्लिकेशन को रिलेशनल डेटाबेस से कनेक्ट करना और उस डेटाबेस में संग्रहीत डेटा को बनाने, पढ़ने, अपडेट करने और हटाने के लिए एप्लिकेशन प्राप्त करना प्रोग्रामिंग में एक सामान्य कार्य है। संबंधपरक डेटाबेस आम तौर पर तालिकाओं . के एक सेट में व्यवस्थित होते हैं , या संबंध . किसी तालिका में दी गई पंक्ति को रिकॉर्ड . के रूप में संदर्भित किया जाता है या टुपल , और एक कॉलम को विशेषता . के रूप में संदर्भित किया जाता है ।
नोट: शब्द फ़ील्ड आमतौर पर किसी तालिका में दिए गए रिकॉर्ड के सेल में संग्रहीत डेटा के एक टुकड़े की पहचान करने के लिए उपयोग किया जाता है। दूसरी ओर, शब्द फ़ील्ड नाम कॉलम के नाम की पहचान करने के लिए प्रयोग किया जाता है।
प्रत्येक कॉलम एक विशिष्ट प्रकार की जानकारी संग्रहीत करता है, जैसे नाम, तिथियां, या संख्याएं। प्रत्येक पंक्ति निकट से संबंधित डेटा के एक सेट का प्रतिनिधित्व करती है, और प्रत्येक पंक्ति में समान सामान्य संरचना होती है। उदाहरण के लिए, एक डेटाबेस में जो किसी कंपनी में कर्मचारियों के बारे में डेटा संग्रहीत करता है, एक विशिष्ट पंक्ति एक व्यक्तिगत कर्मचारी का प्रतिनिधित्व करती है।
अधिकांश रिलेशनल डेटाबेस सिस्टम डेटाबेस में रखे गए डेटा को क्वेरी करने, हेरफेर करने और बनाए रखने के लिए SQL (संरचित क्वेरी भाषा) का उपयोग करते हैं। SQL एक घोषणात्मक और डोमेन-विशिष्ट प्रोग्रामिंग भाषा है जिसे विशेष रूप से डेटाबेस के साथ संचार के लिए डिज़ाइन किया गया है।
रिलेशनल डेटाबेस सिस्टम और SQL आजकल व्यापक रूप से उपयोग किए जाते हैं। आपको कई अलग-अलग डेटाबेस प्रबंधन प्रणालियाँ मिलेंगी, जैसे कि SQLite, PostgreSQL, MySQL, MariaDB, और कई अन्य। आप समर्पित Python SQL लाइब्रेरी का उपयोग करके Python को इनमें से किसी भी डेटाबेस सिस्टम से कनेक्ट कर सकते हैं।
नोट: भले ही PyQt में SQL डेटाबेस को प्रबंधित करने के लिए PyQt का अंतर्निहित SQL समर्थन पसंदीदा विकल्प है, आप डेटाबेस कनेक्शन को संभालने के लिए किसी अन्य लाइब्रेरी का भी उपयोग कर सकते हैं। इनमें से कुछ पुस्तकालयों में SQLAlchemy, पांडा, SQLite, आदि शामिल हैं।
हालांकि, अपने डेटाबेस को प्रबंधित करने के लिए एक अलग पुस्तकालय का उपयोग करने में कुछ कमियां हैं। आप PyQt की SQL कक्षाओं और मॉडल-व्यू आर्किटेक्चर के बीच एकीकरण का लाभ नहीं उठा पाएंगे। इसके अलावा, आप अपने आवेदन में अतिरिक्त निर्भरताएँ जोड़ेंगे।
जब पाइथन और पीईक्यूटी के साथ जीयूआई प्रोग्रामिंग की बात आती है, तो पीईक्यूटी एसक्यूएल डेटाबेस के साथ काम करने के लिए कक्षाओं का एक मजबूत सेट प्रदान करता है। कक्षाओं का यह सेट आपका सबसे अच्छा सहयोगी होगा जब आपको अपने एप्लिकेशन को SQL डेटाबेस से कनेक्ट करने की आवश्यकता होगी।
नोट: दुर्भाग्य से, PyQt5 के आधिकारिक दस्तावेज में कुछ अधूरे खंड हैं। इसे हल करने के लिए, आप PyQt4 दस्तावेज़ीकरण, Qt For Python के दस्तावेज़ीकरण, या मूल Qt दस्तावेज़ देख सकते हैं। इस ट्यूटोरियल में, कुछ लिंक आपको मूल Qt दस्तावेज़ पर ले जाते हैं, जो कि ज़्यादातर मामलों में जानकारी का एक बेहतर स्रोत है।
इस ट्यूटोरियल में, आप GUI एप्लिकेशन बनाने के लिए PyQt के SQL समर्थन का उपयोग करने की मूल बातें सीखेंगे, जो डेटा को पढ़ने, लिखने, हटाने और प्रदर्शित करने के लिए रिलेशनल डेटाबेस के साथ मज़बूती से इंटरैक्ट करते हैं।
डेटाबेस कनेक्शन बनाना
अपने अनुप्रयोगों को भौतिक SQL डेटाबेस से कनेक्ट करना, PyQt के साथ डेटाबेस अनुप्रयोगों को विकसित करने की प्रक्रिया में एक महत्वपूर्ण कदम है। इस चरण को सफलतापूर्वक करने के लिए, आपको अपने डेटाबेस की स्थापना के बारे में कुछ सामान्य जानकारी की आवश्यकता है।
उदाहरण के लिए, आपको यह जानना होगा कि आपका डेटाबेस किस डेटाबेस प्रबंधन प्रणाली पर बनाया गया है, और आपको एक उपयोगकर्ता नाम, एक पासवर्ड, एक होस्टनाम, आदि की भी आवश्यकता हो सकती है।
इस ट्यूटोरियल में, आप SQLite 3 का उपयोग करेंगे, जो सभी प्लेटफार्मों पर समर्थन और न्यूनतम कॉन्फ़िगरेशन आवश्यकताओं के साथ एक अच्छी तरह से परीक्षण किया गया डेटाबेस सिस्टम है। SQLite आपको एक अलग सर्वर प्रक्रिया की आवश्यकता के बिना सीधे अपने स्थानीय डिस्क में डेटाबेस को पढ़ने और लिखने की अनुमति देता है। यह डेटाबेस अनुप्रयोग विकास सीखने के लिए इसे एक उपयोगकर्ता के अनुकूल विकल्प बनाता है।
SQLite का उपयोग करने का एक अन्य लाभ यह है कि पुस्तकालय Python और PyQt के साथ आता है, इसलिए आपको इसके साथ काम करना शुरू करने के लिए कुछ और स्थापित करने की आवश्यकता नहीं है।
PyQt में, आप QSqlDatabase . का उपयोग करके डेटाबेस कनेक्शन बना सकते हैं कक्षा। यह वर्ग एक कनेक्शन का प्रतिनिधित्व करता है और डेटाबेस तक पहुँचने के लिए एक इंटरफ़ेस प्रदान करता है। कनेक्शन बनाने के लिए, बस .addDatabase() पर कॉल करें QSqlDatabase . पर . यह स्थिर विधि एक SQL ड्राइवर और एक वैकल्पिक कनेक्शन नाम को तर्क के रूप में लेती है और एक डेटाबेस कनेक्शन लौटाती है:
QSqlDatabase.addDatabase(
    driver, connectionName=QSqlDatabase.defaultConnection
)
पहला तर्क, driver , एक आवश्यक तर्क है जिसमें एक स्ट्रिंग रखता है जिसमें एक PyQt- समर्थित SQL ड्राइवर का नाम होता है। दूसरा तर्क, connectionName , एक वैकल्पिक तर्क है जो कनेक्शन के नाम के साथ एक स्ट्रिंग रखता है। connectionName डिफ़ॉल्ट QSqlDatabase.defaultConnection , जो सामान्य रूप से स्ट्रिंग रखता है "qt_sql_default_connection" ।
यदि आपके पास पहले से ही connectionName . नामक कनेक्शन है , फिर उस कनेक्शन को हटा दिया जाता है और एक नए कनेक्शन के साथ बदल दिया जाता है, और .addDatabase() नए जोड़े गए डेटाबेस कनेक्शन को कॉलर को वापस लौटाता है।
.addDatabase() . पर कॉल करें उपलब्ध कनेक्शनों की सूची में डेटाबेस कनेक्शन जोड़ता है। यह सूची एक वैश्विक रजिस्ट्री है कि पीईक्यूटी एक एप्लिकेशन में उपलब्ध कनेक्शन का ट्रैक रखने के लिए पर्दे के पीछे रखता है। एक सार्थक connectionName . के साथ अपने कनेक्शन पंजीकृत करना आपको डेटाबेस एप्लिकेशन में कई कनेक्शन प्रबंधित करने की अनुमति देगा।
एक बार जब आप एक कनेक्शन बना लेते हैं, तो आपको उस पर कई विशेषताएँ सेट करने की आवश्यकता हो सकती है। विशेषताओं का विशिष्ट सेट आपके द्वारा उपयोग किए जा रहे ड्राइवर पर निर्भर करेगा। सामान्य तौर पर, आपको डेटाबेस तक पहुँचने के लिए डेटाबेस नाम, उपयोगकर्ता नाम और पासवर्ड जैसी विशेषताएँ सेट करने की आवश्यकता होगी।
यहां सेटर विधियों का सारांश दिया गया है जिनका उपयोग आप डेटाबेस कनेक्शन के अधिक सामान्य रूप से उपयोग की जाने वाली विशेषताओं या गुणों को सेट करने के लिए कर सकते हैं:
| विधि | <थ>विवरण|
|---|---|
.setDatabaseName(name) | डेटाबेस नाम को name . पर सेट करता है , जो एक वैध डेटाबेस नाम का प्रतिनिधित्व करने वाली एक स्ट्रिंग है |
.setHostName(host) | होस्टनाम को host . पर सेट करता है , जो एक वैध होस्टनाम का प्रतिनिधित्व करने वाली एक स्ट्रिंग है |
.setUserName(username) | उपयोगकर्ता नाम को username पर सेट करता है , जो एक वैध उपयोगकर्ता नाम का प्रतिनिधित्व करने वाली एक स्ट्रिंग है |
.setPassword(password) | पासवर्ड को password पर सेट करता है , जो एक वैध पासवर्ड का प्रतिनिधित्व करने वाली एक स्ट्रिंग है |
ध्यान दें कि आप जिस पासवर्ड को .setPassword() . के तर्क के रूप में पास करते हैं सादे पाठ में संग्रहीत किया जाता है और बाद में .password() . पर कॉल करके पुनर्प्राप्त किया जा सकता है . यह एक गंभीर सुरक्षा जोखिम . है कि आपको अपने डेटाबेस अनुप्रयोगों में पेश करने से बचना चाहिए। आप इस ट्यूटोरियल में बाद में एक डेटाबेस कनेक्शन खोलना अनुभाग में एक सुरक्षित तरीका सीखेंगे।
QSqlDatabase . का उपयोग करके SQLite डेटाबेस से कनेक्शन बनाने के लिए , एक पायथन इंटरेक्टिव सत्र खोलें और निम्नलिखित कोड टाइप करें:
>>> from PyQt5.QtSql import QSqlDatabase

>>> con = QSqlDatabase.addDatabase("QSQLITE")
>>> con.setDatabaseName("contacts.sqlite")

>>> con
<PyQt5.QtSql.QSqlDatabase object at 0x7f0facec0c10>

>>> con.databaseName()
'contacts.sqlite'

>>> con.connectionName()
'qt_sql_default_connection'
यह कोड "QSQLITE" . का उपयोग करके एक डेटाबेस कनेक्शन ऑब्जेक्ट बनाएगा कनेक्शन के ड्राइवर और "contacts.sqlite" . के रूप में कनेक्शन के डेटाबेस नाम के रूप में। चूंकि आप .addDatabase() . के लिए एक कनेक्शन नाम पास नहीं करते हैं , नया बनाया गया आपका डिफ़ॉल्ट कनेक्शन बन जाता है, जिसका नाम "qt_sql_default_connection" है ।
SQLite डेटाबेस के मामले में, डेटाबेस नाम सामान्य रूप से एक फ़ाइल नाम या पथ होता है जिसमें डेटाबेस फ़ाइल नाम शामिल होता है। आप विशेष नाम ":memory:" . का भी उपयोग कर सकते हैं इन-मेमोरी डेटाबेस के लिए।
एकाधिक कनेक्शन संभालना
ऐसी स्थितियां हो सकती हैं जिनमें आपको एक ही डेटाबेस में एकाधिक कनेक्शन का उपयोग करने की आवश्यकता हो। उदाहरण के लिए, हो सकता है कि आप प्रत्येक उपयोगकर्ता के लिए एक विशिष्ट कनेक्शन का उपयोग करके डेटाबेस के साथ उपयोगकर्ताओं के इंटरैक्शन को लॉग करना चाहें।
अन्य स्थितियों में, आपको अपने एप्लिकेशन को कई डेटाबेस से कनेक्ट करने की आवश्यकता हो सकती है। उदाहरण के लिए, हो सकता है कि आप स्थानीय डेटाबेस को पॉप्युलेट या अपडेट करने के लिए डेटा एकत्र करने के लिए कई दूरस्थ डेटाबेस से कनेक्ट करना चाहें।
इन स्थितियों को संभालने के लिए, आप अपने विभिन्न कनेक्शनों के लिए विशिष्ट नाम प्रदान कर सकते हैं और प्रत्येक कनेक्शन को उसके नाम से संदर्भित कर सकते हैं। यदि आप अपने डेटाबेस कनेक्शन को एक नाम देना चाहते हैं, तो उस नाम को दूसरे तर्क के रूप में पास करें .addDatabase() :
>>> from PyQt5.QtSql import QSqlDatabase

>>> # First connection
>>> con1 = QSqlDatabase.addDatabase("QSQLITE", "con1")
>>> con1.setDatabaseName("contacts.sqlite")

>>> # Second connection
>>> con2 = QSqlDatabase.addDatabase("QSQLITE", "con2")
>>> con2.setDatabaseName("contacts.sqlite")

>>> con1
<PyQt5.QtSql.QSqlDatabase object at 0x7f367f5fbf90>
>>> con2
<PyQt5.QtSql.QSqlDatabase object at 0x7f3686dd7510>

>>> con1.databaseName()
'contacts.sqlite'
>>> con2.databaseName()
'contacts.sqlite'

>>> con1.connectionName()
'con1'
>>> con2.connectionName()
'con2'
यहां, आप एक ही डेटाबेस से दो अलग-अलग कनेक्शन बनाते हैं, contacts.sqlite . प्रत्येक कनेक्शन का अपना कनेक्शन नाम होता है। आप अपनी आवश्यकताओं के अनुसार किसी भी समय बाद में अपने कोड में किसी विशिष्ट कनेक्शन का संदर्भ प्राप्त करने के लिए कनेक्शन नाम का उपयोग कर सकते हैं। ऐसा करने के लिए, आप .database() . पर कॉल कर सकते हैं एक कनेक्शन नाम के साथ:
>>> from PyQt5.QtSql import QSqlDatabase

>>> db = QSqlDatabase.database("con1", open=False)

>>> db.databaseName()
'contacts.sqlite'
>>> db.connectionName()
'con1'
इस उदाहरण में, आप देखते हैं कि .database() दो तर्क लेता है:
connectionNameकनेक्शन नाम रखता है जिसे आपको उपयोग करने की आवश्यकता है। यदि आप एक कनेक्शन नाम पास नहीं करते हैं, तो डिफ़ॉल्ट कनेक्शन का उपयोग किया जाएगा।openएक बूलियन मान रखता है जो बताता है.database()यदि आप कनेक्शन को स्वचालित रूप से खोलना चाहते हैं या नहीं। अगरopenक्याTrueहै (डिफ़ॉल्ट) और कनेक्शन खुला नहीं है, तो कनेक्शन अपने आप खुल जाता है।
.database() . का रिटर्न मान कनेक्शन ऑब्जेक्ट का संदर्भ है जिसे connectionName . कहा जाता है . आप विशिष्ट कनेक्शन ऑब्जेक्ट्स के संदर्भ प्राप्त करने के लिए विभिन्न कनेक्शन नामों का उपयोग कर सकते हैं और फिर उनका उपयोग अपने डेटाबेस को प्रबंधित करने के लिए कर सकते हैं।
विभिन्न SQL गोताखोरों का उपयोग करना
अब तक, आपने SQLite ड्राइवर . का उपयोग करके डेटाबेस कनेक्शन बनाना सीख लिया है . यह पीईक्यूटी में उपलब्ध एकमात्र ड्राइवर नहीं है। पुस्तकालय SQL ड्राइवरों का एक समृद्ध सेट प्रदान करता है जो आपको आपकी विशिष्ट आवश्यकताओं के अनुसार विभिन्न प्रकार के डेटाबेस प्रबंधन प्रणालियों का उपयोग करने की अनुमति देता है:
| ड्राइवर का नाम | डेटाबेस प्रबंधन प्रणाली |
|---|---|
| QDB2 | IBM Db2 (संस्करण 7.1 और ऊपर) |
| QIBASE | बोर्लैंड इंटरबेस |
| QMYSQL/MARIADB | MySQL या MariaDB (संस्करण 5.0 और ऊपर) |
| QOCI | Oracle कॉल इंटरफ़ेस |
| QODBC | डेटाबेस कनेक्टिविटी खोलें (ODBC) |
| QPSQL | PostgreSQL (संस्करण 7.3 और ऊपर) |
| QSQLITE2 | SQLite 2 (Qt 5.14 से अप्रचलित) |
| QSQLITE | SQLite 3 |
| QTDS | Sybase Adaptive Server (Qt 4.7 से अप्रचलित) |
ड्राइवर का नाम कॉलम पहचानकर्ता स्ट्रिंग्स को धारण करता है कि आपको .addDatabase() . पास करने की आवश्यकता है संबंधित ड्राइवर का उपयोग करने के लिए इसके पहले तर्क के रूप में। SQLite ड्राइवर के विपरीत, जब आप किसी भिन्न ड्राइवर का उपयोग करते हैं, तो आपको कई विशेषताएँ सेट करने की आवश्यकता हो सकती है, जैसे कि databaseName , hostName , username , और password , कनेक्शन के ठीक से काम करने के लिए।
डेटाबेस ड्राइवर QSqlDriver . से प्राप्त होते हैं . आप QSqlDriver . को उपवर्गित करके अपना खुद का डेटाबेस ड्राइवर बना सकते हैं , लेकिन वह विषय इस ट्यूटोरियल के दायरे से बाहर है। यदि आप अपने स्वयं के डेटाबेस ड्राइवर बनाने में रुचि रखते हैं, तो अधिक विवरण के लिए अपना स्वयं का डेटाबेस ड्राइवर कैसे लिखें देखें।
डेटाबेस कनेक्शन खोलना
एक बार आपके पास डेटाबेस कनेक्शन हो जाने के बाद, आपको अपने डेटाबेस से इंटरैक्ट करने में सक्षम होने के लिए उस कनेक्शन को खोलना होगा। ऐसा करने के लिए, आप .open() . पर कॉल करें कनेक्शन ऑब्जेक्ट पर। .open() निम्नलिखित दो भिन्नताएं हैं:
.open()वर्तमान कनेक्शन मानों का उपयोग करके एक डेटाबेस कनेक्शन खोलता है।.open(username, password)दिए गएusername. का उपयोग करके डेटाबेस कनेक्शन खोलता है औरpassword।
दोनों विविधताएं True लौटाती हैं यदि कनेक्शन सफल होता है। अन्यथा, वे False लौटाते हैं . यदि कनेक्शन स्थापित नहीं किया जा सकता है, तो आप .lastError() . पर कॉल कर सकते हैं क्या हुआ इसके बारे में जानकारी प्राप्त करने के लिए। यह फ़ंक्शन डेटाबेस द्वारा रिपोर्ट की गई अंतिम त्रुटि के बारे में जानकारी देता है।
नोट: जैसा कि आपने पहले सीखा, .setPassword(password) पासवर्ड को सादे पाठ के रूप में संग्रहीत करता है, जो एक सुरक्षा जोखिम है। दूसरी ओर, .open() पासवर्ड बिल्कुल स्टोर नहीं करता है। यह कनेक्शन खोलते समय सीधे ड्राइवर को पासवर्ड भेजता है। उसके बाद, यह पासवर्ड को त्याग देता है। तो, .open() . का उपयोग करके यदि आप सुरक्षा समस्याओं को रोकना चाहते हैं तो अपने पासवर्ड को प्रबंधित करने का तरीका है।
.open() की पहली विविधता का उपयोग करके SQLite डेटाबेस कनेक्शन को खोलने का एक उदाहरण यहां दिया गया है :
>>> from PyQt5.QtSql import QSqlDatabase

>>> # Create the connection
>>> con = QSqlDatabase.addDatabase("QSQLITE")
>>> con.setDatabaseName("contacts.sqlite")

>>> # Open the connection
>>> con.open()
True
>>> con.isOpen()
True
उपरोक्त उदाहरण में, आप पहले अपने SQLite डेटाबेस से एक कनेक्शन बनाते हैं और .open() का उपयोग करके उस कनेक्शन को खोलते हैं। . चूंकि .open() रिटर्न True , कनेक्शन सफल है। इस बिंदु पर, आप .isOpen() . का उपयोग करके कनेक्शन की जांच कर सकते हैं , जो True returns लौटाता है यदि कनेक्शन खुला है और False अन्यथा।
नोट: अगर आप .open() . को कॉल करते हैं एक कनेक्शन पर जो SQLite ड्राइवर का उपयोग करता है और डेटाबेस फ़ाइल मौजूद नहीं है, तो एक नई और खाली डेटाबेस फ़ाइल स्वचालित रूप से बनाई जाएगी।
वास्तविक दुनिया के अनुप्रयोगों में, आपको अपने डेटा पर कोई भी संचालन करने का प्रयास करने से पहले यह सुनिश्चित करना होगा कि आपके पास अपने डेटाबेस से एक वैध कनेक्शन है। अन्यथा, आपका आवेदन टूट सकता है और विफल हो सकता है। उदाहरण के लिए, क्या होगा यदि आपके पास उस निर्देशिका के लिए लिखने की अनुमति नहीं है जिसमें आप उस डेटाबेस फ़ाइल को बनाने का प्रयास कर रहे हैं? आपको यह सुनिश्चित करने की आवश्यकता है कि आप कनेक्शन खोलते समय होने वाली किसी भी त्रुटि को संभाल रहे हैं।
कॉल करने का एक सामान्य तरीका .open() इसे एक सशर्त बयान में लपेटना है। यह आपको उन त्रुटियों को संभालने की अनुमति देता है जो कनेक्शन खोलते समय हो सकती हैं:
>>> import sys
>>> from PyQt5.QtSql import QSqlDatabase

>>> # Create the connection
>>> con = QSqlDatabase.addDatabase("QSQLITE")
>>> con.setDatabaseName("contacts.sqlite")

>>> # Open the connection and handle errors
>>> if not con.open():
...     print("Unable to connect to the database")
...     sys.exit(1)
कॉल को .open() to पर रैप करना एक सशर्त बयान में आप कनेक्शन खोलते समय होने वाली किसी भी त्रुटि को संभालने की अनुमति देते हैं। इस तरह, आप एप्लिकेशन के चलने से पहले अपने उपयोगकर्ताओं को किसी भी समस्या के बारे में सूचित कर सकते हैं। ध्यान दें कि एप्लिकेशन 1 . की निकास स्थिति के साथ बाहर निकलता है , जो आमतौर पर प्रोग्राम की विफलता को इंगित करने के लिए उपयोग किया जाता है।
उपरोक्त उदाहरण में, आप .open() . का उपयोग करते हैं एक इंटरैक्टिव सत्र में, इसलिए आप print() . का उपयोग करें उपयोगकर्ताओं को त्रुटि संदेश प्रस्तुत करने के लिए। हालाँकि, GUI अनुप्रयोगों में, print() . का उपयोग करने के बजाय , आप आमतौर पर एक QMessageBox . का उपयोग करते हैं वस्तु। QMessageBox . के साथ , आप अपने उपयोगकर्ताओं को जानकारी प्रस्तुत करने के लिए छोटे संवाद बना सकते हैं।
यहां एक नमूना GUI एप्लिकेशन है जो कनेक्शन त्रुटियों को संभालने का एक तरीका दिखाता है:
 1import sys
 2
 3from PyQt5.QtSql import QSqlDatabase
 4from PyQt5.QtWidgets import QApplication, QMessageBox, QLabel
 5
 6# Create the connection
 7con = QSqlDatabase.addDatabase("QSQLITE")
 8con.setDatabaseName("/home/contacts.sqlite")
 9
10# Create the application
11app = QApplication(sys.argv)
12
13# Try to open the connection and handle possible errors
14if not con.open():
15    QMessageBox.critical(
16        None,
17        "App Name - Error!",
18        "Database Error: %s" % con.lastError().databaseText(),
19    )
20    sys.exit(1)
21
22# Create the application's window
23win = QLabel("Connection Successfully Opened!")
24win.setWindowTitle("App Name")
25win.resize(200, 100)
26win.show()
27sys.exit(app.exec_())
if अगर कनेक्शन असफल रहा तो लाइन 14 में स्टेटमेंट चेक करता है। अगर /home/ निर्देशिका मौजूद नहीं है या यदि आपको इसमें लिखने की अनुमति नहीं है, तो .open() पर कॉल करें विफल रहता है क्योंकि डेटाबेस फ़ाइल नहीं बनाई जा सकती है। इस स्थिति में, निष्पादन का प्रवाह if . में प्रवेश करता है स्टेटमेंट कोड ब्लॉक करता है और स्क्रीन पर एक संदेश दिखाता है।
यदि आप किसी अन्य निर्देशिका में पथ बदलते हैं जिसमें आप लिख सकते हैं, तो .open() पर कॉल करें सफल होगा और आपको संदेश प्रदर्शित करने वाली एक विंडो दिखाई देगी Connection Successfully Opened! आपके पास contacts.sqlite . नामक एक नई डेटाबेस फ़ाइल भी होगी चयनित निर्देशिका में।
ध्यान दें कि आप None pass पास करते हैं संदेश के अभिभावक . के रूप में क्योंकि, संदेश दिखाते समय, आपने अभी तक एक विंडो नहीं बनाई है, इसलिए आपके पास संदेश बॉक्स के लिए एक व्यवहार्य अभिभावक नहीं है।
PyQt के साथ SQL क्वेरी चलाना
पूरी तरह कार्यात्मक डेटाबेस कनेक्शन के साथ, आप अपने डेटाबेस के साथ काम करना शुरू करने के लिए तैयार हैं। ऐसा करने के लिए, आप स्ट्रिंग-आधारित SQL क्वेरी और QSqlQuery . का उपयोग कर सकते हैं वस्तुओं। QSqlQuery आपको अपने डेटाबेस में किसी भी प्रकार की SQL क्वेरी चलाने की अनुमति देता है। QSqlQuery के साथ , आप डेटा हेरफेर भाषा (डीएमएल) कथनों को निष्पादित कर सकते हैं, जैसे SELECT , INSERT , UPDATE , और DELETE , साथ ही डेटा परिभाषा भाषा (DDL) कथन, जैसे CREATE TABLE और इसी तरह।
QSqlQuery . का निर्माता इसके कई रूप हैं, लेकिन इस ट्यूटोरियल में, आप उनमें से दो के बारे में जानेंगे:
-
QSqlQuery(query, connection)स्ट्रिंग-आधारित SQLquery. का उपयोग करके क्वेरी ऑब्जेक्ट का निर्माण करता है और एक डेटाबेसconnection. यदि आप कोई कनेक्शन निर्दिष्ट नहीं करते हैं, या यदि निर्दिष्ट कनेक्शन अमान्य है, तो डिफ़ॉल्ट डेटाबेस कनेक्शन का उपयोग किया जाता है। अगरqueryखाली स्ट्रिंग नहीं है, तो इसे तुरंत निष्पादित किया जाएगा। -
QSqlQuery(connection)connection. का उपयोग करके एक क्वेरी ऑब्जेक्ट का निर्माण करता है . अगरconnectionअमान्य है, तो डिफ़ॉल्ट कनेक्शन का उपयोग किया जाता है।
आप QSqlQuery भी बना सकते हैं कंस्ट्रक्टर को कोई तर्क दिए बिना ऑब्जेक्ट। उस स्थिति में, क्वेरी डिफ़ॉल्ट डेटाबेस कनेक्शन, यदि कोई हो, का उपयोग करेगी।
किसी क्वेरी को निष्पादित करने के लिए, आपको .exec() . पर कॉल करना होगा क्वेरी ऑब्जेक्ट पर। आप .exec() . का उपयोग कर सकते हैं दो अलग-अलग तरीकों से:
-
.exec(query)query. में निहित स्ट्रिंग-आधारित SQL क्वेरी को निष्पादित करता है . यहTrueलौटाता है यदि क्वेरी सफल रही और अन्यथाFalseलौटाती है । -
.exec()पहले से तैयार SQL क्वेरी निष्पादित करता है। यहTrueलौटाता है यदि क्वेरी सफल रही और अन्यथाFalseलौटाती है ।
नोट: PyQt QSqlQuery.exec() की विविधताओं को भी लागू करता है नाम के साथ .exec_() . ये पायथन के पुराने संस्करणों के साथ पश्चगामी संगतता प्रदान करते हैं जिसमें exec भाषा का एक कीवर्ड था।
अब जब आप QSqlQuery . का उपयोग करने की मूल बातें जानते हैं SQL क्वेरी बनाने और निष्पादित करने के लिए, आप यह जानने के लिए तैयार हैं कि अपने ज्ञान को व्यवहार में कैसे लाया जाए।
स्थिर SQL क्वेरी निष्पादित करना
PyQt के साथ क्वेरी बनाना और निष्पादित करना शुरू करने के लिए, आप अपने पसंदीदा कोड संपादक या IDE को सक्रिय करने जा रहे हैं और queries.py नामक एक पायथन स्क्रिप्ट बनाएं। . स्क्रिप्ट सहेजें और उसमें निम्न कोड जोड़ें:
 1import sys
 2
 3from PyQt5.QtSql import QSqlDatabase, QSqlQuery
 4
 5# Create the connection
 6con = QSqlDatabase.addDatabase("QSQLITE")
 7con.setDatabaseName("contacts.sqlite")
 8
 9# Open the connection
10if not con.open():
11    print("Database Error: %s" % con.lastError().databaseText())
12    sys.exit(1)
13
14# Create a query and execute it right away using .exec()
15createTableQuery = QSqlQuery()
16createTableQuery.exec(
17    """
18    CREATE TABLE contacts (
19        id INTEGER PRIMARY KEY AUTOINCREMENT UNIQUE NOT NULL,
20        name VARCHAR(40) NOT NULL,
21        job VARCHAR(50),
22        email VARCHAR(40) NOT NULL
23    )
24    """
25)
26
27print(con.tables())
इस स्क्रिप्ट में, आप उन मॉड्यूल और कक्षाओं को आयात करके शुरू करते हैं जिनके साथ आप काम करने जा रहे हैं। फिर आप .addDatabase() . का उपयोग करके एक डेटाबेस कनेक्शन बनाते हैं SQLite ड्राइवर के साथ। आपने डेटाबेस का नाम "contacts.sqlite" . पर सेट किया है और कनेक्शन खोलें।
अपनी पहली क्वेरी बनाने के लिए, आप QSqlQuery . को इंस्टेंट करते हैं बिना किसी तर्क के। क्वेरी ऑब्जेक्ट के साथ, आप .exec() . को कॉल करते हैं , एक स्ट्रिंग-आधारित SQL क्वेरी को तर्क के रूप में पास करना। इस प्रकार की क्वेरी को स्थिर क्वेरी . के रूप में जाना जाता है क्योंकि इसे क्वेरी के बाहर से कोई पैरामीटर नहीं मिलता है।
उपरोक्त SQL क्वेरी contacts नामक एक नई तालिका बनाती है आपके डेटाबेस में। उस तालिका में निम्नलिखित चार स्तंभ होंगे:
| कॉलम | सामग्री |
|---|---|
id | तालिका की प्राथमिक कुंजी के साथ एक पूर्णांक |
name | संपर्क के नाम वाली एक स्ट्रिंग |
job | एक संपर्क के कार्य शीर्षक के साथ एक स्ट्रिंग |
email | एक संपर्क के ईमेल के साथ एक स्ट्रिंग |
उपरोक्त स्क्रिप्ट की अंतिम पंक्ति आपके डेटाबेस में निहित तालिकाओं की सूची को प्रिंट करती है। यदि आप स्क्रिप्ट चलाते हैं, तो आप देखेंगे कि contacts.sqlite नामक एक नई डेटाबेस फ़ाइल आपकी वर्तमान निर्देशिका में बनाया गया है। आपको ['contacts', 'sqlite_sequence'] जैसा कुछ भी मिलेगा आपकी स्क्रीन पर मुद्रित। इस सूची में आपके डेटाबेस में तालिकाओं के नाम शामिल हैं।
नोट: एक स्ट्रिंग-आधारित SQL क्वेरी को उस विशिष्ट SQL डेटाबेस के अनुसार उपयुक्त सिंटैक्स का उपयोग करना चाहिए जिसे आप क्वेरी कर रहे हैं। अगर सिंटैक्स गलत है, तो .exec() क्वेरी को अनदेखा करता है और False लौटाता है ।
SQLite के मामले में, क्वेरी में एक समय में केवल एक ही कथन हो सकता है।
कॉलिंग .exec() एक QSqlQuery . पर ऑब्जेक्ट आपके डेटाबेस पर स्ट्रिंग-आधारित SQL प्रश्नों को तुरंत निष्पादित करने का एक सामान्य तरीका है, लेकिन क्या होगा यदि आप बाद में निष्पादन के लिए अपने प्रश्नों को पहले से तैयार करना चाहते हैं? यह अगले भाग का विषय है।
गतिशील क्वेरी निष्पादित करना:स्ट्रिंग स्वरूपण
अब तक, आपने सीखा है कि डेटाबेस पर स्थिर प्रश्नों को कैसे निष्पादित किया जाता है। स्थिर क्वेरी वे हैं जो पैरामीटर . को स्वीकार नहीं करती हैं , इसलिए क्वेरी वैसे ही चलती है जैसे वह है। हालांकि ये क्वेरी काफी उपयोगी हैं, कभी-कभी आपको कुछ इनपुट पैरामीटर के जवाब में डेटा पुनर्प्राप्त करने वाली क्वेरी बनाने की आवश्यकता होती है।
निष्पादन समय पर पैरामीटर स्वीकार करने वाली क्वेरी को गतिशील क्वेरी . के रूप में जाना जाता है . पैरामीटर का उपयोग करने से आप क्वेरी को फ़ाइन-ट्यून कर सकते हैं और विशिष्ट पैरामीटर मानों के जवाब में डेटा पुनर्प्राप्त कर सकते हैं। अलग-अलग मान अलग-अलग परिणाम देंगे। आप निम्न दो दृष्टिकोणों में से किसी एक का उपयोग करके किसी क्वेरी में इनपुट पैरामीटर ले सकते हैं:
- पैरामीटर मानों को प्रक्षेपित करने के लिए स्ट्रिंग स्वरूपण का उपयोग करके गतिशील रूप से क्वेरी बनाएं।
- प्लेसहोल्डर पैरामीटर का उपयोग करके क्वेरी तैयार करें और फिर विशिष्ट मानों को पैरामीटर से बांधें।
पहला दृष्टिकोण आपको गतिशील क्वेरी जल्दी से बनाने की अनुमति देता है। हालांकि, इस दृष्टिकोण का सुरक्षित रूप से उपयोग करने के लिए, आपको यह सुनिश्चित करने की आवश्यकता है कि आपके पैरामीटर मान किसी विश्वसनीय स्रोत से आते हैं। अन्यथा, आपको SQL इंजेक्शन हमलों का सामना करना पड़ सकता है।
PyQt में गतिशील क्वेरी बनाने के लिए स्ट्रिंग स्वरूपण का उपयोग करने का एक उदाहरण यहां दिया गया है:
>>>>>> from PyQt5.QtSql import QSqlQuery, QSqlDatabase
>>> con = QSqlDatabase.addDatabase("QSQLITE")
>>> con.setDatabaseName("contacts.sqlite")
>>> con.open()
True
>>> name = "Linda"
>>> job = "Technical Lead"
>>> email = "linda@example.com"
>>> query = QSqlQuery()
>>> query.exec(
... f"""INSERT INTO contacts (name, job, email)
... VALUES ('{name}', '{job}', '{email}')"""
... )
True
इस उदाहरण में, आप एक स्ट्रिंग-आधारित SQL क्वेरी में विशिष्ट मानों को प्रक्षेपित करके एक गतिशील क्वेरी बनाने के लिए f-स्ट्रिंग का उपयोग करते हैं। अंतिम क्वेरी आपके contacts . में डेटा सम्मिलित करती है तालिका, जिसमें अब Linda . के बारे में डेटा है ।
नोट: बाद में इस ट्यूटोरियल में, आप देखेंगे कि डेटाबेस में संग्रहीत डेटा को कैसे पुनर्प्राप्त और नेविगेट किया जाए।
ध्यान दें कि इस प्रकार की गतिशील क्वेरी के काम करने के लिए, आपको यह सुनिश्चित करना होगा कि सम्मिलित किए जाने वाले मानों में सही डेटा प्रकार हो। इसलिए, आप f-स्ट्रिंग में प्लेसहोल्डर के चारों ओर सिंगल कोट्स का उपयोग करते हैं क्योंकि उन मानों को स्ट्रिंग्स की आवश्यकता होती है।
गतिशील क्वेरी निष्पादित करना:प्लेसहोल्डर पैरामीटर
गतिशील प्रश्नों को क्रियान्वित करने के दूसरे दृष्टिकोण के लिए आपको प्लेसहोल्डर के साथ एक टेम्पलेट का उपयोग करके अपने प्रश्नों को पहले से तैयार करने की आवश्यकता है मापदंडों के लिए। PyQt दो पैरामीटर प्लेसहोल्डर शैलियों का समर्थन करता है:
- Oracle शैली नामित प्लेसहोल्डर का उपयोग करता है जैसे
:nameया:email। - ओडीबीसी शैली एक प्रश्न चिह्न का उपयोग करता है (
?) एक स्थितीय प्लेसहोल्डर के रूप में।
ध्यान दें कि इन शैलियों को एक ही क्वेरी में मिश्रित नहीं किया जा सकता है। प्लेसहोल्डर्स का उपयोग करने के तरीके के बारे में अतिरिक्त उदाहरणों के लिए आप बाध्यकारी मूल्यों के दृष्टिकोण की जांच कर सकते हैं।
नोट: ODBC का मतलब ओपन डेटाबेस कनेक्टिविटी है।
PyQt में इस तरह की गतिशील क्वेरी बनाने के लिए, आप पहले प्रत्येक क्वेरी पैरामीटर के लिए प्लेसहोल्डर के साथ एक टेम्पलेट बनाते हैं और फिर उस टेम्पलेट को .prepare() के तर्क के रूप में पास करते हैं। , जो निष्पादन के लिए क्वेरी टेम्पलेट को पार्स, संकलित और तैयार करता है। यदि टेम्पलेट में कोई समस्या है, जैसे SQL सिंटैक्स त्रुटि, तो .prepare() टेम्पलेट को संकलित करने में विफल रहता है और False लौटाता है ।
यदि तैयारी प्रक्रिया सफल हो जाती है, तो prepare() रिटर्न True . उसके बाद, आप .bindValue() . का उपयोग करके प्रत्येक पैरामीटर के लिए एक विशिष्ट मान पास कर सकते हैं नामित या स्थितीय मापदंडों के साथ या .addBindValue() . का उपयोग करके स्थितीय मापदंडों के साथ। .bindValue() निम्नलिखित दो भिन्नताएं हैं:
.bindValue(placeholder, val).bindValue(pos, val)
पहली भिन्नता में, placeholder Oracle-शैली प्लेसहोल्डर का प्रतिनिधित्व करता है। दूसरी भिन्नता में, pos क्वेरी में एक पैरामीटर की स्थिति के साथ एक शून्य-आधारित पूर्णांक संख्या का प्रतिनिधित्व करता है। दोनों रूपों में, val मान को एक विशिष्ट पैरामीटर के लिए बाध्य करता है।
.addBindValue() पोजिशनल बाइंडिंग का उपयोग करके प्लेसहोल्डर्स की सूची में एक मान जोड़ता है। इसका मतलब है कि .addBindValue() . पर कॉल का क्रम निर्धारित करता है कि तैयार क्वेरी में प्रत्येक प्लेसहोल्डर पैरामीटर के लिए कौन सा मान बाध्य होगा।
तैयार प्रश्नों का उपयोग शुरू करने के लिए, आप एक INSERT INTO . तैयार कर सकते हैं कुछ नमूना डेटा के साथ अपने डेटाबेस को पॉप्युलेट करने के लिए SQL कथन। उस स्क्रिप्ट पर वापस जाएं जिसे आपने स्टेटिक SQL क्वेरीज़ को निष्पादित करने वाले अनुभाग में बनाया था और कॉल के ठीक बाद print() में निम्न कोड जोड़ें। :
28# Creating a query for later execution using .prepare()
29insertDataQuery = QSqlQuery()
30insertDataQuery.prepare(
31    """
32    INSERT INTO contacts (
33        name,
34        job,
35        email
36    )
37    VALUES (?, ?, ?)
38    """
39)
40
41# Sample data
42data = [
43    ("Joe", "Senior Web Developer", "joe@example.com"),
44    ("Lara", "Project Manager", "lara@example.com"),
45    ("David", "Data Analyst", "david@example.com"),
46    ("Jane", "Senior Python Developer", "jane@example.com"),
47]
48
49# Use .addBindValue() to insert data
50for name, job, email in data:
51    insertDataQuery.addBindValue(name)
52    insertDataQuery.addBindValue(job)
53    insertDataQuery.addBindValue(email)
54    insertDataQuery.exec()
पहला कदम एक QSqlQuery बनाना है वस्तु। फिर आप .prepare() . पर कॉल करें क्वेरी ऑब्जेक्ट पर। इस स्थिति में, आप प्लेसहोल्डर के लिए ODBC शैली का उपयोग करते हैं। आपकी क्वेरी आपके संपर्क के name . के लिए मान लेगी , job , और email , इसलिए आपको तीन प्लेसहोल्डर चाहिए। चूंकि id कॉलम एक ऑटोइन्क्रिमेंटेड पूर्णांक संख्या है, इसके लिए आपको मान देने की आवश्यकता नहीं है।
फिर आप डेटाबेस को पॉप्युलेट करने के लिए कुछ नमूना डेटा बनाते हैं। data टुपल्स की एक सूची रखता है, और प्रत्येक टपल में तीन आइटम होते हैं:प्रत्येक संपर्क का नाम, नौकरी और ईमेल।
अंतिम चरण उन मानों को बाइंड करना है जिन्हें आप प्रत्येक प्लेसहोल्डर को पास करना चाहते हैं और फिर .exec() पर कॉल करें। क्वेरी निष्पादित करने के लिए। ऐसा करने के लिए, आप for . का उपयोग करते हैं कुंडली। The loop header unpacks each tuple in data into three separate variables with convenient names. Then you call .addBindValue() on the query object to bind the values to the placeholders.
Note that you’re using positional placeholders , so the order in which you call .addBindValue() will define the order in which each value is passed to the corresponding placeholder.
This approach for creating dynamic queries is handy when you want to customize your queries using values that come from your user’s input. Anytime you take the user’s input to complete a query on a database, you face the security risk of SQL injection.
In PyQt, combining .prepare() , .bindValue() , and .addBindValue() fully protects you against SQL injection attacks, so this is the way to go when you’re taking untrusted input to complete your queries.
Navigating the Records in a Query
If you execute a SELECT statement, then your QSqlQuery object will retrieve zero or more records from one or more tables in your database. The query will hold records containing data that matches the query’s criteria. If no data matches the criteria, then your query will be empty.
QSqlQuery provides a set of navigation methods that you can use to move throughout the records in a query result:
| Method | Retrieves |
|---|---|
.next() | The next record |
.previous() | The previous record |
.first() | The first record |
.last() | The last record |
.seek(index, relative=False) | The record at position index |
All these methods position the query object on the retrieved record if that record is available. Most of these methods have specific rules that apply when using them. With these methods, you can move forward, backward, or arbitrarily through the records in a query result. Since they all return either True or False , you can use them in a while loop to navigate all the records in one go.
These methods work with active queries . A query is active when you’ve successfully run .exec() on it, but the query isn’t finished yet. Once an active query is on a valid record, you can retrieve data from that record using .value(index) . This method takes a zero-based integer number, index , and returns the value at that index (column) in the current record.
नोट: If you execute a SELECT * type of query, then the columns in the result won’t follow a known order. This might cause problems when you use .value() to retrieve the value at a given column because there’s no way of knowing if you’re using the right column index.
You’ll look at a few examples of how to use some of the navigation methods to move throughout a query below. But first, you need to create a connection to your database:
>>>>>> from PyQt5.QtSql import QSqlDatabase, QSqlQuery
>>> con = QSqlDatabase.addDatabase("QSQLITE")
>>> con.setDatabaseName("contacts.sqlite")
>>> con.open()
True
Here, you create and open a new connection to contacts.sqlite . If you’ve been following along with this tutorial so far, then this database already contains some sample data. Now you can create a QSqlQuery object and execute it on that data:
>>> # Create and execute a query
>>> query = QSqlQuery()
>>> query.exec("SELECT name, job, email FROM contacts")
True
This query retrieves data about the name , job , and email of all the contacts stored in the contacts table. Since .exec() returned True , the query was successful and is now an active query. You can navigate the records in this query using any of the navigation methods you saw before. You can also retrieve the data at any column in a record using .value() :
>>> # First record
>>> query.first()
True

>>> # Named indices for readability
>>> name, job, email = range(3)

>>> # Retrieve data from the first record
>>> query.value(name)
'Linda'

>>> # Next record
>>> query.next()
True
>>> query.value(job)
'Senior Web Developer'

>>> # Last record
>>> query.last()
True
>>> query.value(email)
'jane@example.com'
With the navigation methods, you can move around the query result. With .value() , you can retrieve the data at any column in a given record.
You can also iterate through all the records in your query using a while loop along with .next() :
>>> query.exec()
True

>>> while query.next():
...     print(query.value(name), query.value(job), query.value(email))
...
Linda Technical Lead linda@example.com
Joe Senior Web Developer joe@example.com
...
With .next() , you navigate all the records in a query result. .next() works similar to the iterator protocol in Python. Once you’ve iterated over the records in a query result, .next() starts returning False until you run .exec() again. A call to .exec() retrieves data from a database and places the query object’s internal pointer one position before the first record, so when you call .next() , you get the first record again.
You can also loop in reverse order using .previous() :
>>> while query.previous():
...     print(query.value(name), query.value(job), query.value(email))
...
Jane Senior Python Developer jane@example.com
David Data Analyst david@example.com
...
.previous() works similar to .next() , but the iteration is done in reverse order. In other words, the loop goes from the query pointer’s position back to the first record.
Sometimes you might want to get the index that identifies a given column in a table by using the name of that column. To do that, you can call .indexOf() on the return value of .record() :
>>> query.first()
True

>>> # Get the index of name
>>> name = query.record().indexOf("name")

>>> query.value(name)
'Linda'

>>> # Finish the query object if unneeded
>>> query.finish()
>>> query.isActive()
False
The call to .indexOf() on the result of .record() returns the index of the "name" कॉलम। If "name" doesn’t exist, then .indexOf() रिटर्न -1 . This is handy when you use a SELECT * statement in which the order of columns is unknown. Finally, if you’re done with a query object, then you can turn it inactive by calling .finish() . This will free the system memory associated with the query object at hand.
Closing and Removing Database Connections
In practice, some of your PyQt applications will depend on a database, and others won’t. An application that depends on a database often creates and opens a database connection just before creating any window or graphical component and keeps the connection open until the application is closed.
On the other hand, applications that don’t depend on a database but use a database to provide some of their functionalities typically connect to that database only when needed, if at all. In these cases, you can close the connection after use and free the resources associated with that connection, such as system memory.
To close a connection in PyQt, you call .close() on the connection. This method closes the connection and frees any acquired resources. It also invalidates any associated QSqlQuery objects because they can’t work properly without an active connection.
Here’s an example of how to close an active database connection using .close() :
>>> from PyQt5.QtSql import QSqlDatabase

>>> con = QSqlDatabase.addDatabase("QSQLITE")
>>> con.setDatabaseName("contacts.sqlite")

>>> con.open()
True
>>> con.isOpen()
True

>>> con.close()
>>> con.isOpen()
False
You can call .close() on a connection to close it and free all its associated resources. To make sure that a connection is closed, you call .isOpen() .
Note that QSqlQuery objects remain in memory after closing their associated connection, so you must make your queries inactive by calling .finish() or .clear() , or by deleting the QSqlQuery object before closing the connection. Otherwise, residual memory is left out in your query object.
You can reopen and reuse any previously closed connection. That’s because .close() doesn’t remove connections from the list of available connections, so they remain usable.
You can also completely remove your database connections using .removeDatabase() . To do this safely, first finish your queries using .finish() , then close the database using .close() , and finally remove the connection. You can use .removeDatabase(connectionName) to remove the database connection called connectionName from the list of available connections. Removed connections are no longer available for use in the application at hand.
To remove the default database connection, you can call .connectionName() on the object returned by .database() and pass the result to .removeDatabase() :
>>> # The connection is closed but still in the list of connections
>>> QSqlDatabase.connectionNames()
['qt_sql_default_connection']

>>> # Remove the default connection
>>> QSqlDatabase.removeDatabase(QSqlDatabase.database().connectionName())

>>> # The connection is no longer in the list of connections
>>> QSqlDatabase.connectionNames()
[]

>>> # Try to open a removed connection
>>> con.open()
False
Here, the call to .connectionNames() returns the list of available connections. In this case, you have only one connection, the default. Then you remove the connection using .removeDatabase() .
नोट: Before closing and removing a database connection, you need to make sure that everything that uses the connection is deleted or set to use a different data source. Otherwise, you can have a resource leak .
Since you need a connection name to use .removeDatabase() , you call .connectionName() on the result of .database() to get the name of the default connection. Finally, you call .connectionNames() again to make sure that the connection is no longer in the list of available connections. Trying to open a removed connection will return False because the connection no longer exists.
Displaying and Editing Data With PyQt
A common requirement in GUI applications that use databases is the ability to load, display, and edit data from the database using different widgets. Table, list, and tree widgets are commonly used in GUIs to manage data.
PyQt provides two different kind of widgets for managing data:
- Standard widgets include internal containers for storing data.
- View widgets don’t maintain internal data containers but use models to access data.
For small GUI applications that manage small databases, you can use the first approach. The second approach is handy when you’re building complex GUI applications that manage large databases.
The second approach takes advantage of PyQt’s Model-View programming. With this approach, you have widgets that represent views such as tables, lists, and trees on one hand and model classes that communicate with your data on the other hand.
Understanding PyQt’s Model-View Architecture
The Model-View-Controller (MVC) design pattern is a general software pattern intended to divide an application’s code into three general layers, each with a different role.
The model takes care of the business logic of the application, the view provides on-screen representations, and the controller connects the model and the view to make the application work.
Qt provides a custom variation of MVC. They call it the Model-View architecture, and it’s available for PyQt as well. The pattern also separates the logic into three components:
-
Models communicate with and access the data. They also define an interface that’s used by views and delegates to access the data. All models are based on
QAbstractItemModel. Some commonly used models includeQStandardItemModel,QFileSystemModel, and SQL-related models. -
Views are responsible for displaying the data to the user. They also have similar functionality to the controller in the MVC pattern. All views are based on
QAbstractItemView. Some commonly used views areQListView,QTableView, andQTreeView. -
Delegates paint view items and provide editor widgets for modifying items. They also communicate back with the model if an item has been modified. The base class is
QAbstractItemDelegate.
Separating classes into these three components implies that changes on models will be reflected on associated views or widgets automatically, and changes on views or widgets through delegates will update the underlying model automatically.
In addition, you can display the same data in different views without the need for multiple models.
Using Standard Widget Classes
PyQt provides a bunch of standard widgets for displaying and editing data in your GUI applications. These standard widgets provide views such as tables, trees, and lists. They also provide an internal container for storing data and convenient delegates for editing the data. All these features are grouped into a single class.
Here are three of these standard classes:
| Standard Class | Displays |
|---|---|
QListWidget | A list of items |
QTreeWidget | A hierarchical tree of items |
QTableWidget | A table of items |
QTableWidget is arguably the most popular widget when it comes to displaying and editing data. It creates a 2D array of QTableWidgetItem objects. Each item holds an individual value as a string. All these values are displayed and organized in a table of rows and columns.
You can perform at least the following operations on a QTableWidget object:
- Editing the content of its items using delegate objects
- Adding new items using
.setItem() - Setting the number of rows and columns using
.setRowCount()and.setColumnCount() - Adding vertical and horizontal header labels using
setHorizontalHeaderLabels()and.setVerticalHeaderLabels
Here’s a sample application that shows how to use a QTableWidget object to display data in a GUI. The application uses the database you created and populated in previous sections, so if you want to run it, then you need to save the code into the same directory in which you have the contacts.sqlite database:
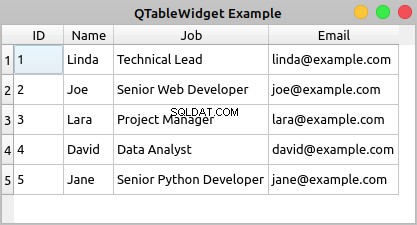
If you double-click any cell of the table, then you’ll be able to edit the content of the cell. However, your changes won’t be saved to your database.
Here’s the code for your application:
 1import sys
 2
 3from PyQt5.QtSql import QSqlDatabase, QSqlQuery
 4from PyQt5.QtWidgets import (
 5    QApplication,
 6    QMainWindow,
 7    QMessageBox,
 8    QTableWidget,
 9    QTableWidgetItem,
10)
11
12class Contacts(QMainWindow):
13    def __init__(self, parent=None):
14        super().__init__(parent)
15        self.setWindowTitle("QTableView Example")
16        self.resize(450, 250)
17        # Set up the view and load the data
18        self.view = QTableWidget()
19        self.view.setColumnCount(4)
20        self.view.setHorizontalHeaderLabels(["ID", "Name", "Job", "Email"])
21        query = QSqlQuery("SELECT id, name, job, email FROM contacts")
22        while query.next():
23            rows = self.view.rowCount()
24            self.view.setRowCount(rows + 1)
25            self.view.setItem(rows, 0, QTableWidgetItem(str(query.value(0))))
26            self.view.setItem(rows, 1, QTableWidgetItem(query.value(1)))
27            self.view.setItem(rows, 2, QTableWidgetItem(query.value(2)))
28            self.view.setItem(rows, 3, QTableWidgetItem(query.value(3)))
29        self.view.resizeColumnsToContents()
30        self.setCentralWidget(self.view)
31
32def createConnection():
33    con = QSqlDatabase.addDatabase("QSQLITE")
34    con.setDatabaseName("contacts.sqlite")
35    if not con.open():
36        QMessageBox.critical(
37            None,
38            "QTableView Example - Error!",
39            "Database Error: %s" % con.lastError().databaseText(),
40        )
41        return False
42    return True
43
44app = QApplication(sys.argv)
45if not createConnection():
46    sys.exit(1)
47win = Contacts()
48win.show()
49sys.exit(app.exec_())
Here’s what’s happening in this example:
- Lines 18 to 20 create a
QTableWidgetobject, set the number of columns to4, and set user-friendly labels for each column’s header. - Line 21 creates and executes a
SELECTSQL query on your database to get all the data in thecontactstable. - Line 22 starts a
whileloop to navigate the records in the query result using.next()। - Line 24 increments the number of rows in the table by
1using.setRowCount()। - Lines 25 to 28 add items of data to your table using
.setItem(). Note that since the values in theidcolumns are integer numbers, you need to convert them into strings to be able to store them in aQTableWidgetItemobject.
.setItem() takes three arguments:
rowholds a zero-based integer that represents the index of a given row in the table.columnholds a zero-based integer that represents the index of a given column in the table.itemholds theQTableWidgetItemobject that you need to place at a given cell in the table.
Finally, you call .resizeColumnsToContents() on your view to adjust the size of the columns to their content and provide a better rendering of the data.
Displaying and editing database tables using standard widgets can become a challenging task. That’s because you’ll have two copies of the same data. In other words you’ll have a copy of the data in two locations:
- Outside the widget, in your database
- Inside the widget, in the widget’s internal containers
You’re responsible for synchronizing both copies of your data manually, which can be an annoying and error-prone operation. Luckily, you can use PyQt’s Model-View architecture to avoid most of these problems, as you’ll see in the following section.
Using View and Model Classes
PyQt’s Model-View classes eliminate the problems of data duplication and synchronization that may occur when you use standard widget classes to build database applications. The Model-View architecture allows you to use several views to display the same data because you can pass one model to many views.
Model classes provide an application programming interface (API) that you can use to manipulate data. View classes provide convenient delegate objects that you can use to edit data in the view directly. To connect a view with a given module, you need to call .setModel() on the view object.
PyQt offers a set of view classes that support the Model-View architecture:
| View Class | Displays |
|---|---|
QListView | A list of items that take values directly from a model class |
QTreeView | A hierarchical tree of items that take values directly from a model class |
QTableView | A table of items that take values directly from a model class |
You can use these view classes along with model classes to create your database applications. This will make your applications more robust, faster to code, and less error-prone.
Here are some of the model classes that PyQt provides for working with SQL databases:
| Model Class | <थ>विवरण|
|---|---|
QSqlQueryModel | A read-only data model for SQL queries |
QSqlTableModel | An editable data model for reading and writing records in a single table |
QSqlRelationalTableModel | An editable data model for reading and writing records in a relational table |
Once you’ve connected one of these models to a physical database table or query, you can use them to populate your views. Views provide delegate objects that allow you to modify the data directly in the view. The model connected to the view will update the data in your database to reflect any change in the view. Note that you don’t have to update the data in the database manually. The model will do that for you.
Here’s an example that shows the basics of how to use a QTableView object and a QSqlTableModel object together to build a database application using PyQt’s Model-View architecture:
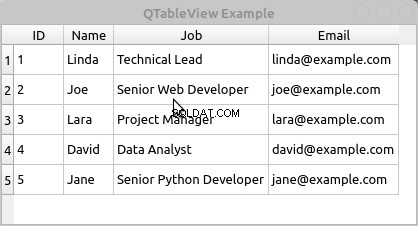
To edit the data in a cell of the table, you can double-click the cell. A convenient delegate widget will show in the cell, allowing you to edit its content. Then you can hit Enter to save the changes.
The ability to automatically handle and save changes in the data is one of the more important advantages of using PyQt’s Model-View classes. The Model-View architecture will improve your productivity and reduce the errors that can appear when you have to write data manipulation code by yourself.
Here’s the code to create the application:
 1import sys
 2
 3from PyQt5.QtCore import Qt
 4from PyQt5.QtSql import QSqlDatabase, QSqlTableModel
 5from PyQt5.QtWidgets import (
 6    QApplication,
 7    QMainWindow,
 8    QMessageBox,
 9    QTableView,
10)
11
12class Contacts(QMainWindow):
13    def __init__(self, parent=None):
14        super().__init__(parent)
15        self.setWindowTitle("QTableView Example")
16        self.resize(415, 200)
17        # Set up the model
18        self.model = QSqlTableModel(self)
19        self.model.setTable("contacts")
20        self.model.setEditStrategy(QSqlTableModel.OnFieldChange)
21        self.model.setHeaderData(0, Qt.Horizontal, "ID")
22        self.model.setHeaderData(1, Qt.Horizontal, "Name")
23        self.model.setHeaderData(2, Qt.Horizontal, "Job")
24        self.model.setHeaderData(3, Qt.Horizontal, "Email")
25        self.model.select()
26        # Set up the view
27        self.view = QTableView()
28        self.view.setModel(self.model)
29        self.view.resizeColumnsToContents()
30        self.setCentralWidget(self.view)
31
32def createConnection():
33    con = QSqlDatabase.addDatabase("QSQLITE")
34    con.setDatabaseName("contacts.sqlite")
35    if not con.open():
36        QMessageBox.critical(
37            None,
38            "QTableView Example - Error!",
39            "Database Error: %s" % con.lastError().databaseText(),
40        )
41        return False
42    return True
43
44app = QApplication(sys.argv)
45if not createConnection():
46    sys.exit(1)
47win = Contacts()
48win.show()
49sys.exit(app.exec_())
Here’s what’s happening in this code:
- Line 18 creates an editable
QSqlTableModelobject. - Line 19 connects your model with the
contactstable in your database using.setTable()। - Line 20 sets the edit strategy of the model to
OnFieldChange. This strategy allows the model to automatically update the data in your database if the user modifies any of the data directly in the view. - Lines 21 to 24 set some user-friendly labels to the horizontal headers of the model using
.setHeaderData()। - Line 25 loads the data from your database and populates the model by calling
.select()। - Line 27 creates the table view object to display the data contained in the model.
- Line 28 connects the view with the model by calling
.setModel()on the view with your data model as an argument. - Line 29 calls
.resizeColumnsToContents()on the view object to adjust the table to its content.
इतना ही! You now have a fully-functional database application.
Using SQL Databases in PyQt:Best Practices
When it comes to using PyQt’s SQL support effectively, there are some best practices that you might want to use in your applications:
-
Favor PyQt’s SQL support over Python standard library or third-party libraries to take advantage of the natural integration of these classes with the rest of PyQt’s classes and infrastructure, mostly with the Model-View architecture.
-
Use previously prepared dynamic queries with placeholders for parameters and bind values to those parameters using
.addBindValue()and.bindValue(). This will help prevent SQL injection attacks. -
Handle errors that can occur when opening a database connection to avoid unexpected behaviors and application crashes.
-
Close and remove unneeded database connections and queries to free any acquired system resources.
-
Minimize the use of
SELECT *queries to avoid problems when retrieving data with.value(). -
Pass your passwords to
.open()instead of to.setPassword()to avoid the risk of compromising your security. -
Take advantage of PyQt’s Model-View architecture and its integration with PyQt’s SQL support to make your applications more robust.
This list isn’t complete, but it’ll help you make better use of PyQt’s SQL support when developing your database applications.
Conclusion
Using PyQt’s built-in support to work with SQL databases is an important skill for any Python developer who’s creating PyQt GUI applications and needs to connect them to a database. PyQt provides a consistent set of classes for managing SQL databases.
These classes fully integrate with PyQt’s Model-View architecture, allowing you to develop GUI applications that can manage databases in a user-friendly way.
In this tutorial, you’ve learned how to:
- Use PyQt’s SQL support to connect to a database
- Execute SQL queries on a database with PyQt
- Build database applications using PyQt’s Model-View architecture
- Display and edit data from a database using PyQt widgets
With this knowledge, you can improve your productivity when creating nontrivial database applications and make your GUI applications more robust.