हमने हाल ही में ClusterControl 1.7.3 जारी करने की घोषणा की है जिसमें कई तरह के सुधार और नई जोड़ी गई विशेषताएं शामिल हैं। इन नई सुविधाओं में से एक उपयोगकर्ता को एक ही होस्ट पर एकाधिक पोस्टग्रेएसक्यूएल इंस्टेंस को सेटअप और प्रबंधित करने की अनुमति देने के लिए क्लस्टरकंट्रोल में समर्थन को जोड़ना है। इस नई सुविधा के बारे में हम नीचे अपने ब्लॉग में चर्चा करेंगे, जिसमें इस प्रकार के सेटअप से आपको संसाधनों को बचाने में मदद करने के साथ-साथ ClusterControl में इस प्रकार के इंस्टॉलेशन को प्राप्त करने के लिए चरण-दर-चरण निर्देश प्रदान करने के कारण भी शामिल हैं।
आपको एकल होस्ट पर एकाधिक-PostgreSQL स्थापना की आवश्यकता क्यों होगी?
आज के तेजी से विकास और हार्डवेयर से सॉफ्टवेयर में प्रौद्योगिकियों के सुधार के साथ, आवश्यकताओं का दायरा अधिक अनुकूलनीय, लचीला और स्केलेबल हो गया है। कुछ संगठन प्रौद्योगिकी स्टैक का लाभ उठाना भी पसंद करते हैं क्योंकि इसे स्केल करना आसान है। इसके अलावा, ऐसी स्थितियां हैं जहां आप एक उच्च अंत, शक्तिशाली सर्वर पर एक डेटाबेस सर्वर को तैनात करना चाह सकते हैं जिसमें एक बड़ा सीपीयू, बहुत सारी मेमोरी, और तेज, शक्तिशाली और गैर-वाष्पशील स्टोरेज डिवाइस जैसे एसएसडी / फ्यूजन आईओ शामिल हैं। /एनवीएमई। हालाँकि, यह कभी-कभी संसाधनों की बर्बादी हो सकती है यदि आप किसी डेटाबेस सर्वर के साझा-संसाधनों को चलाना चाहते हैं (जैसे कि इसे दास के रूप में उपयोग करना, हॉट-बैकअप मशीन या बैकअप सत्यापन सर्वर के रूप में भी)। कुछ सेटअपों में, हो सकता है कि आप अवांछित हार्डवेयर लागतों से बचने के लिए अपने शक्तिशाली सर्वर में उपलब्ध संसाधनों का उपयोग अपने विकास और क्यूए सर्वर दोनों के रूप में करना चाहें (बजाय एक समर्पित मशीन खरीदने या क्लाउड में एक नया कंप्यूट इंस्टेंस उत्पन्न करने के)।
मल्टी-पोस्टग्रेएसक्यूएल इंस्टालेशन कैसे सेटअप करें
इस उदाहरण के लिए हम क्लस्टरकंट्रोल का उपयोग करते हुए एक ही होस्ट में मल्टी-पोस्टग्रेएसक्यूएल इंस्टॉलेशन के साथ मल्टी-पोस्टग्रेएसक्यूएल रनिंग इंस्टेंस के साथ एक क्लस्टर बनाएंगे।
नोट:वर्तमान संस्करण (अर्थात ClusterControl 1.7.3) के अनुसार, ClusterControl आपको क्लस्टर बनाने या क्लस्टर को प्रारंभ करने की अनुमति नहीं देता है यदि आप एक मास्टर और स्लेव जानकारी को एक बहु-संस्करण स्थापित PostgreSQL या एक बहु के साथ निर्दिष्ट करते हैं -एक मेजबान के भीतर चल रहे PostgreSQL के उदाहरण। हालांकि, आप एक एकल होस्ट में चल रहे PostgreSQL के बहु-संस्करण स्थापित या बहु-उदाहरण के साथ एक नोड आयात कर सकते हैं।
सर्वर विवरण और सूचना
चूंकि PostgreSQL का एक से अधिक संस्करण स्थापित होने पर हम वर्तमान में क्लस्टर शुरू या बना नहीं सकते हैं, हम PostgreSQL के मौजूदा या चल रहे इंस्टेंस को आयात करेंगे। सर्वर की जानकारी नीचे दी गई है।
आईपी: 192.168.30.10
OS उपयोगकर्ता: आवारा
OS प्रकार और संस्करण: उबंटू 16.04.6 एलटीएस (ज़ेनियल)
और मेरे /etc/postgresql/9.6/multi_pg/postgresql.conf,
से कुछ जानकारीdata_directory = '/data/pgsql/master/data'
hba_file = '/etc/postgresql/9.6/multi_pg/pg_hba.conf'
ident_file = '/etc/postgresql/9.6/multi_pg/pg_ident.conf'
external_pid_file = '/var/run/postgresql/9.6-main.pid'
listen_addresses = '*'
port = 7654
max_connections = 100
shared_buffers = 511995kB
work_mem = 10239kB
maintenance_work_mem = 127998kB
dynamic_shared_memory_type = posix
wal_level = hot_standby
full_page_writes = on
wal_log_hints = on
checkpoint_completion_target = 0.9
max_wal_senders = 16
wal_keep_segments = 32
hot_standby = on
effective_cache_size = 1535985kB
logging_collector = on
log_timezone = 'Etc/UTC'
cluster_name = '9.6/multi_pg'
stats_temp_directory = '/var/run/postgresql/9.6-main.pg_stat_tmp'
datestyle = 'iso, mdy'
timezone = 'Etc/UTC'
lc_messages = 'en_US.UTF-8'
lc_monetary = 'en_US.UTF-8'
lc_numeric = 'en_US.UTF-8'
lc_time = 'en_US.UTF-8'
default_text_search_config = 'pg_catalog.english'जिसमें एक मौजूदा संस्करण पहले ही स्थापित किया जा चुका है:
example@sqldat.com:/home/vagrant# dpkg -l | grep 'object-relational'
ii  postgresql-11                     11.4-1.pgdg16.04+1                         amd64        object-relational SQL database, version 11 server
ii  postgresql-9.2                    9.2.24-1.pgdg16.04+1                       amd64        object-relational SQL database, version 9.2 server
ii  postgresql-9.6                    9.6.14-1.pgdg16.04+1                       amd64        object-relational SQL database, version 9.6 server
इसके अतिरिक्त, इस सेटअप के लिए, अतिरिक्त उदाहरण हैं जो चल रहे हैं...
example@sqldat.com:/data/pgsql/master# ps axufwww | grep 'postgre[s]'
postgres  1243  0.0  0.8 186064 17916 ?        S    15:59   0:00 /usr/lib/postgresql/9.2/bin/postgres -D /var/lib/postgresql/9.2/main -c config_file=/etc/postgresql/9.2/main/postgresql.conf
postgres  1285  0.0  0.1 186064  3860 ?        Ss   15:59   0:00  \_ postgres: checkpointer process
postgres  1286  0.0  0.2 186064  4620 ?        Ss   15:59   0:00  \_ postgres: writer process
postgres  1287  0.0  0.1 186064  3860 ?        Ss   15:59   0:00  \_ postgres: wal writer process
postgres  1288  0.0  0.2 186808  6008 ?        Ss   15:59   0:00  \_ postgres: autovacuum launcher process
postgres  1289  0.0  0.1 145808  3736 ?        Ss   15:59   0:00  \_ postgres: stats collector process
postgres  1246  0.0  1.2 309600 25884 ?        S    15:59   0:00 /usr/lib/postgresql/11/bin/postgres -D /var/lib/postgresql/11/main -c config_file=/etc/postgresql/11/main/postgresql.conf
postgres  1279  0.0  0.1 309600  4028 ?        Ss   15:59   0:00  \_ postgres: 11/main: checkpointer
postgres  1280  0.0  0.1 309600  4028 ?        Ss   15:59   0:00  \_ postgres: 11/main: background writer
postgres  1281  0.0  0.4 309600  9072 ?        Ss   15:59   0:00  \_ postgres: 11/main: walwriter
postgres  1282  0.0  0.3 310012  6496 ?        Ss   15:59   0:00  \_ postgres: 11/main: autovacuum launcher
postgres  1283  0.0  0.1 164516  3528 ?        Ss   15:59   0:00  \_ postgres: 11/main: stats collector
postgres  1284  0.0  0.3 309892  6596 ?        Ss   15:59   0:00  \_ postgres: 11/main: logical replication launcher
इस उदाहरण के लिए, हम PostgreSQL 9.6 का उपयोग करेंगे।
मास्टर-स्लेव PostgreSQL क्लस्टर का निर्माण
क्लस्टर बनाने के लिए, हमें PostgreSQL इंस्टेंस को मैन्युअल रूप से सेटअप करना होगा और फिर उस इंस्टेंस को बाद में ClusterControl में इम्पोर्ट करना होगा। वैकल्पिक रूप से, हम केवल एक मास्टर नोड के साथ एक क्लस्टर बना सकते हैं और ClusterControl को इसे संभालने दें लेकिन ऐसा करने के लिए हमें अन्य सभी चल रहे नोड्स को बंद करना होगा। यदि आप व्यस्त PostgreSQL डेटाबेस सर्वर पर काम कर रहे हैं तो यह आदर्श नहीं होगा।
अब, मैन्युअल सेटअप करते हैं...
example@sqldat.com:/etc/postgresql/9.6/multi_pg# sudo -iu postgres /usr/lib/postgresql/9.6/bin/pg_ctl -D /data/pgsql/master/data initdb
The files belonging to this database system will be owned by user "postgres".
This user must also own the server process.

The database cluster will be initialized with locale "en_US.UTF-8".
The default database encoding has accordingly been set to "UTF8".
The default text search configuration will be set to "english".

Data page checksums are disabled.

creating directory /data/pgsql/master/data ... ok
creating subdirectories ... ok
selecting default max_connections ... 100
selecting default shared_buffers ... 128MB
selecting default timezone ... Etc/UTC
selecting dynamic shared memory implementation ... posix
creating configuration files ... ok
running bootstrap script ... ok
performing post-bootstrap initialization ... ok
syncing data to disk ... ok

WARNING: enabling "trust" authentication for local connections
You can change this by editing pg_hba.conf or using the option -A, or
--auth-local and --auth-host, the next time you run initdb.

Success. You can now start the database server using:

    /usr/lib/postgresql/9.6/bin/pg_ctl -D /data/pgsql/master/data -l logfile start
फिर नीचे दिए गए कमांड को चलाकर डेटाबेस शुरू करें,
example@sqldat.com:/etc/postgresql/9.6/multi_pg# sudo -iu postgres /usr/lib/postgresql/9.6/bin/pg_ctl -D /data/pgsql/master/data  -o "-c config_file=/etc/postgresql/9.6/multi_pg/postgresql.conf" -l /var/log/postgresql/postgresql-9.6-master.log start
server starting
अब, आइए सत्यापित करें कि क्या इंस्टेंस चलता है और हमारे द्वारा उपयोग किए गए वांछित पोर्ट का उपयोग करता है:
example@sqldat.com:/etc/postgresql/9.6/multi_pg# netstat -ntlvp46|grep postgres
tcp        0      0 127.0.0.1:5432          0.0.0.0:*               LISTEN      1246/postgres
tcp        0      0 127.0.0.1:5433          0.0.0.0:*               LISTEN      1243/postgres
tcp        0      0 0.0.0.0:7654            0.0.0.0:*               LISTEN      18403/postgres
tcp6       0      0 :::7654                 :::*
अब, यह सही लग रहा है। 18403 . का पिड दिखाता है कि हम इसे चलाने में सक्षम हैं और इसमें IPv4 और IPv6 दोनों खुले हैं।
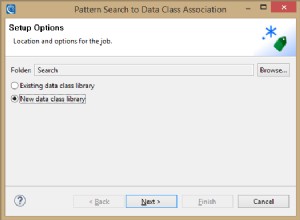
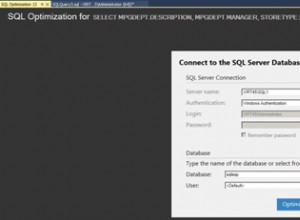
अब, इसे ClusterControl में इम्पोर्ट करते हैं। तैनाती करें → मौजूदा सर्वर/डेटाबेस आयात करें . पर जाएं , वांछित मास्टर नोड आयात करने के लिए हमने अभी सेटअप किया है।
आपके द्वारा आयात बटन को हिट करने के बाद, आप नीचे की तरह एक मास्टर नोड के साथ एक क्लस्टर प्राप्त करने में सक्षम होंगे:

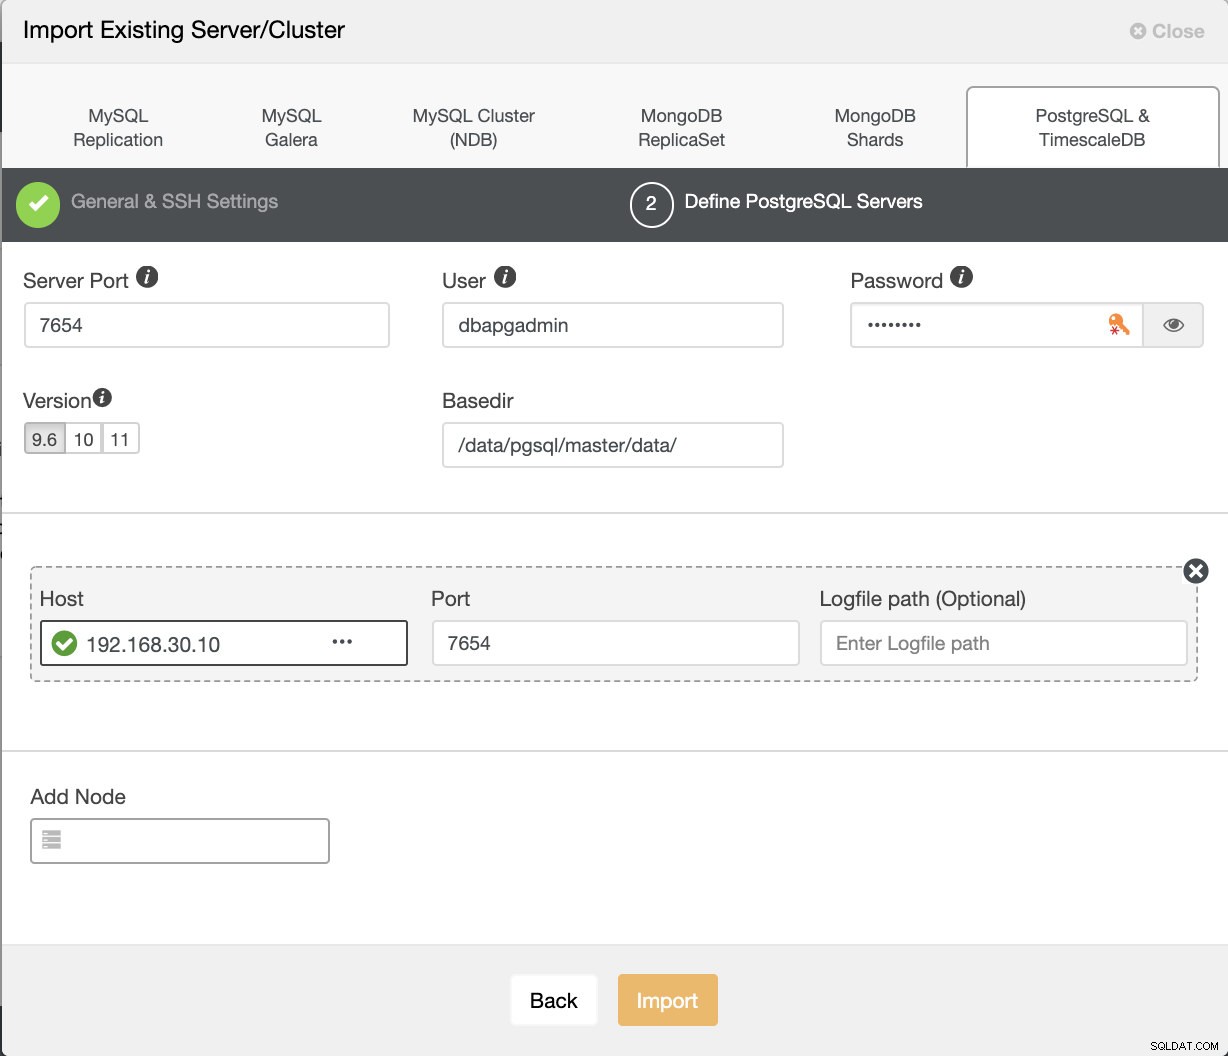
अब, एक ही होस्ट (यानी IP 192.168.30.10 के साथ) के भीतर एक स्लेव बनाते हैं।
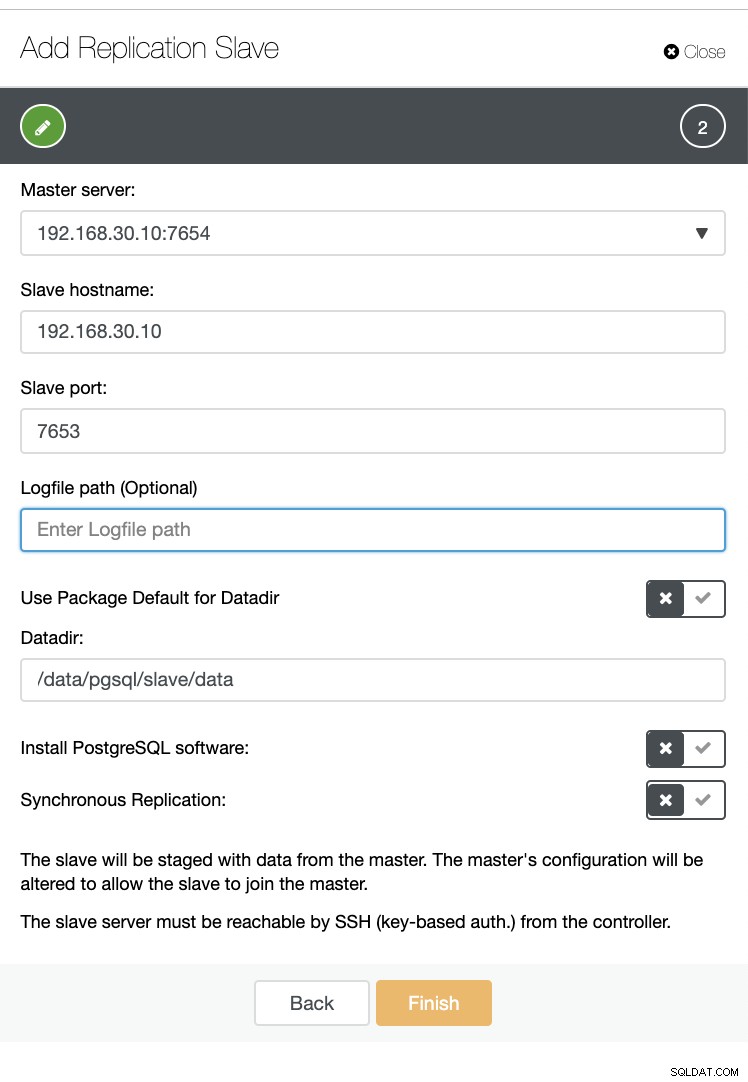
और चिंता न करें, ClusterControl आपके लिए इसे एक नमूना कार्य गतिविधि लॉग शो के रूप में संभाल लेगा।
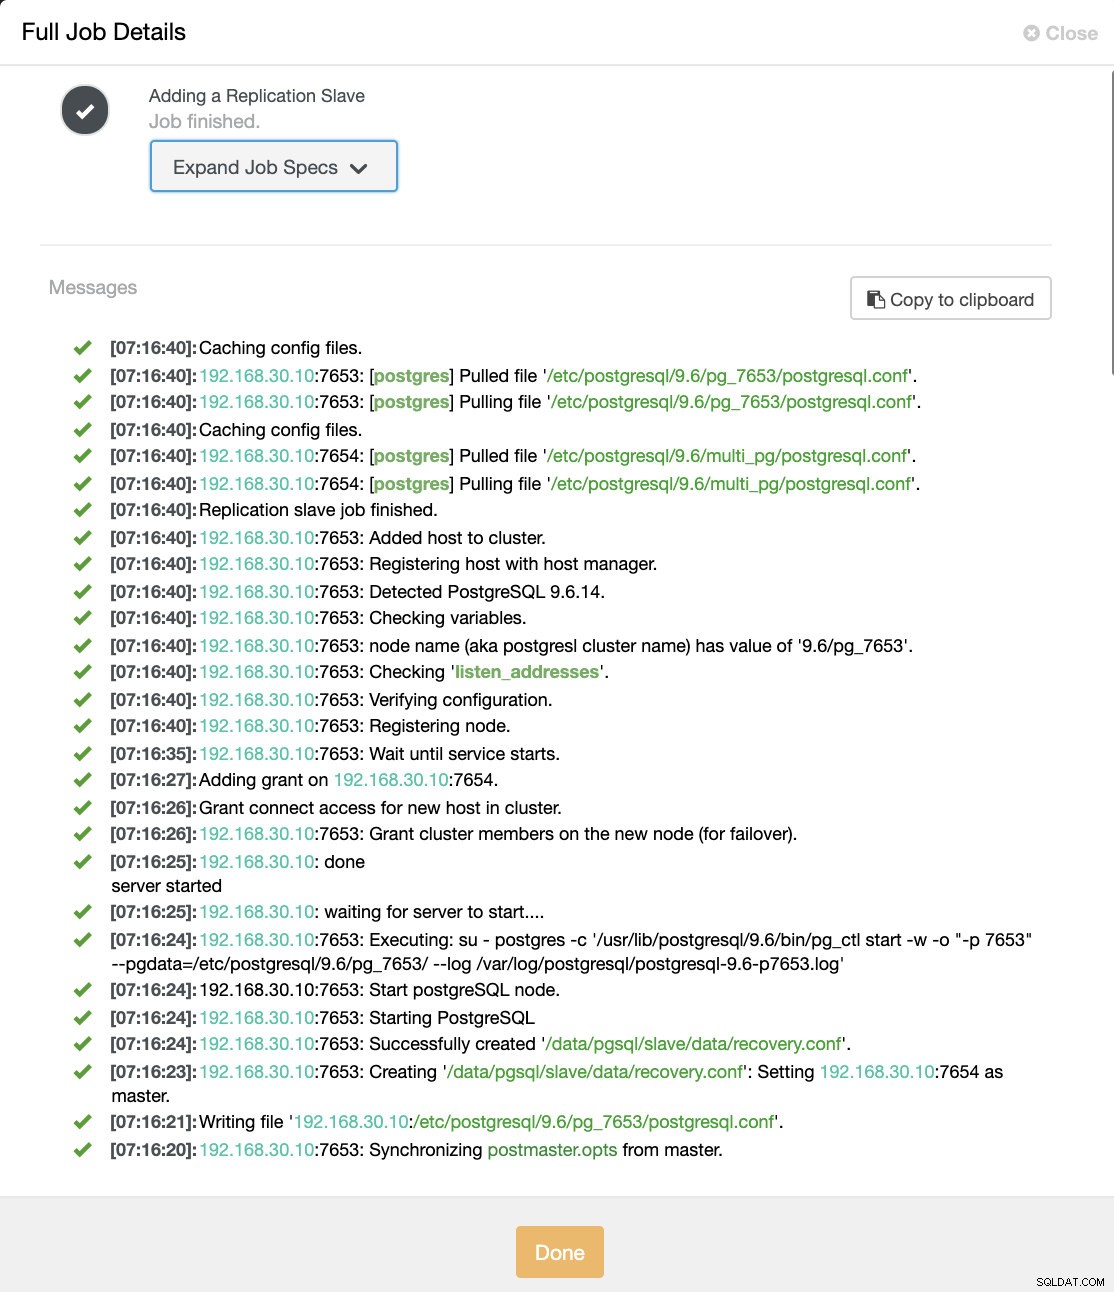
आप देख सकते हैं कि इसे सफलतापूर्वक सेटअप और स्थापित किया गया था। तकनीकी रूप से, ClusterControl /etc/postgresql/
आइए अब pg_lsclusters . से पुष्टि करें और देखें कि बहु-PostgreSQL इंस्टेंस होस्ट में समानांतर में चल रहा है या नहीं। नीचे देखें:
example@sqldat.com:/var/log/postgresql# pg_lsclusters
Ver Cluster Port Status Owner Data directory Log file
9.2 main 5433 online postgres /var/lib/postgresql/9.2/main /var/log/postgresql/postgresql-9.2-main.log
9.6 multi_pg 7654 online postgres /data/pgsql/master/data /var/log/postgresql/postgresql-9.6-master.log
9.6 pg_7653 7653 online,recovery postgres /data/pgsql/slave/data pg_log/postgresql-%Y-%m-%d_%H%M%S.log
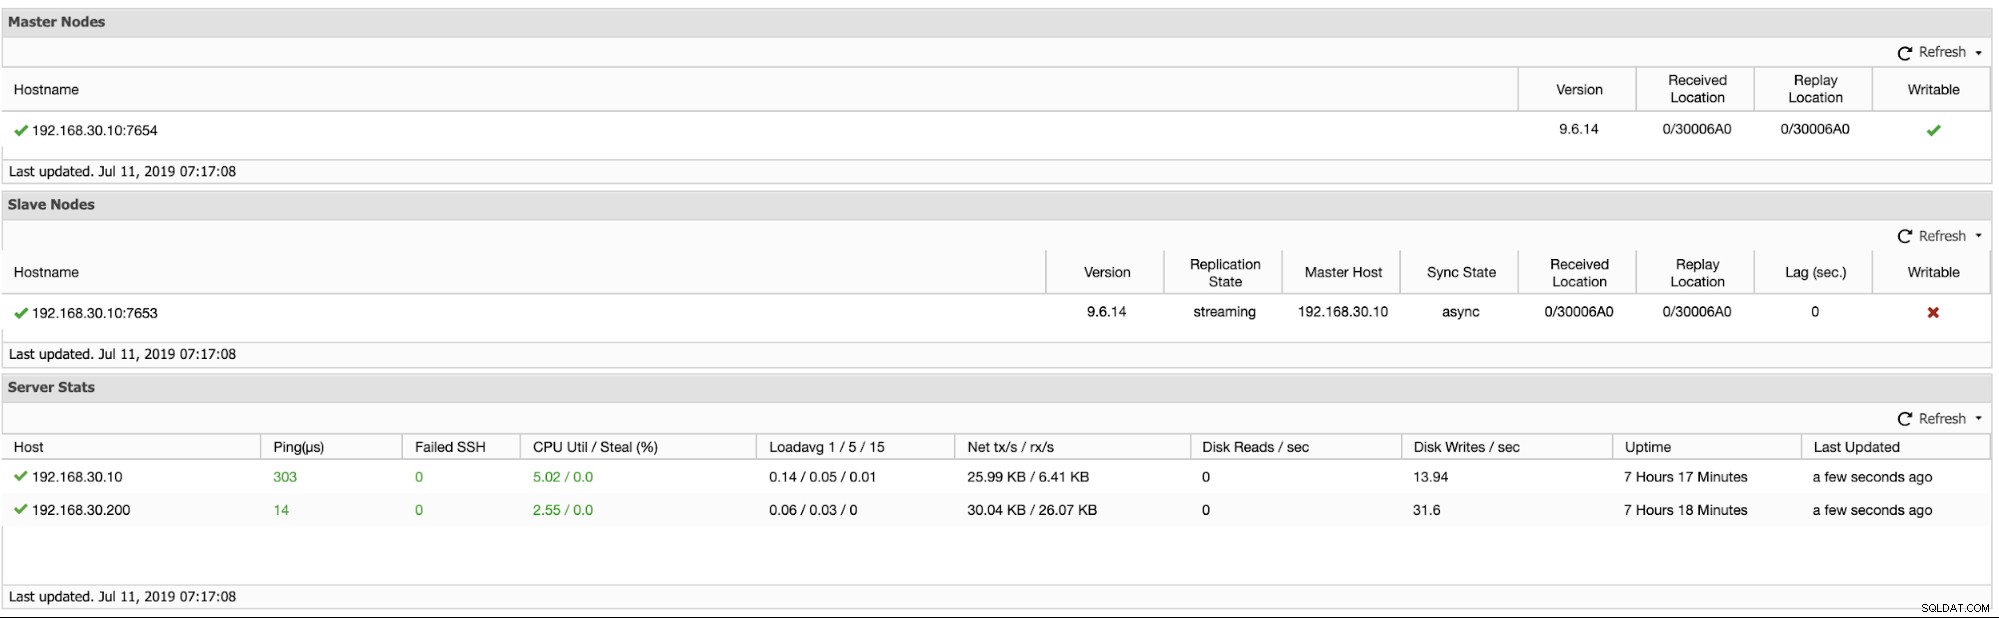
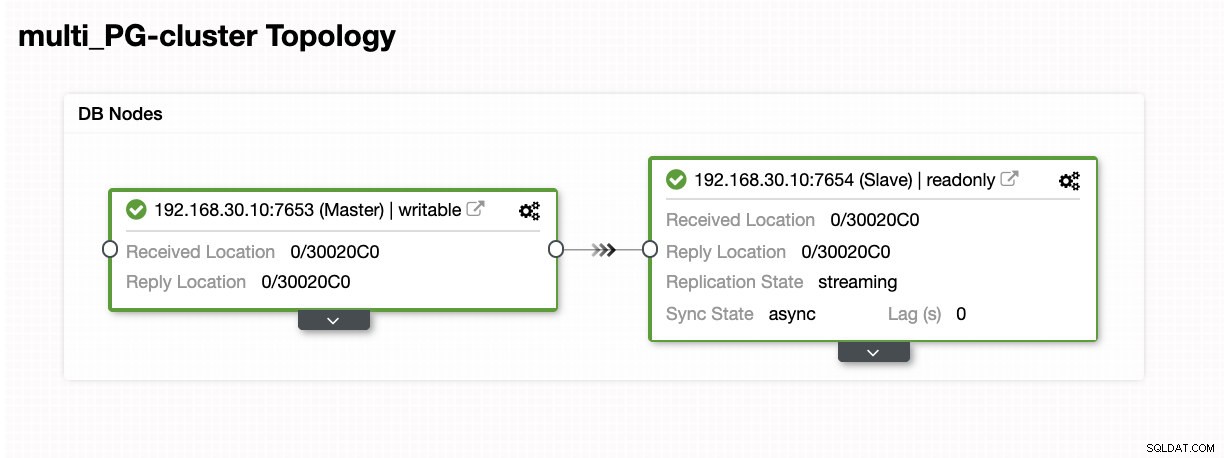
11 main 5432 online postgres /var/lib/postgresql/11/main /var/log/postgresql/postgresql-11-main.logइसके अलावा, तार्किक प्रतिकृति समूहों के लिए मेट्रिक्स नीचे देखे गए हैं:
एक एकल होस्ट में मल्टी-पोस्टग्रेएसक्यूएल रनिंग इंस्टेंस में स्लेव को बढ़ावा देना
एकल होस्ट में मल्टी-पोस्टग्रेएसक्यूएल रनिंग इंस्टेंस के लिए स्लेव प्रमोशन आसान है। जैसा कि आप नीचे देख सकते हैं, इस प्रकार का वातावरण ClusterControl द्वारा नियंत्रित किए जाने पर त्रुटिपूर्ण ढंग से काम करता है।
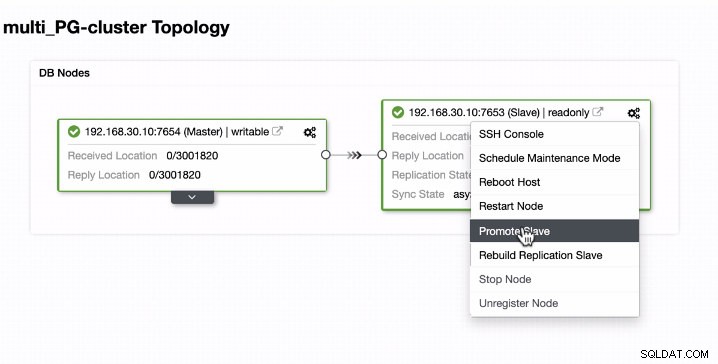
अब, देखते हैं कि बैकग्राउंड में क्या होता है जबकि ClusterControl स्लेव को बढ़ावा देता है। नौकरी का पूरा विवरण और विवरण देखें
[09:01:02]:Successfully promoted a new master.
[09:01:02]:<em style='color: #1abc9c;'>192.168.30.10</em>:7653: promote finished (this is the new master).
[09:01:02]:Servers after promote:
<em style='color: #1abc9c;'>192.168.30.10</em>:7653:
• Role: master (slaves: 1)
• Status: CmonHostOnline (NODE_CONNECTED)
• Receive/replay: 0/30020C0; 0/30020C0
<em style='color: #1abc9c;'>192.168.30.10</em>:7654:
• Role: slave (slaves: 0)
• Status: CmonHostOnline (NODE_CONNECTED)
• Receive/replay: 0/30020C0; 0/30020C0
• Master: 192.168.30.10:7653
[09:01:02]:<em style='color: #1abc9c;'>192.168.30.10</em>:7654: Restarted with new master.
[09:01:02]:<em style='color: #1abc9c;'>192.168.30.10</em>:7654: Started PostgreSQL.
[09:00:53]:<em style='color: #1abc9c;'>192.168.30.10</em>: done
server started
[09:00:53]:<em style='color: #1abc9c;'>192.168.30.10</em>: waiting for server to start....
[09:00:52]:<em style='color: #1abc9c;'>192.168.30.10</em>:7654: Executing: su - postgres -c '/usr/lib/postgresql/9.6/bin/pg_ctl start -w -o "-p 7654" --pgdata=/etc/postgresql/9.6/multi_pg/ --log /var/log/postgresql/postgresql-11-main.log'
[09:00:51]:192.168.30.10:7654: Start postgreSQL node.
[09:00:51]:<em style='color: #1abc9c;'>192.168.30.10</em>:7654: Starting PostgreSQL.
[09:00:51]:<em style='color: #1abc9c;'>192.168.30.10</em>:7654: Successfully created '<em style='color: #109602;'>/data/pgsql/master/data/recovery.conf</em>'.
[09:00:50]:<em style='color: #1abc9c;'>192.168.30.10</em>:7654: Creating '<em style='color: #109602;'>/data/pgsql/master/data/recovery.conf</em>': Setting <em style='color: #1abc9c;'>192.168.30.10</em>:7653 as master.
[09:00:50]:<em style='color: #1abc9c;'>192.168.30.10</em>: servers diverged at WAL position 0/3001890 on timeline 1
no rewind required
[09:00:49]:Running /usr/lib/postgresql/9.6/bin/pg_rewind --target-pgdata=/data/pgsql/master/data --source-server="host=192.168.30.10 port=7653 user=dbapgadmin password=***** dbname=postgres"
[09:00:47]:<em style='color: #1abc9c;'>192.168.30.10</em>:7653: Granting host (<em style='color: #1abc9c;'>192.168.30.10</em>:7654).
[09:00:45]:<em style='color: #1abc9c;'>192.168.30.10</em>:7654: Stopped PostgreSQL.
[09:00:38]:<em style='color: #1abc9c;'>192.168.30.10</em>:7654: Waiting to stop.
[09:00:38]:192.168.30.10:7654: node is already stopped. No need to stop it.
[09:00:38]:192.168.30.10:7654: Stop postgreSQL node.
[09:00:38]:<em style='color: #1abc9c;'>192.168.30.10</em>:7654: Stopping PostgreSQL.
[09:00:38]:Switching slaves to the new master.
[09:00:38]:<em style='color: #1abc9c;'>192.168.30.10</em>:7653: Became master, ok.
[09:00:37]:<em style='color: #1abc9c;'>192.168.30.10</em>:7653: Waiting to become a master.
[09:00:37]:<em style='color: #1abc9c;'>192.168.30.10</em>: server promoting
[09:00:36]:<em style='color: #1abc9c;'>192.168.30.10</em>:7653: Attempting to promote using <strong style='color: #59a449;'>pg_ctl</strong>.
[09:00:36]:<em style='color: #1abc9c;'>192.168.30.10</em>:7653: Promoting host.
[09:00:35]:<em style='color: #1abc9c;'>192.168.30.10</em>:7654: Stopped PostgreSQL.
[09:00:28]:<em style='color: #1abc9c;'>192.168.30.10</em>:7654: Waiting to stop.
[09:00:28]:<em style='color: #1abc9c;'>192.168.30.10</em>: done
server stopped
[09:00:28]:<em style='color: #1abc9c;'>192.168.30.10</em>: waiting for server to shut down....
[09:00:27]:<em style='color: #1abc9c;'>192.168.30.10</em>:7654: Executing: su - postgres -c '/usr/lib/postgresql/9.6/bin/pg_ctl stop --pgdata=/etc/postgresql/9.6/multi_pg/'
[09:00:26]:192.168.30.10:7654: Stop postgreSQL node.
[09:00:26]:<em style='color: #1abc9c;'>192.168.30.10</em>:7654: Stopping PostgreSQL.
[09:00:26]:<em style='color: #1abc9c;'>192.168.30.10</em>:7654: Stopping the current master.
[09:00:26]:Switching over to <em style='color: #1abc9c;'>192.168.30.10</em>:7653 (previous master is <em style='color: #1abc9c;'>192.168.30.10</em>:7654)
[09:00:26]:Servers:
<em style='color: #1abc9c;'>192.168.30.10</em>:7653:
• Role: slave (slaves: 0)
• Status: CmonHostOnline (NODE_CONNECTED)
• Receive/replay: 0/3001820; 0/3001820
• Master: 192.168.30.10:7654
<em style='color: #1abc9c;'>192.168.30.10</em>:7654:
• Role: master (slaves: 1)
• Status: CmonHostOnline (NODE_CONNECTED)
• Receive/replay: 0/3001820; 0/3001820
[09:00:26]:<em style='color: #1abc9c;'>192.168.30.10</em>:7653: Current master is <em style='color: #1abc9c;'>192.168.30.10</em>:7654.
[09:00:26]:<em style='color: #1abc9c;'>192.168.30.10</em>:7653: Promoting server to master.
Job spec: {
"command": "promote_replication_slave",
"group_id": 1,
"group_name": "admins",
"job_data":
{
"clusterId": "6",
"slave_address": "192.168.30.10:7653"
},
"user_id": 1,
"user_name": "example@sqldat.com"
}जैसा कि आप देख सकते हैं, इसे उसी होस्ट पर भी आसानी से संभाला गया था। टोपोलॉजी परिणाम से पता चलता है कि इसे सफलतापूर्वक प्रचारित किया गया है।
निष्कर्ष
हम ClusterControl 1.7.3 की रिलीज़ को लेकर उत्साहित हैं, यह सोचते हैं कि इसमें बहुत कुछ है। हमें यह भी लगता है कि एक ही होस्ट फीचर पर चलने वाला यह नया मल्टी-पोस्टग्रेएसक्यूएल इंस्टेंस पोस्टग्रेएसक्यूएल के लिए हमारे समग्र समर्थन को बेहतर बनाने में एक और अच्छा कदम है। इसे आज़माएं और हमें बताएं कि इस नई सुविधा के बारे में आपके क्या विचार हैं।