मूल रूप से @ https://codeanddeploy.com पर पोस्ट किया गया और नमूना कोड डाउनलोड करें:
https://codeanddeploy.com/blog/laravel/complete-laravel-8-soft-delete-restore-deleted-records-tutorial
इस पोस्ट में, मैं आपके साथ एक संपूर्ण लारवेल 8 सॉफ्ट डिलीट और हटाए गए रिकॉर्ड्स को पुनर्स्थापित करें . साझा करूंगा ट्यूटोरियल। लारवेल में सीआरयूडी संचालन विकसित करते समय कभी-कभी हमें सॉफ्ट डिलीट को लागू करने की आवश्यकता होती है। ताकि यदि हमने विशिष्ट रिकॉर्ड को गलत तरीके से हटा दिया है तो हम उन्हें आसानी से पुनर्स्थापित कर सकते हैं। इसलिए यह महत्वपूर्ण है और हमारे Laravel एप्लिकेशन में मौजूद होना चाहिए।

इस लेख में, आप लारवेल सॉफ्ट डिलीट के साथ एक पूर्ण कार्यान्वयन सीखेंगे और उदाहरण के साथ हटाए गए रिकॉर्ड को कैसे पुनर्स्थापित करें।
चरण 1:लारवेल इंस्टालेशन
यदि आपके पास अपने स्थानीय में Laravel 8 इंस्टॉल नहीं है, तो नीचे दिए गए कमांड को चलाएँ:
composer create-project --prefer-dist laravel/laravel laravel-soft-delete
ऊपर किए जाने के बाद हमें लारवेल कलेक्टिव पैकेज, . को स्थापित करने की आवश्यकता है नीचे निम्न आदेश चलाएँ:
composer require laravelcollective/html
चरण 2:डेटाबेस कॉन्फ़िगरेशन
अगर आपका लारवेल प्रोजेक्ट ताजा है तो आपको अपने डेटाबेस क्रेडेंशियल्स को अपडेट करना होगा। अपने Laravel 8 प्रोजेक्ट में बस .env फ़ाइल खोलें।
.env
DB_CONNECTION=mysql
DB_HOST=127.0.0.1
DB_PORT=3306
DB_DATABASE=your_database_name_here
DB_USERNAME=your_database_username_here
DB_PASSWORD=your_database_password_here
चरण 3:माइग्रेशन सेटअप
आइए हमारे **लार्वेल सॉफ्ट डिलीट **उदाहरण प्रोजेक्ट के लिए माइग्रेशन बनाएं। इस उदाहरण में, हम उपयोगकर्ता की तालिका का उपयोग कर रहे हैं जो कि Laravel इंस्टॉलेशन में माइग्रेशन पहले से मौजूद है। तो हमें बस उस माइग्रेशन को संपादित करने की आवश्यकता है। नीचे अद्यतन कोड देखें:
<?php

use Illuminate\Database\Migrations\Migration;
use Illuminate\Database\Schema\Blueprint;
use Illuminate\Support\Facades\Schema;

class CreateUsersTable extends Migration
{
    /**
     * Run the migrations.
     *
     * @return void
     */
    public function up()
    {
        Schema::create('users', function (Blueprint $table) {
            $table->id();
            $table->string('name')->nullable();
            $table->string('email')->unique();
            $table->string('username')->unique();
            $table->timestamp('email_verified_at')->nullable();
            $table->string('password');
            $table->softDeletes();
            $table->rememberToken();
            $table->timestamps();
        });
    }

    /**
     * Reverse the migrations.
     *
     * @return void
     */
    public function down()
    {
        Schema::dropIfExists('users');
    }
}
जैसा कि आप देख सकते हैं कि हमने $table->softDeletes(); लार्वा सॉफ्ट डिलीट को लागू करने की विधि।
अब नीचे निम्न कमांड चलाते हैं:
php artisan migrate
चरण 4:रूट सेट करना
मेरे उदाहरण में, मैं मैन्युअल रूप से अपने क्रूड मार्ग बनाउंगा। बस "मार्ग/web.php" खोलें फ़ाइल और निम्नलिखित मार्ग जोड़ें।
<?php

use Illuminate\Support\Facades\Route;

/*
|--------------------------------------------------------------------------
| Web Routes
|--------------------------------------------------------------------------
|
| Here is where you can register web routes for your application. These
| routes are loaded by the RouteServiceProvider within a group which
| contains the "web" middleware group. Now create something great!
|
*/

Route::group(['namespace' => 'App\Http\Controllers'], function()
{
    /**
     * Home Routes
     */
    Route::get('/', 'HomeController@index')->name('home.index');

    Route::group(['prefix' => 'users'], function() {
        Route::get('/', 'UsersController@index')->name('users.index');
        Route::get('/create', 'UsersController@create')->name('users.create');
        Route::post('/create', 'UsersController@store')->name('users.store');
        Route::get('/{user}/show', 'UsersController@show')->name('users.show');
        Route::get('/{user}/edit', 'UsersController@edit')->name('users.edit');
        Route::patch('/{user}/update', 'UsersController@update')->name('users.update');
        Route::delete('/{user}/delete', 'UsersController@destroy')->name('users.destroy');
        Route::post('/{user}/restore', 'UsersController@restore')->name('users.restore');
        Route::delete('/{user}/force-delete', 'UsersController@forceDelete')->name('users.force-delete');
        Route::post('/restore-all', 'UsersController@restoreAll')->name('users.restore-all');
    });
});
जैसा कि आप देख सकते हैं कि हमने रिस्टोर, फोर्स-डिलीट और रिस्टोर-ऑल रूट्स जोड़े हैं। आप इन मार्गों के लिए हमारा नियंत्रक कोड देखेंगे।
चरण 5:हमारे सॉफ्ट डिलीट के लिए मॉडल सेट करना
जैसा कि आप नीचे देख सकते हैं, हमने उपयोग Illuminate\Database\Eloquent\SoftDeletes; वर्ग और हमारे उपयोगकर्ता मॉडल में इसका इस्तेमाल करते हैं।
<?php

namespace App\Models;

use Illuminate\Contracts\Auth\MustVerifyEmail;
use Illuminate\Database\Eloquent\Factories\HasFactory;
use Illuminate\Foundation\Auth\User as Authenticatable;
use Illuminate\Notifications\Notifiable;
use Laravel\Sanctum\HasApiTokens;
use Illuminate\Database\Eloquent\SoftDeletes;


class User extends Authenticatable
{
    use HasApiTokens, HasFactory, Notifiable, SoftDeletes;

    /**
     * The database table used by the model.
     *
     * @var string
     */
    protected $table = 'users';

    /**
     * The attributes that are mass assignable.
     *
     * @var array
     */
    protected $fillable = [
        'name',
        'email',
        'username',
        'password',
    ];

    /**
     * The attributes that should be hidden for arrays.
     *
     * @var array
     */
    protected $hidden = [
        'password',
        'remember_token',
    ];

    /**
     * The attributes that should be cast to native types.
     *
     * @var array
     */
    protected $casts = [
        'email_verified_at' => 'datetime',
    ];

    /**
     * The attributes that should be mutated to dates.
     *
     * @var array
     */
    protected $dates = ['deleted_at'];

    /**
     * Always encrypt password when it is updated.
     *
     * @param $value
     * @return string
     */
    public function setPasswordAttribute($value)
    {
        $this->attributes['password'] = bcrypt($value);
    }
}
चरण 6:Laravel सॉफ्ट डिलीट और हटाए गए रिकॉर्ड्स नियंत्रक विधियों को पुनर्स्थापित करें
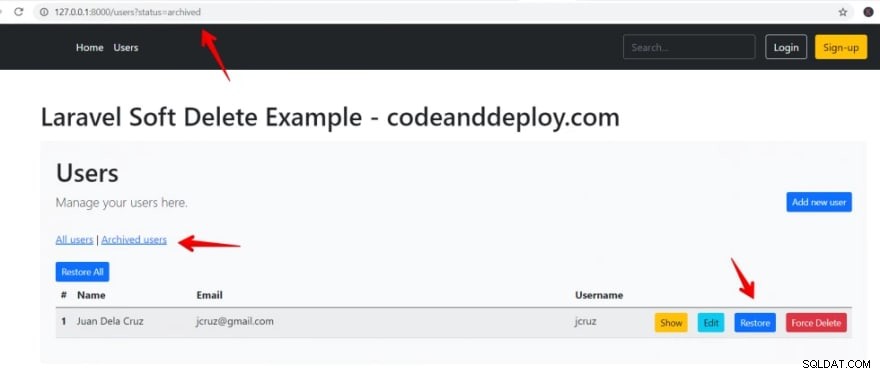
UserController.php के अंदर अनुक्रमणिका विधि जैसा कि आप देख सकते हैं मैंने जांच की है कि अनुरोध से संग्रहीत मूल्य के साथ कोई स्थिति है या नहीं और विधि को कॉल करें $users->onlyTrashed() ताकि केवल सॉफ्ट डिलीट को ही सूचियों में दिखाया जाएगा।
/**
 * Display all users
 *
 * @return \Illuminate\Http\Response
 */
public function index(Request $request)
{
    $users = User::latest();

    if($request->get('status') == 'archived') {
        $users = $users->onlyTrashed();
    }

    $users = $users->paginate(10);

    return view('users.index', compact('users'));
}
UserController.php के अंदर इस विधि में मैंने withTrashed () . को कॉल किया और पुनर्स्थापित करें () यह हमें हटाए गए रिकॉर्ड को पुनर्स्थापित करने की अनुमति देगा।
/**
 *  Restore user data
 *
 * @param User $user
 *
 * @return \Illuminate\Http\Response
 */
public function restore($id)
{
    User::where('id', $id)->withTrashed()->restore();

    return redirect()->route('users.index', ['status' => 'archived'])
        ->withSuccess(__('User restored successfully.'));
}
यह forceDelete () . का उपयोग करके ट्रैश किए गए रिकॉर्ड को हटाने के लिए मजबूर करने का कार्यान्वयन है तरीका।
/**
 * Force delete user data
 *
 * @param User $user
 *
 * @return \Illuminate\Http\Response
 */
public function forceDelete($id)
{
    User::where('id', $id)->withTrashed()->forceDelete();

    return redirect()->route('users.index', ['status' => 'archived'])
        ->withSuccess(__('User force deleted successfully.'));
}
इस क्रिया में, हमने onlyTrashed() . को कॉल किया और पुनर्स्थापित करें () तरीके ताकि हम सभी ट्रैश किए गए रिकॉर्ड को पुनर्स्थापित कर सकें।
/**
 * Restore all archived users
 *
 * @param User $user
 *
 * @return \Illuminate\Http\Response
 */
public function restoreAll()
{
    User::onlyTrashed()->restore();

    return redirect()->route('users.index')->withSuccess(__('All users restored successfully.'));
}
चरण 7:Laravel सॉफ्ट डिलीट यूजर कंट्रोलर
नीचे हमारे UserController.php के लिए Laravel 8 सॉफ्ट डिलीट और हटाए गए रिकॉर्ड को पुनर्स्थापित करने के कार्यान्वयन के साथ पूरा कोड दिया गया है।
<?php

namespace App\Http\Controllers;

use App\Models\User;
use Illuminate\Http\Request;
use App\Http\Requests\StoreUserRequest;
use App\Http\Requests\UpdateUserRequest;

class UsersController extends Controller
{
    /**
     * Display all users
     *
     * @return \Illuminate\Http\Response
     */
    public function index(Request $request)
    {
        $users = User::latest();

        if($request->get('status') == 'archived') {
            $users = $users->onlyTrashed();
        }

        $users = $users->paginate(10);

        return view('users.index', compact('users'));
    }

    /**
     * Show form for creating user
     *
     * @return \Illuminate\Http\Response
     */
    public function create()
    {
        return view('users.create');
    }

    /**
     * Store a newly created user
     *
     * @param User $user
     * @param StoreUserRequest $request
     *
     * @return \Illuminate\Http\Response
     */
    public function store(User $user, StoreUserRequest $request)
    {
        //For demo purposes only. When creating user or inviting a user
        // you should create a generated random password and email it to the user
        $user->create(array_merge($request->validated(), [
            'password' => 'test'
        ]));

        return redirect()->route('users.index')
            ->withSuccess(__('User created successfully.'));
    }

    /**
     * Show user data
     *
     * @param User $user
     *
     * @return \Illuminate\Http\Response
     */
    public function show(User $user)
    {
        return view('users.show', [
            'user' => $user
        ]);
    }

    /**
     * Edit user data
     *
     * @param User $user
     *
     * @return \Illuminate\Http\Response
     */
    public function edit(User $user)
    {
        return view('users.edit', [
            'user' => $user
        ]);
    }

    /**
     * Update user data
     *
     * @param User $user
     * @param UpdateUserRequest $request
     *
     * @return \Illuminate\Http\Response
     */
    public function update(User $user, UpdateUserRequest $request)
    {
        $user->update($request->validated());

        return redirect()->route('users.index')
            ->withSuccess(__('User updated successfully.'));
    }

    /**
     * Delete user data
     *
     * @param User $user
     *
     * @return \Illuminate\Http\Response
     */
    public function destroy(User $user)
    {
        $user->delete();

        return redirect()->route('users.index')
            ->withSuccess(__('User deleted successfully.'));
    }

    /**
     *  Restore user data
     *
     * @param User $user
     *
     * @return \Illuminate\Http\Response
     */
    public function restore($id)
    {
        User::where('id', $id)->withTrashed()->restore();

        return redirect()->route('users.index', ['status' => 'archived'])
            ->withSuccess(__('User restored successfully.'));
    }

    /**
     * Force delete user data
     *
     * @param User $user
     *
     * @return \Illuminate\Http\Response
     */
    public function forceDelete($id)
    {
        User::where('id', $id)->withTrashed()->forceDelete();

        return redirect()->route('users.index', ['status' => 'archived'])
            ->withSuccess(__('User force deleted successfully.'));
    }

    /**
     * Restore all archived users
     *
     * @param User $user
     *
     * @return \Illuminate\Http\Response
     */
    public function restoreAll()
    {
        User::onlyTrashed()->restore();

        return redirect()->route('users.index')->withSuccess(__('All users restored successfully.'));
    }
}
चरण 8:इंडेक्स ब्लेड व्यू
हमारे index.blade.php के बारे में नीचे दिया गया कोड जिसे हम Laravel सॉफ्ट डिलीट इंप्लीमेंटेशन को कोड करते हैं।
@extends('layouts.app-master')

@section('content')

    <h1 class="mb-3">Laravel Soft Delete Example - codeanddeploy.com</h1>

    <div class="bg-light p-4 rounded">
        <h1>Users</h1>
        <div class="lead">
            Manage your users here.
            <a href="{{ route('users.create') }}" class="btn btn-primary btn-sm float-right">Add new user</a>
        </div>

        <div class="mt-2">
            @include('layouts.partials.messages')

            <br>
            <a href="/users">All users</a> | <a href="/users?status=archived">Archived users</a>

            <br><br>
            @if(request()->get('status') == 'archived')
                {!! Form::open(['method' => 'POST','route' => ['users.restore-all'],'style'=>'display:inline']) !!}
                {!! Form::submit('Restore All', ['class' => 'btn btn-primary btn-sm']) !!}
                {!! Form::close() !!}
            @endif
        </div>

        <table class="table table-striped">
            <thead>
            <tr>
                <th scope="col" width="1%">#</th>
                <th scope="col" width="15%">Name</th>
                <th scope="col">Email</th>
                <th scope="col" width="10%">Username</th>
                <th scope="col" width="1%" colspan="4"></th>
            </tr>
            </thead>
            <tbody>
                @foreach($users as $user)
                    <tr>
                        <th scope="row">{{ $user->id }}</th>
                        <td>{{ $user->name }}</td>
                        <td>{{ $user->email }}</td>
                        <td>{{ $user->username }}</td>
                        <td><a href="{{ route('users.show', $user->id) }}" class="btn btn-warning btn-sm">Show</a></td>
                        <td><a href="{{ route('users.edit', $user->id) }}" class="btn btn-info btn-sm">Edit</a></td>
                        <td>
                            @if(request()->get('status') == 'archived')
                                {!! Form::open(['method' => 'POST','route' => ['users.restore', $user->id],'style'=>'display:inline']) !!}
                                {!! Form::submit('Restore', ['class' => 'btn btn-primary btn-sm']) !!}
                                {!! Form::close() !!}
                            @else
                                {!! Form::open(['method' => 'DELETE','route' => ['users.destroy', $user->id],'style'=>'display:inline']) !!}
                                {!! Form::submit('Delete', ['class' => 'btn btn-danger btn-sm']) !!}
                                {!! Form::close() !!}
                            @endif
                        </td>
                        <td>
                            @if(request()->get('status') == 'archived')
                                {!! Form::open(['method' => 'DELETE','route' => ['users.force-delete', $user->id],'style'=>'display:inline']) !!}
                                {!! Form::submit('Force Delete', ['class' => 'btn btn-danger btn-sm']) !!}
                                {!! Form::close() !!}
                            @endif
                        </td>
                    </tr>
                @endforeach
            </tbody>
        </table>

        <div class="d-flex">
            {!! $users->links() !!}
        </div>

    </div>
@endsection
अब आपके पास हटाए गए रिकॉर्ड को पुनर्स्थापित करने सहित लारवेल सॉफ्ट डिलीट के लिए पूर्ण कार्यान्वयन है।
मुझे उम्मीद है कि यह ट्यूटोरियल आपकी मदद कर सकता है। अगर आप इस कोड को डाउनलोड करना चाहते हैं तो कृपया यहां https://codeanddeploy.com/blog/laravel/complete-laravel-8-soft-delete-restore-deleted-records-tutorial पर जाएं।
हैप्पी कोडिंग :)


