MySQL आज बाजार में सबसे लोकप्रिय डेटाबेस मैनेजमेंट सिस्टम (DBMS) में से एक है। यह इस साल की डीबी-इंजन रैंकिंग में ओरेकल डीबीएमएस के बाद दूसरे स्थान पर है। चूंकि अधिकांश सॉफ़्टवेयर अनुप्रयोगों को किसी न किसी रूप में डेटा के साथ सहभागिता करने की आवश्यकता होती है, इसलिए पायथन जैसी प्रोग्रामिंग भाषाएं इन डेटा स्रोतों को संग्रहीत करने और उन तक पहुंचने के लिए उपकरण प्रदान करती हैं।
इस ट्यूटोरियल में चर्चा की गई तकनीकों का उपयोग करके, आप एक MySQL डेटाबेस को पायथन एप्लिकेशन के साथ कुशलतापूर्वक एकीकृत करने में सक्षम होंगे। आप मूवी रेटिंग सिस्टम के लिए एक छोटा MySQL डेटाबेस विकसित करेंगे और सीधे अपने पायथन कोड से इसे क्वेरी करना सीखेंगे।
इस ट्यूटोरियल के अंत तक, आप निम्न में सक्षम होंगे:
- MySQL की अनूठी विशेषताओं की पहचान करें
- अपना एप्लिकेशन कनेक्ट करें एक MySQL डेटाबेस के लिए
- डेटाबेस से आवश्यक डेटा प्राप्त करने के लिए
- अपवादों को संभालें जो डेटाबेस तक पहुँचने के दौरान होता है
- सर्वोत्तम प्रथाओं का उपयोग करें डेटाबेस एप्लिकेशन बनाते समय
इस ट्यूटोरियल का अधिक से अधिक लाभ उठाने के लिए, आपको for . जैसी पायथन अवधारणाओं का कार्यसाधक ज्ञान होना चाहिए लूप्स, फंक्शन्स, एक्सेप्शन हैंडलिंग, और pip . का उपयोग करके पायथन पैकेज को इंस्टाल करना . आपको रिलेशनल डेटाबेस मैनेजमेंट सिस्टम और SQL क्वेरी जैसे SELECT . की बुनियादी समझ भी होनी चाहिए , DROP , CREATE , और JOIN ।
निःशुल्क डाउनलोड: पायथन ट्रिक्स से एक नमूना अध्याय प्राप्त करें:वह पुस्तक जो आपको सरल उदाहरणों के साथ पायथन की सर्वोत्तम प्रथाओं को दिखाती है जिसे आप और अधिक सुंदर + पाइथोनिक कोड लिखने के लिए तुरंत लागू कर सकते हैं।
MySQL की तुलना अन्य SQL डेटाबेस से करना
एसक्यूएल संरचित क्वेरी भाषा के लिए खड़ा है और रिलेशनल डेटाबेस के प्रबंधन के लिए व्यापक रूप से उपयोग की जाने वाली प्रोग्रामिंग भाषा है। आपने एसक्यूएल-आधारित डीबीएमएस के विभिन्न स्वादों के बारे में सुना होगा। सबसे लोकप्रिय लोगों में MySQL, PostgreSQL, SQLite और SQL सर्वर शामिल हैं। ये सभी डेटाबेस SQL मानकों के अनुरूप हैं लेकिन अनुपालन की अलग-अलग डिग्री के साथ हैं।
ओपन सोर्स होने के नाते 1995 में अपनी स्थापना के बाद से, MySQL जल्दी ही SQL समाधानों के बीच एक मार्केट लीडर बन गया। MySQL भी Oracle पारिस्थितिकी तंत्र का एक हिस्सा है। जबकि इसकी मुख्य कार्यक्षमता पूरी तरह से मुफ़्त है, कुछ सशुल्क ऐड-ऑन भी हैं। वर्तमान में, MySQL का उपयोग Google, लिंक्डइन, उबर, नेटफ्लिक्स, ट्विटर और अन्य सहित सभी प्रमुख तकनीकी फर्मों द्वारा किया जाता है।
समर्थन के लिए एक बड़े ओपन सोर्स समुदाय के अलावा, MySQL की सफलता के कई अन्य कारण भी हैं:
-
इंस्टॉलेशन में आसानी: MySQL को उपयोगकर्ता के अनुकूल होने के लिए डिज़ाइन किया गया था। MySQL डेटाबेस सेट करना काफी आसान है, और कई व्यापक रूप से उपलब्ध तृतीय-पक्ष टूल, जैसे phpMyAdmin, सेटअप प्रक्रिया को और सुव्यवस्थित करते हैं। MySQL विंडोज, मैकओएस, लिनक्स और सोलारिस सहित सभी प्रमुख ऑपरेटिंग सिस्टम के लिए उपलब्ध है।
-
गति: MySQL अत्यधिक तेज़ डेटाबेस समाधान होने के लिए एक प्रतिष्ठा रखता है। इसका एक अपेक्षाकृत छोटा पदचिह्न है और लंबे समय में अत्यंत मापनीय है।
-
उपयोगकर्ता विशेषाधिकार और सुरक्षा: MySQL एक स्क्रिप्ट के साथ आता है जो आपको पासवर्ड सुरक्षा स्तर सेट करने, व्यवस्थापक पासवर्ड असाइन करने और उपयोगकर्ता खाता विशेषाधिकार जोड़ने और हटाने की अनुमति देता है। यह स्क्रिप्ट वेब होस्टिंग उपयोगकर्ता प्रबंधन पोर्टल के लिए व्यवस्थापक प्रक्रिया को सरल बनाती है। अन्य डीबीएमएस, जैसे पोस्टग्रेएसक्यूएल, कॉन्फिग फाइलों का उपयोग करते हैं जो उपयोग करने के लिए अधिक जटिल हैं।
जबकि MySQL अपनी गति और उपयोग में आसानी के लिए प्रसिद्ध है, आप PostgreSQL के साथ अधिक उन्नत सुविधाएँ प्राप्त कर सकते हैं। साथ ही, MySQL पूरी तरह से SQL के अनुरूप नहीं है और इसकी कुछ कार्यात्मक सीमाएँ हैं, जैसे FULL JOIN के लिए कोई समर्थन नहीं है। खंड।
आपको MySQL में समवर्ती पढ़ने और लिखने के साथ कुछ समस्याओं का भी सामना करना पड़ सकता है। यदि आपके सॉफ़्टवेयर में एक साथ कई उपयोगकर्ता डेटा लिख रहे हैं, तो PostgreSQL अधिक उपयुक्त विकल्प हो सकता है।
नोट: वास्तविक दुनिया के संदर्भ में MySQL और PostgreSQL की अधिक गहराई से तुलना करने के लिए, देखें कि Uber Engineering ने Postgres से MySQL में स्विच क्यों किया।
SQL सर्वर भी एक बहुत ही लोकप्रिय DBMS है और अपनी विश्वसनीयता, दक्षता और सुरक्षा के लिए जाना जाता है। यह कंपनियों द्वारा पसंद किया जाता है, विशेष रूप से बैंकिंग डोमेन में, जो नियमित रूप से बड़े ट्रैफिक वर्कलोड से निपटते हैं। यह एक व्यावसायिक समाधान है और उन प्रणालियों में से एक है जो विंडोज सेवाओं के साथ सबसे अधिक संगत हैं।
2010 में, जब Oracle ने Sun Microsystems और MySQL का अधिग्रहण किया, तो कई लोग MySQL के भविष्य को लेकर चिंतित थे। उस समय, Oracle MySQL का सबसे बड़ा प्रतियोगी था। डेवलपर्स को डर था कि यह MySQL को नष्ट करने के उद्देश्य से Oracle का एक शत्रुतापूर्ण अधिग्रहण था।
MySQL के मूल लेखक माइकल विडेनियस के नेतृत्व में कई डेवलपर्स ने MySQL कोड बेस का एक कांटा बनाया और मारियाडीबी की नींव रखी। इसका उद्देश्य MySQL तक सुरक्षित पहुंच और इसे हमेशा के लिए मुक्त रखना था।
आज तक, मारियाडीबी पूरी तरह से जीपीएल लाइसेंस प्राप्त है, इसे पूरी तरह से सार्वजनिक डोमेन में रखते हुए। दूसरी ओर, MySQL की कुछ सुविधाएँ केवल सशुल्क लाइसेंस के साथ उपलब्ध हैं। इसके अलावा, मारियाडीबी कई अत्यंत उपयोगी सुविधाएँ प्रदान करता है जो MySQL सर्वर द्वारा समर्थित नहीं हैं, जैसे वितरित SQL और स्तंभ भंडारण। आप मारियाडीबी की वेबसाइट पर सूचीबद्ध MySQL और MariaDB के बीच अधिक अंतर पा सकते हैं।
MySQL मानक SQL के समान सिंटैक्स का उपयोग करता है। हालांकि, आधिकारिक दस्तावेज़ीकरण में कुछ उल्लेखनीय अंतरों का उल्लेख किया गया है।
MySQL सर्वर और MySQL कनेक्टर/पायथन स्थापित करना
अब, इस ट्यूटोरियल के माध्यम से काम करना शुरू करने के लिए, आपको दो चीजें सेट करने की आवश्यकता है:एक MySQL सर्वर और एक MySQL कनेक्टर . MySQL सर्वर आपके डेटाबेस को संभालने के लिए आवश्यक सभी सेवाएँ प्रदान करेगा। एक बार सर्वर के चालू और चलने के बाद, आप MySQL Connector/Python का उपयोग करके अपने Python एप्लिकेशन को इससे कनेक्ट कर सकते हैं।
MySQL सर्वर स्थापित करना
आधिकारिक दस्तावेज MySQL सर्वर को डाउनलोड और इंस्टॉल करने के अनुशंसित तरीके का विवरण देता है। आपको विंडोज़, मैकोज़, सोलारिस, लिनक्स, और कई अन्य सहित सभी लोकप्रिय ऑपरेटिंग सिस्टम के लिए निर्देश मिलेंगे।
विंडोज के लिए, सबसे अच्छा तरीका है कि आप MySQL इंस्टालर को डाउनलोड करें और इसे पूरी प्रक्रिया का ध्यान रखने दें। इंस्टॉलेशन मैनेजर आपको MySQL सर्वर की सुरक्षा सेटिंग्स को कॉन्फ़िगर करने में भी मदद करता है। खाते और भूमिका पृष्ठ पर, आपको रूट . के लिए एक पासवर्ड दर्ज करना होगा (व्यवस्थापक) खाता और वैकल्पिक रूप से अलग-अलग विशेषाधिकार वाले अन्य उपयोगकर्ताओं को भी जोड़ें:
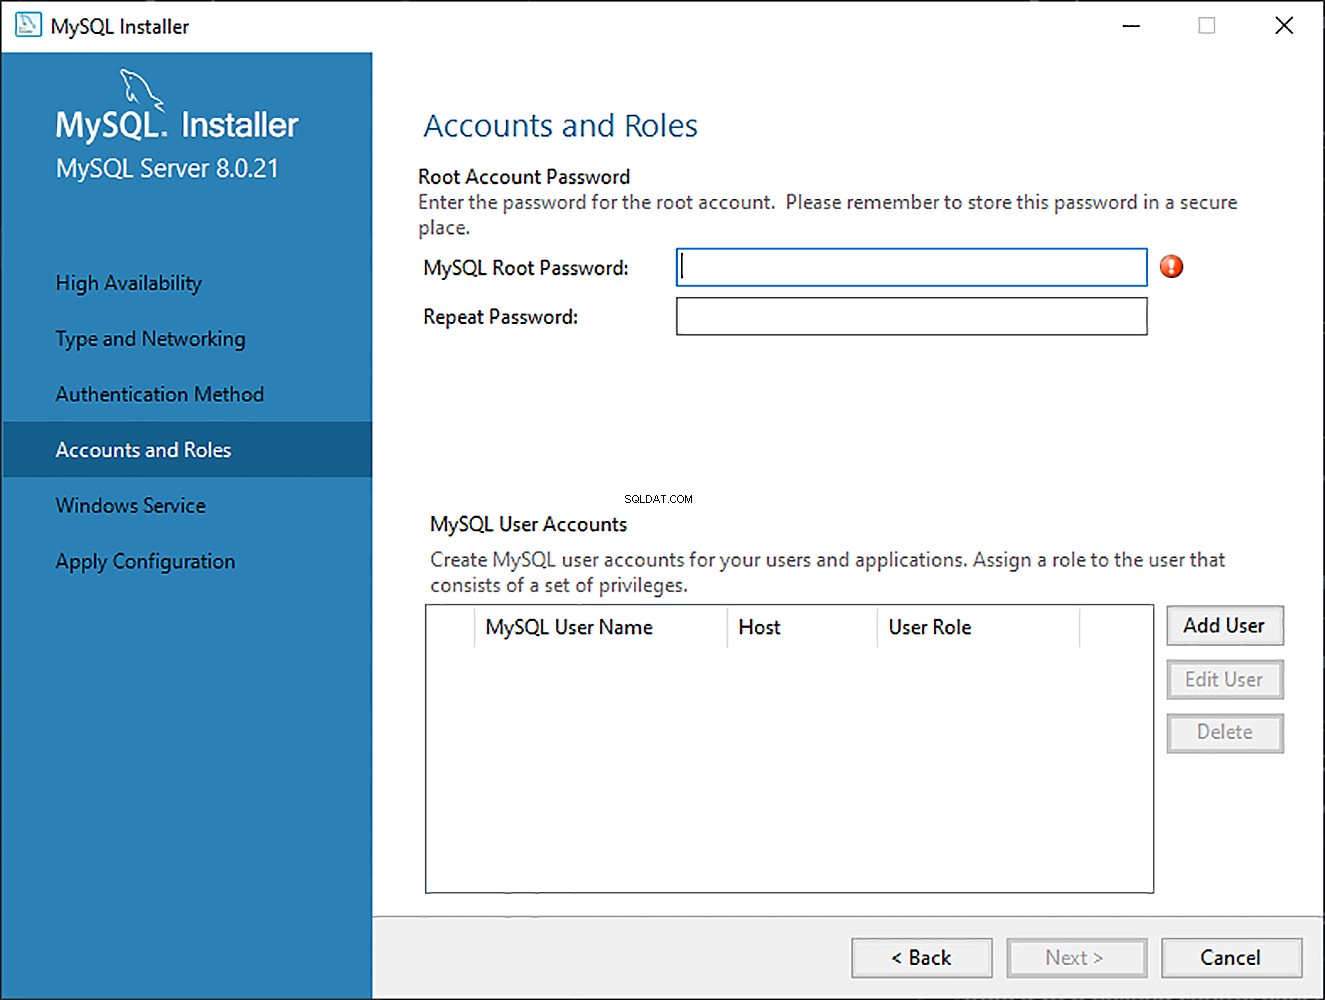
जबकि आपको सेटअप के दौरान रूट खाते के लिए क्रेडेंशियल निर्दिष्ट करना होगा, आप बाद में इन सेटिंग्स को संशोधित कर सकते हैं।
नोट: होस्टनाम, उपयोगकर्ता नाम और पासवर्ड याद रखें क्योंकि बाद में MySQL सर्वर के साथ कनेक्शन स्थापित करने के लिए इनकी आवश्यकता होगी।
यद्यपि आपको इस ट्यूटोरियल के लिए केवल MySQL सर्वर की आवश्यकता है, आप इन इंस्टालर का उपयोग करके अन्य सहायक टूल जैसे MySQL वर्कबेंच भी सेट कर सकते हैं। यदि आप MySQL को सीधे अपने ऑपरेटिंग सिस्टम में स्थापित नहीं करना चाहते हैं, तो डॉकर के साथ Linux पर MySQL को परिनियोजित करना एक सुविधाजनक विकल्प है।
MySQL कनेक्टर/पायथन स्थापित करना
एक डेटाबेस ड्राइवर सॉफ्टवेयर का एक टुकड़ा है जो किसी एप्लिकेशन को डेटाबेस सिस्टम से कनेक्ट और इंटरैक्ट करने की अनुमति देता है। किसी विशिष्ट विक्रेता के डेटाबेस से बात करने से पहले पायथन जैसी प्रोग्रामिंग भाषाओं को एक विशेष ड्राइवर की आवश्यकता होती है।
ये ड्राइवर आमतौर पर तृतीय-पक्ष मॉड्यूल के रूप में प्राप्त किए जाते हैं। पायथन डेटाबेस एपीआई (डीबी-एपीआई) मानक इंटरफ़ेस को परिभाषित करता है जिसके साथ सभी पायथन डेटाबेस ड्राइवरों का पालन करना चाहिए। ये विवरण पीईपी 249 में प्रलेखित हैं। सभी पायथन डेटाबेस ड्राइवर, जैसे कि SQLite के लिए sqlite3, PostgreSQL के लिए psycopg, और MySQL के लिए MySQL कनेक्टर/पायथन, इन कार्यान्वयन नियमों का पालन करें।
नोट: MySQL का आधिकारिक दस्तावेज कनेक्टर शब्द का उपयोग करता है ड्राइवर . के बजाय . तकनीकी रूप से, कनेक्टर केवल डेटाबेस से कनेक्ट होने से जुड़े होते हैं, इसके साथ इंटरैक्ट नहीं करते हैं। हालांकि, इस शब्द का प्रयोग अक्सर संपूर्ण डेटाबेस एक्सेस मॉड्यूल के लिए किया जाता है जिसमें कनेक्टर शामिल होता है और ड्राइवर।
दस्तावेज़ीकरण के साथ निरंतरता बनाए रखने के लिए, आपको कनेक्टर . शब्द दिखाई देगा जब भी MySQL का उल्लेख किया जाता है।
कई लोकप्रिय प्रोग्रामिंग भाषाओं का अपना डेटाबेस एपीआई होता है। उदाहरण के लिए, जावा में जावा डेटाबेस कनेक्टिविटी (JDBC) API है। यदि आपको जावा एप्लिकेशन को MySQL डेटाबेस से कनेक्ट करने की आवश्यकता है, तो आपको MySQL JDBC कनेक्टर का उपयोग करने की आवश्यकता है, जो JDBC API का अनुसरण करता है।
इसी तरह, पायथन में आपको एक MySQL डेटाबेस के साथ बातचीत करने के लिए एक पायथन MySQL कनेक्टर स्थापित करने की आवश्यकता है। कई पैकेज डीबी-एपीआई मानकों का पालन करते हैं, लेकिन उनमें से सबसे लोकप्रिय MySQL कनेक्टर/पायथन है। आप इसे pip . से प्राप्त कर सकते हैं :
$ pip install mysql-connector-python
pip वर्तमान में सक्रिय वर्चुअल वातावरण में कनेक्टर को तृतीय-पक्ष मॉड्यूल के रूप में स्थापित करता है। यह अनुशंसा की जाती है कि आप सभी निर्भरताओं के साथ परियोजना के लिए एक अलग आभासी वातावरण स्थापित करें।
यह जांचने के लिए कि क्या इंस्टॉलेशन सफल रहा, अपने पायथन टर्मिनल पर निम्न कमांड टाइप करें:
>>>>>> import mysql.connector
यदि उपरोक्त कोड बिना किसी त्रुटि के निष्पादित होता है, तो mysql.connector स्थापित है और उपयोग के लिए तैयार है। यदि आपको कोई त्रुटि मिलती है, तो सुनिश्चित करें कि आप सही आभासी वातावरण में हैं और आप सही पायथन दुभाषिया का उपयोग कर रहे हैं।
सुनिश्चित करें कि आप सही mysql-connector-python . स्थापित कर रहे हैं पैकेज, जो एक शुद्ध-पायथन कार्यान्वयन है। mysql-connector . जैसे मिलते-जुलते नाम वाले लेकिन अब ह्रासित कनेक्टरों से सावधान रहें .
MySQL सर्वर के साथ कनेक्शन स्थापित करना
MySQL एक सर्वर-आधारित है डेटाबेस प्रबंधन प्रणाली। एक सर्वर में कई डेटाबेस हो सकते हैं। डेटाबेस के साथ इंटरैक्ट करने के लिए, आपको पहले सर्वर के साथ एक कनेक्शन स्थापित करना होगा। एक MySQL-आधारित डेटाबेस के साथ इंटरैक्ट करने वाले Python प्रोग्राम का सामान्य वर्कफ़्लो इस प्रकार है:
- MySQL सर्वर से कनेक्ट करें।
- नया डेटाबेस बनाएं।
- नए बनाए गए या मौजूदा डेटाबेस से कनेक्ट करें।
- SQL क्वेरी निष्पादित करें और परिणाम प्राप्त करें।
- यदि तालिका में कोई परिवर्तन किया जाता है तो डेटाबेस को सूचित करें।
- MySQL सर्वर से कनेक्शन बंद करें।
यह एक सामान्य वर्कफ़्लो है जो अलग-अलग एप्लिकेशन के आधार पर भिन्न हो सकता है। लेकिन एप्लिकेशन कुछ भी हो, पहला कदम अपने डेटाबेस को अपने एप्लिकेशन से जोड़ना है।
कनेक्शन स्थापित करना
एक MySQL सर्वर के साथ इंटरैक्ट करने में पहला कदम एक कनेक्शन स्थापित करना है। ऐसा करने के लिए, आपको connect() की आवश्यकता है mysql.connector . से मापांक। यह फ़ंक्शन host . जैसे पैरामीटर लेता है , user , और password और एक MySQLConnection देता है वस्तु। आप इन क्रेडेंशियल्स को उपयोगकर्ता से इनपुट के रूप में प्राप्त कर सकते हैं और उन्हें connect() . पर भेज सकते हैं :
from getpass import getpass
from mysql.connector import connect, Error

try:
    with connect(
        host="localhost",
        user=input("Enter username: "),
        password=getpass("Enter password: "),
    ) as connection:
        print(connection)
except Error as e:
    print(e)
उपरोक्त कोड आपके MySQL सर्वर के साथ कनेक्शन स्थापित करने के लिए दर्ज लॉगिन क्रेडेंशियल का उपयोग करता है। बदले में, आपको एक MySQLConnection मिलता है ऑब्जेक्ट, जो connection . में संग्रहीत है चर। अब से, आप अपने MySQL सर्वर तक पहुँचने के लिए इस चर का उपयोग करेंगे।
ऊपर दिए गए कोड में ध्यान देने योग्य कई महत्वपूर्ण बातें हैं:
-
आपको हमेशा उन अपवादों से निपटना चाहिए जो MySQL सर्वर से कनेक्शन स्थापित करते समय उठाए जा सकते हैं। यही कारण है कि आप
try. का उपयोग करते हैं ...exceptआपके सामने आने वाले किसी भी अपवाद को पकड़ने और प्रिंट करने के लिए ब्लॉक करें। -
डेटाबेस तक पहुँचने के बाद आपको हमेशा कनेक्शन बंद करना चाहिए। अप्रयुक्त खुले कनेक्शनों को छोड़ने से कई अप्रत्याशित त्रुटियां और प्रदर्शन समस्याएं हो सकती हैं। उपरोक्त कोड
with. का उपयोग करके एक संदर्भ प्रबंधक का लाभ उठाता है , जो कनेक्शन क्लीनअप प्रक्रिया को दूर कर देता है। -
आपको अपने लॉगिन क्रेडेंशियल को कभी भी हार्ड-कोड नहीं करना चाहिए , यानी आपका उपयोगकर्ता नाम और पासवर्ड, सीधे एक पायथन लिपि में। यह तैनाती के लिए एक बुरा अभ्यास है और सुरक्षा के लिए एक गंभीर खतरा है। उपरोक्त कोड उपयोगकर्ता को लॉगिन क्रेडेंशियल के लिए संकेत देता है। यह बिल्ट-इन
getpass. का उपयोग करता है पासवर्ड छिपाने के लिए मॉड्यूल। हालांकि यह हार्ड-कोडिंग से बेहतर है, फिर भी संवेदनशील जानकारी को संग्रहीत करने के अन्य, अधिक सुरक्षित तरीके हैं, जैसे पर्यावरण चर का उपयोग करना।
अब आपने अपने प्रोग्राम और अपने MySQL सर्वर के बीच एक कनेक्शन स्थापित कर लिया है, लेकिन आपको अभी भी एक नया डेटाबेस बनाने या सर्वर के अंदर किसी मौजूदा डेटाबेस से कनेक्ट करने की आवश्यकता है।
नया डेटाबेस बनाना
पिछले खंड में, आपने अपने MySQL सर्वर के साथ एक कनेक्शन स्थापित किया था। एक नया डेटाबेस बनाने के लिए, आपको एक SQL कथन निष्पादित करने की आवश्यकता है:
CREATE DATABASE books_db;
उपरोक्त कथन books_db . नाम से एक नया डेटाबेस तैयार करेगा ।
नोट: MySQL में, अर्धविराम लगाना अनिवार्य है (; ) एक बयान के अंत में, जो एक प्रश्न की समाप्ति को दर्शाता है। हालाँकि, MySQL Connector/Python आपके प्रश्नों के अंत में स्वचालित रूप से एक अर्धविराम जोड़ देता है, इसलिए इसे आपके Python कोड में उपयोग करने की कोई आवश्यकता नहीं है।
पायथन में SQL क्वेरी को निष्पादित करने के लिए, आपको एक कर्सर का उपयोग करना होगा, जो डेटाबेस रिकॉर्ड तक पहुंच को दूर करता है। MySQL Connector/Python आपको MySQLCursor प्रदान करता है क्लास, जो ऑब्जेक्ट्स को इंस्टेंट करता है जो पायथन में MySQL क्वेरीज़ को निष्पादित कर सकता है। MySQLCursor का एक उदाहरण क्लास को cursor भी कहा जाता है ।
cursor ऑब्जेक्ट MySQLConnection का उपयोग करते हैं अपने MySQL सर्वर के साथ बातचीत करने के लिए आपत्ति। cursor बनाने के लिए , .cursor() . का उपयोग करें आपके connection . की विधि चर:
cursor = connection.cursor()
उपरोक्त कोड आपको MySQLCursor . का एक उदाहरण देता है कक्षा।
एक क्वेरी जिसे निष्पादित करने की आवश्यकता है उसे cursor.execute() . पर भेजा जाता है स्ट्रिंग प्रारूप में। इस विशेष अवसर पर, आप CREATE DATABASE . भेजेंगे cursor.execute() . के लिए क्वेरी :
from getpass import getpass
from mysql.connector import connect, Error

try:
    with connect(
        host="localhost",
        user=input("Enter username: "),
        password=getpass("Enter password: "),
    ) as connection:
        create_db_query = "CREATE DATABASE online_movie_rating"
        with connection.cursor() as cursor:
            cursor.execute(create_db_query)
except Error as e:
    print(e)
उपरोक्त कोड को निष्पादित करने के बाद, आपके पास online_movie_rating नामक एक नया डेटाबेस होगा। आपके MySQL सर्वर में।
CREATE DATABASE क्वेरी को create_db_query . में एक स्ट्रिंग के रूप में संग्रहित किया जाता है वेरिएबल और फिर cursor.execute() . को पास किया गया निष्पादन के लिए। कोड cursor . के साथ एक संदर्भ प्रबंधक का उपयोग करता है सफाई प्रक्रिया को संभालने के लिए आपत्ति।
यदि आपके सर्वर में समान नाम वाला डेटाबेस पहले से मौजूद है तो आपको यहां एक त्रुटि प्राप्त हो सकती है। इसकी पुष्टि करने के लिए, आप अपने सर्वर में सभी डेटाबेस के नाम प्रदर्शित कर सकते हैं। उसी का उपयोग करना MySQLConnection पहले से ऑब्जेक्ट, SHOW DATABASES निष्पादित करें कथन:
>>> show_db_query = "SHOW DATABASES"
>>> with connection.cursor() as cursor:
...     cursor.execute(show_db_query)
...     for db in cursor:
...         print(db)
...
('information_schema',)
('mysql',)
('online_movie_rating',)
('performance_schema',)
('sys',)
उपरोक्त कोड आपके MySQL सर्वर में वर्तमान में सभी डेटाबेस के नाम प्रिंट करता है। SHOW DATABASES कमांड कुछ ऐसे डेटाबेस को भी आउटपुट करता है जिन्हें आपने अपने सर्वर में नहीं बनाया था, जैसे information_schema , performance_schema , और इसी तरह। ये डेटाबेस MySQL सर्वर द्वारा स्वचालित रूप से उत्पन्न होते हैं और विभिन्न डेटाबेस मेटाडेटा और MySQL सर्वर सेटिंग्स तक पहुँच प्रदान करते हैं।
आपने CREATE DATABASE . को क्रियान्वित करके इस अनुभाग में एक नया डेटाबेस बनाया है बयान। अगले भाग में, आप देखेंगे कि पहले से मौजूद डेटाबेस से कैसे जुड़ना है।
मौजूदा डेटाबेस से कनेक्ट करना
पिछले अनुभाग में, आपने online_movie_rating . नामक एक नया डेटाबेस बनाया है . हालाँकि, आप अभी भी इससे जुड़े नहीं हैं। कई स्थितियों में, आपके पास पहले से ही एक MySQL डेटाबेस होगा जिसे आप अपने पायथन एप्लिकेशन से जोड़ना चाहते हैं।
आप इसे उसी connect() . का उपयोग करके कर सकते हैं फ़ंक्शन जिसे आपने पहले database . नामक एक अतिरिक्त पैरामीटर भेजकर उपयोग किया था :
from getpass import getpass
from mysql.connector import connect, Error

try:
    with connect(
        host="localhost",
        user=input("Enter username: "),
        password=getpass("Enter password: "),
        database="online_movie_rating",
    ) as connection:
        print(connection)
except Error as e:
    print(e)
उपरोक्त कोड उस कनेक्शन स्क्रिप्ट के समान है जिसका आपने पहले उपयोग किया था। यहां केवल एक ही बदलाव है एक अतिरिक्त database पैरामीटर, जहां आपके डेटाबेस का नाम connect() . को पास किया जाता है . एक बार जब आप इस स्क्रिप्ट को निष्पादित कर लेते हैं, तो आप online_movie_rating . से जुड़ जाएंगे डेटाबेस।
टेबल बनाना, बदलना और छोड़ना
इस खंड में, आप सीखेंगे कि कुछ बुनियादी डीडीएल क्वेरी कैसे करें जैसे CREATE , DROP , और ALTER पायथन के साथ। आप MySQL डेटाबेस पर एक त्वरित नज़र डालेंगे जिसका उपयोग आप इस ट्यूटोरियल के बाकी हिस्सों में करेंगे। आप डेटाबेस के लिए आवश्यक सभी तालिकाएँ भी बनाएंगे और बाद में इन तालिकाओं में संशोधन करना सीखेंगे।
डेटाबेस स्कीमा को परिभाषित करना
आप ऑनलाइन मूवी रेटिंग सिस्टम के लिए डेटाबेस स्कीमा बनाकर शुरू कर सकते हैं। डेटाबेस में तीन टेबल होंगे:
moviesफिल्मों के बारे में सामान्य जानकारी होती है और इसमें निम्नलिखित विशेषताएं होती हैं:idtitlerelease_yeargenrecollection_in_mil
reviewersइसमें उन लोगों के बारे में जानकारी होती है, जिन्होंने समीक्षाएं या रेटिंग पोस्ट की हैं और उनमें निम्नलिखित विशेषताएं हैं:idfirst_namelast_name
ratingsइसमें पोस्ट की गई रेटिंग के बारे में जानकारी होती है और इसमें निम्नलिखित विशेषताएं होती हैं:movie_id(विदेशी कुंजी)reviewer_id(विदेशी कुंजी)ratings
आईएमडीबी की तरह एक वास्तविक दुनिया की मूवी रेटिंग सिस्टम को ईमेल, मूवी कास्ट लिस्ट आदि जैसी अन्य विशेषताओं का एक समूह स्टोर करने की आवश्यकता होगी। यदि आप चाहें, तो आप इस डेटाबेस में अधिक तालिकाएँ और विशेषताएँ जोड़ सकते हैं। लेकिन ये तीन टेबल इस ट्यूटोरियल के लिए काफी हैं।
नीचे दी गई छवि डेटाबेस स्कीमा को दर्शाती है:
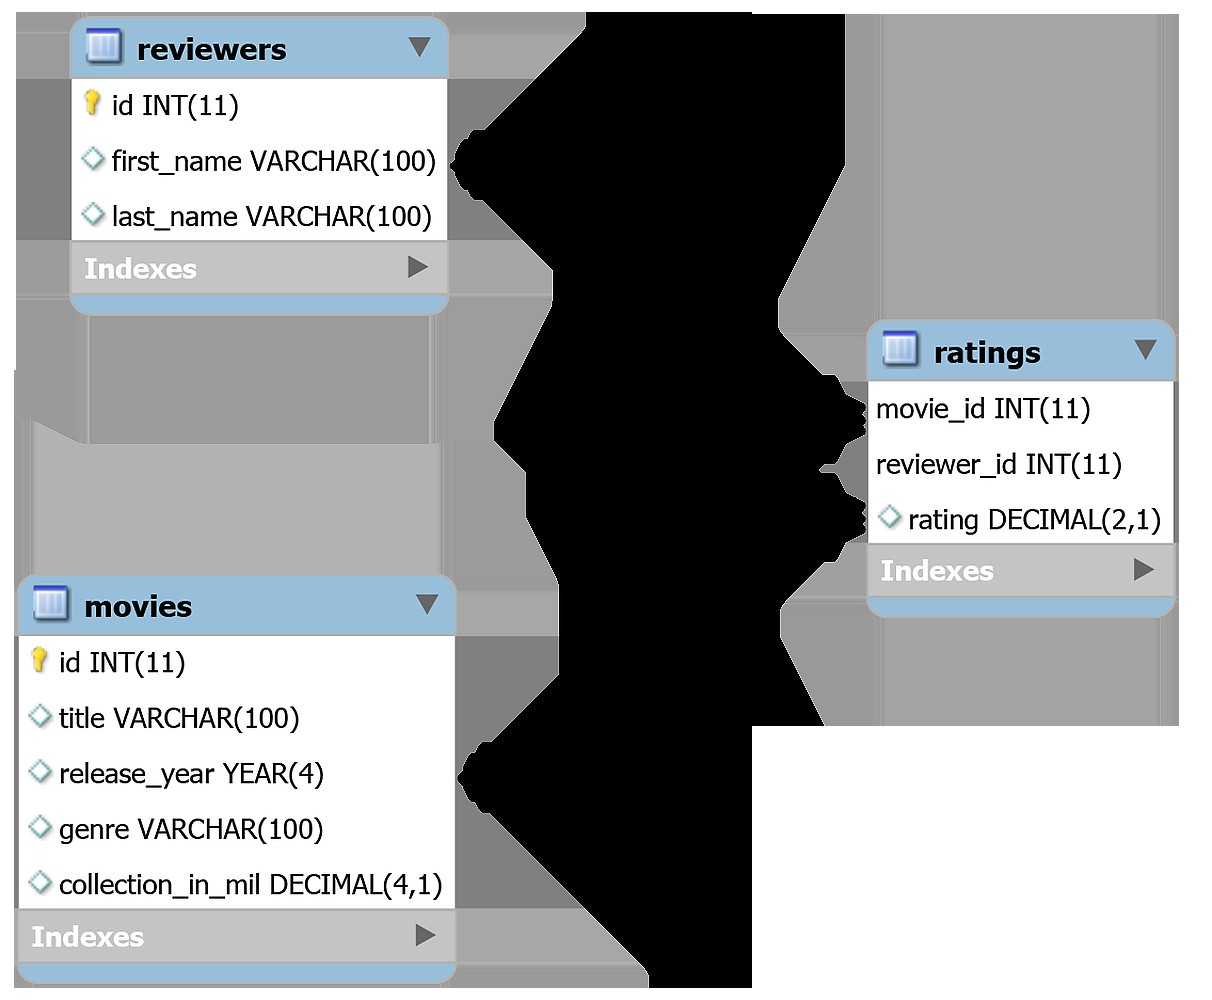
इस डेटाबेस में टेबल एक दूसरे से संबंधित हैं। movies और reviewers एक अनेक-से-अनेक . होगा संबंध क्योंकि एक फिल्म की समीक्षा कई समीक्षकों द्वारा की जा सकती है और एक समीक्षक कई फिल्मों की समीक्षा कर सकता है। ratings तालिका movies . को जोड़ती है reviewers . के साथ तालिका टेबल।
CREATE TABLE का उपयोग करके टेबल बनाना कथन
अब, MySQL में एक नई तालिका बनाने के लिए, आपको CREATE TABLE . का उपयोग करने की आवश्यकता है बयान। निम्नलिखित MySQL क्वेरी movies बनाएगी आपके online_movie_rating . के लिए तालिका डेटाबेस:
CREATE TABLE movies(
    id INT AUTO_INCREMENT PRIMARY KEY,
    title VARCHAR(100),
    release_year YEAR(4),
    genre VARCHAR(100),
    collection_in_mil INT
);
यदि आपने पहले SQL कथनों को देखा है, तो उपरोक्त अधिकांश क्वेरी समझ में आ सकती हैं। लेकिन MySQL सिंटैक्स में कुछ अंतर हैं जिनसे आपको अवगत होना चाहिए।
उदाहरण के लिए, MySQL में आपके अवलोकन के लिए कई प्रकार के डेटा प्रकार हैं, जिनमें YEAR . शामिल हैं , INT , BIGINT , और इसी तरह। साथ ही, MySQL AUTO_INCREMENT . का उपयोग करता है कीवर्ड जब नए रिकॉर्ड डालने पर कॉलम मान को स्वचालित रूप से बढ़ाना पड़ता है।
एक नई तालिका बनाने के लिए, आपको इस क्वेरी को cursor.execute() . पर पास करना होगा , जो एक MySQL क्वेरी को स्वीकार करता है और कनेक्टेड MySQL डेटाबेस पर क्वेरी निष्पादित करता है:
create_movies_table_query = """
CREATE TABLE movies(
    id INT AUTO_INCREMENT PRIMARY KEY,
    title VARCHAR(100),
    release_year YEAR(4),
    genre VARCHAR(100),
    collection_in_mil INT
)
"""
with connection.cursor() as cursor:
    cursor.execute(create_movies_table_query)
    connection.commit()
अब आपके पास movies है आपके डेटाबेस में तालिका। आप create_movies_table_query pass पास करते हैं करने के लिए cursor.execute() , जो आवश्यक निष्पादन करता है।
नोट: connection वेरिएबल MySQLConnection को संदर्भित करता है ऑब्जेक्ट जो आपके डेटाबेस से कनेक्ट होने पर वापस किया गया था।
साथ ही, connection.commit() पर भी ध्यान दें कोड के अंत में कथन। डिफ़ॉल्ट रूप से, आपका MySQL कनेक्टर लेनदेन को स्वत:प्रतिबद्ध नहीं करता है। MySQL में, लेन-देन में उल्लिखित संशोधन केवल तभी होते हैं जब आप COMMIT . का उपयोग करते हैं अंत में आदेश। वास्तविक तालिका में परिवर्तन करने के लिए प्रत्येक लेनदेन के बाद हमेशा इस विधि को कॉल करें।
जैसा आपने movies . के साथ किया था तालिका, reviewers बनाने के लिए निम्न स्क्रिप्ट निष्पादित करें तालिका:
create_reviewers_table_query = """
CREATE TABLE reviewers (
    id INT AUTO_INCREMENT PRIMARY KEY,
    first_name VARCHAR(100),
    last_name VARCHAR(100)
)
"""
with connection.cursor() as cursor:
    cursor.execute(create_reviewers_table_query)
    connection.commit()
यदि आवश्यक हो, तो आप समीक्षक के बारे में अधिक जानकारी जोड़ सकते हैं, जैसे कि उनकी ईमेल आईडी या जनसांख्यिकीय जानकारी। लेकिन first_name और last_name अभी के लिए आपके उद्देश्य को पूरा करेगा।
अंत में, आप ratings बना सकते हैं निम्न स्क्रिप्ट का उपयोग कर तालिका:
create_ratings_table_query = """
CREATE TABLE ratings (
    movie_id INT,
    reviewer_id INT,
    rating DECIMAL(2,1),
    FOREIGN KEY(movie_id) REFERENCES movies(id),
    FOREIGN KEY(reviewer_id) REFERENCES reviewers(id),
    PRIMARY KEY(movie_id, reviewer_id)
)
"""
with connection.cursor() as cursor:
    cursor.execute(create_ratings_table_query)
    connection.commit()
MySQL में विदेशी कुंजी संबंधों का कार्यान्वयन मानक SQL की तुलना में थोड़ा अलग और सीमित है। MySQL में, विदेशी कुंजी बाधा में माता-पिता और बच्चे दोनों को एक ही स्टोरेज इंजन का उपयोग करना चाहिए ।
एक स्टोरेज इंजन अंतर्निहित सॉफ्टवेयर घटक है जो एक डेटाबेस प्रबंधन प्रणाली SQL संचालन करने के लिए उपयोग करता है। MySQL में, स्टोरेज इंजन दो अलग-अलग फ्लेवर में आते हैं:
-
लेन-देन भंडारण इंजन लेन-देन सुरक्षित हैं और आपको
rollback. जैसे सरल आदेशों का उपयोग करके लेनदेन को वापस रोल करने की अनुमति देते हैं . InnoDB और NDB सहित कई लोकप्रिय MySQL इंजन इस श्रेणी के हैं। -
गैर-लेनदेन भंडारण इंजन डेटाबेस पर किए गए बयानों को पूर्ववत करने के लिए विस्तृत मैनुअल कोड पर निर्भर करता है। MyISAM, MEMORY, और कई अन्य MySQL इंजन गैर-लेनदेन वाले हैं।
InnoDB डिफ़ॉल्ट और सबसे लोकप्रिय स्टोरेज इंजन है। यह विदेशी कुंजी बाधाओं का समर्थन करके डेटा अखंडता को बनाए रखने में मदद करता है। इसका मतलब यह है कि विदेशी कुंजी पर किसी भी सीआरयूडी ऑपरेशन की जांच यह सुनिश्चित करने के लिए की जाती है कि यह विभिन्न तालिकाओं में विसंगतियों का कारण नहीं बनता है।
साथ ही, ध्यान दें कि ratings तालिका movie_id columns कॉलम का उपयोग करती है और reviewer_id , दोनों विदेशी कुंजी, संयुक्त रूप से प्राथमिक कुंजी . के रूप में . यह कदम सुनिश्चित करता है कि एक समीक्षक एक ही फिल्म को दो बार रेट नहीं कर सकता।
आप एकाधिक निष्पादन के लिए एक ही कर्सर का पुन:उपयोग करना चुन सकते हैं। उस स्थिति में, सभी निष्पादन कई अलग-अलग लेनदेन के बजाय एक परमाणु लेनदेन बन जाएंगे। उदाहरण के लिए, आप सभी CREATE TABLE execute निष्पादित कर सकते हैं एक कर्सर के साथ बयान और फिर अपना लेनदेन केवल एक बार करें:
with connection.cursor() as cursor:
    cursor.execute(create_movies_table_query)
    cursor.execute(create_reviewers_table_query)
    cursor.execute(create_ratings_table_query)
    connection.commit()
उपरोक्त कोड सबसे पहले तीनों को निष्पादित करेगा CREATE बयान। फिर यह एक COMMIT भेजेगा MySQL सर्वर को कमांड करें जो आपका लेनदेन करता है। आप .rollback() . का भी उपयोग कर सकते हैं एक rollback भेजने के लिए MySQL सर्वर को कमांड दें और लेन-देन से सभी डेटा परिवर्तन हटा दें।
DESCRIBE का उपयोग करके एक टेबल स्कीमा दिखा रहा है कथन
अब, जब आपने तीनों टेबल बना लिए हैं, तो आप निम्न SQL स्टेटमेंट का उपयोग करके उनकी स्कीमा देख सकते हैं:
DESCRIBE <table_name>;
cursor से कुछ परिणाम वापस पाने के लिए ऑब्जेक्ट, आपको cursor.fetchall() . का उपयोग करने की आवश्यकता है . यह विधि अंतिम निष्पादित कथन से सभी पंक्तियों को प्राप्त करती है। मान लें कि आपके पास पहले से ही MySQLConnection है connection में ऑब्जेक्ट चर, आप cursor.fetchall() . द्वारा प्राप्त सभी परिणामों का प्रिंट आउट ले सकते हैं :
>>> show_table_query = "DESCRIBE movies"
>>> with connection.cursor() as cursor:
...     cursor.execute(show_table_query)
...     # Fetch rows from last executed query
...     result = cursor.fetchall()
...     for row in result:
...         print(row)
...
('id', 'int(11)', 'NO', 'PRI', None, 'auto_increment')
('title', 'varchar(100)', 'YES', '', None, '')
('release_year', 'year(4)', 'YES', '', None, '')
('genre', 'varchar(100)', 'YES', '', None, '')
('collection_in_mil', 'int(11)', 'YES', '', None, '')
एक बार जब आप उपरोक्त कोड को निष्पादित कर लेते हैं, तो आपको movies . के सभी कॉलमों के बारे में जानकारी वाली एक तालिका प्राप्त होनी चाहिए टेबल। प्रत्येक कॉलम के लिए, आपको कॉलम के डेटा प्रकार, कॉलम प्राथमिक कुंजी है या नहीं, इत्यादि जैसे विवरण प्राप्त होंगे।
ALTER . का उपयोग करके तालिका स्कीमा को संशोधित करना कथन
movies . में तालिका, आपके पास collection_in_mil . नामक एक स्तंभ है , जिसमें लाखों डॉलर में फिल्म का बॉक्स ऑफिस संग्रह होता है। collection_in_mil के डेटा प्रकार को संशोधित करने के लिए आप निम्न MySQL कथन लिख सकते हैं INT . से विशेषता करने के लिए DECIMAL :
ALTER TABLE movies MODIFY COLUMN collection_in_mil DECIMAL(4,1);
DECIMAL(4,1) मतलब एक दशमलव संख्या जिसमें अधिकतम 4 . हो सकता है अंक, जिनमें से 1 दशमलव है, जैसे 120.1 , 3.4 , 38.0 , और इसी तरह। ALTER TABLE executing को क्रियान्वित करने के बाद कथन, आप DESCRIBE . का उपयोग करके अद्यतन तालिका स्कीमा दिखा सकते हैं :
>>> alter_table_query = """
... ALTER TABLE movies
... MODIFY COLUMN collection_in_mil DECIMAL(4,1)
... """
>>> show_table_query = "DESCRIBE movies"
>>> with connection.cursor() as cursor:
...     cursor.execute(alter_table_query)
...     cursor.execute(show_table_query)
...     # Fetch rows from last executed query
...     result = cursor.fetchall()
...     print("Movie Table Schema after alteration:")
...     for row in result:
...         print(row)
...
Movie Table Schema after alteration
('id', 'int(11)', 'NO', 'PRI', None, 'auto_increment')
('title', 'varchar(100)', 'YES', '', None, '')
('release_year', 'year(4)', 'YES', '', None, '')
('genre', 'varchar(100)', 'YES', '', None, '')
('collection_in_mil', 'decimal(4,1)', 'YES', '', None, '')
जैसा कि आउटपुट में दिखाया गया है, collection_in_mil विशेषता अब प्रकार की है DECIMAL(4,1) . यह भी ध्यान दें कि ऊपर दिए गए कोड में, आप cursor.execute() . पर कॉल करते हैं दो बार। लेकिन cursor.fetchall() केवल अंतिम निष्पादित क्वेरी से पंक्तियाँ प्राप्त करता है, जो कि show_table_query . है ।
DROP का उपयोग करके तालिकाएं हटाना कथन
किसी तालिका को हटाने के लिए, आपको DROP TABLE . निष्पादित करने की आवश्यकता है MySQL में बयान। तालिका को हटाना एक अपरिवर्तनीय है प्रक्रिया। यदि आप नीचे दिए गए कोड को निष्पादित करते हैं, तो आपको CREATE TABLE . पर कॉल करने की आवश्यकता होगी ratings . का उपयोग करने के लिए फिर से क्वेरी करें आगामी अनुभागों में तालिका।
ratings को मिटाने के लिए तालिका, भेजें drop_table_query करने के लिए cursor.execute() :
drop_table_query = "DROP TABLE ratings"
with connection.cursor() as cursor:
    cursor.execute(drop_table_query)
यदि आप उपरोक्त कोड को निष्पादित करते हैं, तो आपने ratings . को सफलतापूर्वक हटा दिया होगा टेबल।
तालिकाओं में अभिलेख सम्मिलित करना
पिछले अनुभाग में, आपने अपने डेटाबेस में तीन तालिकाएँ बनाईं:movies , reviewers , और ratings . अब आपको इन तालिकाओं को डेटा से भरना होगा। यह खंड पायथन के लिए MySQL कनेक्टर में रिकॉर्ड डालने के दो अलग-अलग तरीकों को कवर करेगा।
पहली विधि, .execute() , अच्छी तरह से काम करता है जब रिकॉर्ड की संख्या कम होती है और रिकॉर्ड को हार्ड-कोड किया जा सकता है। दूसरी विधि, .executemany() , अधिक लोकप्रिय है और वास्तविक दुनिया के परिदृश्यों के लिए बेहतर अनुकूल है।
.execute() का उपयोग करना
पहला तरीका उसी का उपयोग करता है cursor.execute() वह तरीका जो आप अब तक इस्तेमाल कर रहे हैं। आप INSERT INTO . लिखें एक स्ट्रिंग में क्वेरी करें और इसे cursor.execute() . पर पास करें . आप इस विधि का उपयोग movies . में डेटा डालने के लिए कर सकते हैं टेबल।
संदर्भ के लिए, movies तालिका में पाँच विशेषताएँ हैं:
idtitlerelease_yeargenrecollection_in_mil
आपको id . के लिए डेटा जोड़ने की आवश्यकता नहीं है AUTO_INCREMENT . के रूप में स्वचालित रूप से id की गणना करता है आपके लिए। निम्न स्क्रिप्ट movies . में रिकॉर्ड सम्मिलित करती है तालिका:
insert_movies_query = """
INSERT INTO movies (title, release_year, genre, collection_in_mil)
VALUES
    ("Forrest Gump", 1994, "Drama", 330.2),
    ("3 Idiots", 2009, "Drama", 2.4),
    ("Eternal Sunshine of the Spotless Mind", 2004, "Drama", 34.5),
    ("Good Will Hunting", 1997, "Drama", 138.1),
    ("Skyfall", 2012, "Action", 304.6),
    ("Gladiator", 2000, "Action", 188.7),
    ("Black", 2005, "Drama", 3.0),
    ("Titanic", 1997, "Romance", 659.2),
    ("The Shawshank Redemption", 1994, "Drama",28.4),
    ("Udaan", 2010, "Drama", 1.5),
    ("Home Alone", 1990, "Comedy", 286.9),
    ("Casablanca", 1942, "Romance", 1.0),
    ("Avengers: Endgame", 2019, "Action", 858.8),
    ("Night of the Living Dead", 1968, "Horror", 2.5),
    ("The Godfather", 1972, "Crime", 135.6),
    ("Haider", 2014, "Action", 4.2),
    ("Inception", 2010, "Adventure", 293.7),
    ("Evil", 2003, "Horror", 1.3),
    ("Toy Story 4", 2019, "Animation", 434.9),
    ("Air Force One", 1997, "Drama", 138.1),
    ("The Dark Knight", 2008, "Action",535.4),
    ("Bhaag Milkha Bhaag", 2013, "Sport", 4.1),
    ("The Lion King", 1994, "Animation", 423.6),
    ("Pulp Fiction", 1994, "Crime", 108.8),
    ("Kai Po Che", 2013, "Sport", 6.0),
    ("Beasts of No Nation", 2015, "War", 1.4),
    ("Andadhun", 2018, "Thriller", 2.9),
    ("The Silence of the Lambs", 1991, "Crime", 68.2),
    ("Deadpool", 2016, "Action", 363.6),
    ("Drishyam", 2015, "Mystery", 3.0)
"""
with connection.cursor() as cursor:
    cursor.execute(insert_movies_query)
    connection.commit()
The movies table is now loaded with thirty records. The code calls connection.commit() अंत में। It’s crucial to call .commit() after preforming any modifications to a table.
Using .executemany()
The previous approach is more suitable when the number of records is fairly small and you can write these records directly into the code. But this is rarely true. You’ll often have this data stored in some other file, or the data will be generated by a different script and will need to be added to the MySQL database.
This is where .executemany() comes in handy. It accepts two parameters:
- A query that contains placeholders for the records that need to be inserted
- A list that contains all records that you wish to insert
The following example inserts records for the reviewers table:
insert_reviewers_query = """
INSERT INTO reviewers
(first_name, last_name)
VALUES ( %s, %s )
"""
reviewers_records = [
    ("Chaitanya", "Baweja"),
    ("Mary", "Cooper"),
    ("John", "Wayne"),
    ("Thomas", "Stoneman"),
    ("Penny", "Hofstadter"),
    ("Mitchell", "Marsh"),
    ("Wyatt", "Skaggs"),
    ("Andre", "Veiga"),
    ("Sheldon", "Cooper"),
    ("Kimbra", "Masters"),
    ("Kat", "Dennings"),
    ("Bruce", "Wayne"),
    ("Domingo", "Cortes"),
    ("Rajesh", "Koothrappali"),
    ("Ben", "Glocker"),
    ("Mahinder", "Dhoni"),
    ("Akbar", "Khan"),
    ("Howard", "Wolowitz"),
    ("Pinkie", "Petit"),
    ("Gurkaran", "Singh"),
    ("Amy", "Farah Fowler"),
    ("Marlon", "Crafford"),
]
with connection.cursor() as cursor:
    cursor.executemany(insert_reviewers_query, reviewers_records)
    connection.commit()
In the script above, you pass both the query and the list of records as arguments to .executemany() . These records could have been fetched from a file or from the user and stored in the reviewers_records list.
The code uses %s as a placeholder for the two strings that had to be inserted in the insert_reviewers_query . Placeholders act as format specifiers and help reserve a spot for a variable inside a string. The specified variable is then added to this spot during execution.
You can similarly use .executemany() to insert records in the ratings table:
insert_ratings_query = """
INSERT INTO ratings
(rating, movie_id, reviewer_id)
VALUES ( %s, %s, %s)
"""
ratings_records = [
    (6.4, 17, 5), (5.6, 19, 1), (6.3, 22, 14), (5.1, 21, 17),
    (5.0, 5, 5), (6.5, 21, 5), (8.5, 30, 13), (9.7, 6, 4),
    (8.5, 24, 12), (9.9, 14, 9), (8.7, 26, 14), (9.9, 6, 10),
    (5.1, 30, 6), (5.4, 18, 16), (6.2, 6, 20), (7.3, 21, 19),
    (8.1, 17, 18), (5.0, 7, 2), (9.8, 23, 3), (8.0, 22, 9),
    (8.5, 11, 13), (5.0, 5, 11), (5.7, 8, 2), (7.6, 25, 19),
    (5.2, 18, 15), (9.7, 13, 3), (5.8, 18, 8), (5.8, 30, 15),
    (8.4, 21, 18), (6.2, 23, 16), (7.0, 10, 18), (9.5, 30, 20),
    (8.9, 3, 19), (6.4, 12, 2), (7.8, 12, 22), (9.9, 15, 13),
    (7.5, 20, 17), (9.0, 25, 6), (8.5, 23, 2), (5.3, 30, 17),
    (6.4, 5, 10), (8.1, 5, 21), (5.7, 22, 1), (6.3, 28, 4),
    (9.8, 13, 1)
]
with connection.cursor() as cursor:
    cursor.executemany(insert_ratings_query, ratings_records)
    connection.commit()
All three tables are now populated with data. You now have a fully functional online movie rating database. The next step is to understand how to interact with this database.
Reading Records From the Database
Until now, you’ve been building your database. Now it’s time to perform some queries on it and find some interesting properties from this dataset. In this section, you’ll learn how to read records from database tables using the SELECT बयान।
Reading Records Using the SELECT Statement
To retrieve records, you need to send a SELECT query to cursor.execute() . Then you use cursor.fetchall() to extract the retrieved table in the form of a list of rows or records.
Try writing a MySQL query to select all records from the movies table and send it to .execute() :
>>> select_movies_query = "SELECT * FROM movies LIMIT 5"
>>> with connection.cursor() as cursor:
...     cursor.execute(select_movies_query)
...     result = cursor.fetchall()
...     for row in result:
...         print(row)
...
(1, 'Forrest Gump', 1994, 'Drama', Decimal('330.2'))
(2, '3 Idiots', 2009, 'Drama', Decimal('2.4'))
(3, 'Eternal Sunshine of the Spotless Mind', 2004, 'Drama', Decimal('34.5'))
(4, 'Good Will Hunting', 1997, 'Drama', Decimal('138.1'))
(5, 'Skyfall', 2012, 'Action', Decimal('304.6'))
The result variable holds the records returned from using .fetchall() . It’s a list of tuples representing individual records from the table.
In the query above, you use the LIMIT clause to constrain the number of rows that are received from the SELECT बयान। Developers often use LIMIT to perform pagination when handling large volumes of data.
In MySQL, the LIMIT clause takes one or two nonnegative numeric arguments. When using one argument, you specify the maximum number of rows to return. Since your query includes LIMIT 5 , only the first 5 records are fetched. When using both arguments, you can also specify the offset of the first row to return:
SELECT * FROM movies LIMIT 2,5;
The first argument specifies an offset of 2 , and the second argument constrains the number of returned rows to 5 . The above query will return rows 3 to 7.
You can also query for selected columns:
>>>>>> select_movies_query = "SELECT title, release_year FROM movies LIMIT 5"
>>> with connection.cursor() as cursor:
... cursor.execute(select_movies_query)
... for row in cursor.fetchall():
... print(row)
...
('Forrest Gump', 1994)
('3 Idiots', 2009)
('Eternal Sunshine of the Spotless Mind', 2004)
('Good Will Hunting', 1997)
('Skyfall', 2012)
Now, the code outputs values only from the two specified columns:title and release_year ।
Filtering Results Using the WHERE Clause
You can filter table records by specific criteria using the WHERE खंड। For example, to retrieve all movies with a box office collection greater than $300 million, you could run the following query:
SELECT title, collection_in_mil
FROM movies
WHERE collection_in_mil > 300;
You can also use ORDER BY clause in the last query to sort the results from the highest to the lowest earner:
>>> select_movies_query = """
... SELECT title, collection_in_mil
... FROM movies
... WHERE collection_in_mil > 300
... ORDER BY collection_in_mil DESC
... """
>>> with connection.cursor() as cursor:
...     cursor.execute(select_movies_query)
...     for movie in cursor.fetchall():
...         print(movie)
...
('Avengers: Endgame', Decimal('858.8'))
('Titanic', Decimal('659.2'))
('The Dark Knight', Decimal('535.4'))
('Toy Story 4', Decimal('434.9'))
('The Lion King', Decimal('423.6'))
('Deadpool', Decimal('363.6'))
('Forrest Gump', Decimal('330.2'))
('Skyfall', Decimal('304.6'))
MySQL offers a plethora of string formatting operations like CONCAT for concatenating strings. Often, websites will show the movie title along with its release year to avoid confusion. To retrieve the titles of the top five grossing movies, concatenated with their release years, you can write the following query:
>>> select_movies_query = """
... SELECT CONCAT(title, " (", release_year, ")"),
...       collection_in_mil
... FROM movies
... ORDER BY collection_in_mil DESC
... LIMIT 5
... """
>>> with connection.cursor() as cursor:
...     cursor.execute(select_movies_query)
...     for movie in cursor.fetchall():
...         print(movie)
...
('Avengers: Endgame (2019)', Decimal('858.8'))
('Titanic (1997)', Decimal('659.2'))
('The Dark Knight (2008)', Decimal('535.4'))
('Toy Story 4 (2019)', Decimal('434.9'))
('The Lion King (1994)', Decimal('423.6'))
If you don’t want to use the LIMIT clause and you don’t need to fetch all the records, then the cursor object has .fetchone() and .fetchmany() methods as well:
.fetchone()retrieves either the next row of the result, as a tuple, orNoneif no more rows are available..fetchmany()retrieves the next set of rows from the result as a list of tuples. It has asizeargument, which defaults to1, that you can use to specify the number of rows you need to fetch. If no more rows are available, then the method returns an empty list.
Try retrieving the titles of the five highest-grossing movies concatenated with their release years again, but this time use .fetchmany() :
>>> select_movies_query = """
... SELECT CONCAT(title, " (", release_year, ")"),
...       collection_in_mil
... FROM movies
... ORDER BY collection_in_mil DESC
... """
>>> with connection.cursor() as cursor:
...     cursor.execute(select_movies_query)
...     for movie in cursor.fetchmany(size=5):
...         print(movie)
...     cursor.fetchall()
...
('Avengers: Endgame (2019)', Decimal('858.8'))
('Titanic (1997)', Decimal('659.2'))
('The Dark Knight (2008)', Decimal('535.4'))
('Toy Story 4 (2019)', Decimal('434.9'))
('The Lion King (1994)', Decimal('423.6'))
The output with .fetchmany() is similar to what you received when you used the LIMIT खंड। You might have noticed the additional cursor.fetchall() call at the end. You do this to clean all the remaining results that weren’t read by .fetchmany() ।
It’s necessary to clean all unread results before executing any other statements on the same connection. Otherwise, an InternalError: Unread result found exception will be raised.
Handling Multiple Tables Using the JOIN Statement
If you found the queries in the last section to be quite straightforward, don’t worry. You can make your SELECT queries as complex as you want using the same methods from the last section.
Let’s look at some slightly more complex JOIN प्रश्न। If you want to find out the name of the top five highest-rated movies in your database, then you can run the following query:
>>> select_movies_query = """
... SELECT title, AVG(rating) as average_rating
... FROM ratings
... INNER JOIN movies
...     ON movies.id = ratings.movie_id
... GROUP BY movie_id
... ORDER BY average_rating DESC
... LIMIT 5
... """
>>> with connection.cursor() as cursor:
...     cursor.execute(select_movies_query)
...     for movie in cursor.fetchall():
...         print(movie)
...
('Night of the Living Dead', Decimal('9.90000'))
('The Godfather', Decimal('9.90000'))
('Avengers: Endgame', Decimal('9.75000'))
('Eternal Sunshine of the Spotless Mind', Decimal('8.90000'))
('Beasts of No Nation', Decimal('8.70000'))
As shown above, Night of the Living Dead and The Godfather are tied as the highest-rated movies in your online_movie_rating डेटाबेस।
To find the name of the reviewer who gave the most ratings, write the following query:
>>>>>> select_movies_query = """
... SELECT CONCAT(first_name, " ", last_name), COUNT(*) as num
... FROM reviewers
... INNER JOIN ratings
... ON reviewers.id = ratings.reviewer_id
... GROUP BY reviewer_id
... ORDER BY num DESC
... LIMIT 1
... """
>>> with connection.cursor() as cursor:
... cursor.execute(select_movies_query)
... for movie in cursor.fetchall():
... print(movie)
...
('Mary Cooper', 4)
Mary Cooper is the most frequent reviewer in this database. As seen above, it doesn’t matter how complicated the query is because it’s ultimately handled by the MySQL server. Your process for executing a query will always remain the same:pass the query to cursor.execute() and fetch the results using .fetchall() ।
Updating and Deleting Records From the Database
In this section, you’ll be updating and deleting records from the database. Both of these operations can be performed on either a single record or multiple records in the table. You’ll select the rows that need to be modified using the WHERE clause.
UPDATE Command
One of the reviewers in your database, Amy Farah Fowler , is now married to Sheldon Cooper . Her last name has now changed to Cooper , so you need to update your database accordingly. For updating records, MySQL uses the UPDATE statement:
update_query = """
UPDATE
    reviewers
SET
    last_name = "Cooper"
WHERE
    first_name = "Amy"
"""
with connection.cursor() as cursor:
    cursor.execute(update_query)
    connection.commit()
The code passes the update query to cursor.execute() , and .commit() brings the required changes to the reviewers table.
नोट: In the UPDATE query, the WHERE clause helps specify the records that need to be updated. If you don’t use WHERE , then all records will be updated!
Suppose you need to provide an option that allows reviewers to modify ratings. A reviewer will provide three values, movie_id , reviewer_id , and the new rating . The code will display the record after performing the specified modification.
Assuming that movie_id = 18 , reviewer_id = 15 , and the new rating = 5.0 , you can use the following MySQL queries to perform the required modification:
UPDATE
    ratings
SET
    rating = 5.0
WHERE
    movie_id = 18 AND reviewer_id = 15;

SELECT *
FROM ratings
WHERE
    movie_id = 18 AND reviewer_id = 15;
The above queries first update the rating and then display it. You can create a complete Python script that establises a connection with the database and allows the reviewer to modify a rating:
from getpass import getpass
from mysql.connector import connect, Error

movie_id = input("Enter movie id: ")
reviewer_id = input("Enter reviewer id: ")
new_rating = input("Enter new rating: ")
update_query = """
UPDATE
    ratings
SET
    rating = "%s"
WHERE
    movie_id = "%s" AND reviewer_id = "%s";

SELECT *
FROM ratings
WHERE
    movie_id = "%s" AND reviewer_id = "%s"
""" % (
    new_rating,
    movie_id,
    reviewer_id,
    movie_id,
    reviewer_id,
)

try:
    with connect(
        host="localhost",
        user=input("Enter username: "),
        password=getpass("Enter password: "),
        database="online_movie_rating",
    ) as connection:
        with connection.cursor() as cursor:
            for result in cursor.execute(update_query, multi=True):
                if result.with_rows:
                    print(result.fetchall())
            connection.commit()
except Error as e:
    print(e)
Save this code to a file named modify_ratings.py . The above code uses %s placeholders to insert the received input in the update_query string. For the first time in this tutorial, you have multiple queries inside a single string. To pass multiple queries to a single cursor.execute() , you need to set the method’s multi argument to True ।
If multi is True , then cursor.execute() returns an iterator. Each item in the iterator corresponds to a cursor object that executes a statement passed in the query. The above code runs a for loop on this iterator and then calls .fetchall() on each cursor object.
नोट: Running .fetchall() on all cursor objects is important. To execute a new statement on the same connection, you must ensure that there are no unread results from previous executions. If there are unread results, then you’ll receive an exception.
If no result set is fetched on an operation, then .fetchall() raises an exception. To avoid this error, in the code above you use the cursor.with_rows property, which indicates whether the most recently executed operation produced rows.
While this code should solve your purpose, the WHERE clause is a prime target for web hackers in its current state. It’s vulnerable to what is called a SQL injection attack, which can allow malicious actors to either corrupt or misuse your database.
Warning :Don’t try the below inputs on your database! They will corrupt your table and you’ll need to recreate it.
For example, if a user sends movie_id=18 , reviewer_id=15 , and the new rating=5.0 as input, then the output looks like this:
$ python modify_ratings.py
Enter movie id: 18
Enter reviewer id: 15
Enter new rating: 5.0
Enter username: <user_name>
Enter password:
[(18, 15, Decimal('5.0'))]
The rating with movie_id=18 and reviewer_id=15 has been changed to 5.0 . But if you were hacker, then you might send a hidden command in your input:
$ python modify_ratings.py
Enter movie id: 18
Enter reviewer id: 15"; UPDATE reviewers SET last_name = "A
Enter new rating: 5.0
Enter username: <user_name>
Enter password:
[(18, 15, Decimal('5.0'))]
Again, the output shows that the specified rating has been changed to 5.0 . What’s changed?
The hacker sneaked in an update query while entering the reviewer_id . The update query, update reviewers set last_name = "A , changes the last_name of all records in the reviewers table to "A" . You can see this change if you print out the reviewers table:
>>> select_query = """
... SELECT first_name, last_name
... FROM reviewers
... """
>>> with connection.cursor() as cursor:
...     cursor.execute(select_query)
...     for reviewer in cursor.fetchall():
...         print(reviewer)
...
('Chaitanya', 'A')
('Mary', 'A')
('John', 'A')
('Thomas', 'A')
('Penny', 'A')
('Mitchell', 'A')
('Wyatt', 'A')
('Andre', 'A')
('Sheldon', 'A')
('Kimbra', 'A')
('Kat', 'A')
('Bruce', 'A')
('Domingo', 'A')
('Rajesh', 'A')
('Ben', 'A')
('Mahinder', 'A')
('Akbar', 'A')
('Howard', 'A')
('Pinkie', 'A')
('Gurkaran', 'A')
('Amy', 'A')
('Marlon', 'A')
The above code displays the first_name and last_name for all records in the reviewers टेबल। The SQL injection attack corrupted this table by changing the last_name of all records to "A" ।
There’s a quick fix to prevent such attacks. Don’t add the query values provided by the user directly to your query string. Instead, update the modify_ratings.py script to send these query values as arguments to .execute() :
from getpass import getpass
from mysql.connector import connect, Error

movie_id = input("Enter movie id: ")
reviewer_id = input("Enter reviewer id: ")
new_rating = input("Enter new rating: ")
update_query = """
UPDATE
    ratings
SET
    rating = %s
WHERE
    movie_id = %s AND reviewer_id = %s;

SELECT *
FROM ratings
WHERE
    movie_id = %s AND reviewer_id = %s
"""
val_tuple = (
    new_rating,
    movie_id,
    reviewer_id,
    movie_id,
    reviewer_id,
)

try:
    with connect(
        host="localhost",
        user=input("Enter username: "),
        password=getpass("Enter password: "),
        database="online_movie_rating",
    ) as connection:
        with connection.cursor() as cursor:
            for result in cursor.execute(update_query, val_tuple, multi=True):
                if result.with_rows:
                    print(result.fetchall())
            connection.commit()
except Error as e:
    print(e)
Notice that the %s placeholders are no longer in string quotes. Strings passed to the placeholders might contain some special characters. If necessary, these can be correctly escaped by the underlying library.
cursor.execute() makes sure that the values in the tuple received as argument are of the required data type. If a user tries to sneak in some problematic characters, then the code will raise an exception:
$ python modify_ratings.py
Enter movie id: 18
Enter reviewer id: 15"; UPDATE reviewers SET last_name = "A
Enter new rating: 5.0
Enter username: <user_name>
Enter password:
1292 (22007): Truncated incorrect DOUBLE value: '15";
UPDATE reviewers SET last_name = "A'
cursor.execute() will raise an exception if it finds any unwanted characters in the user input. You should use this approach whenever you incorporate user input in a query. There are other ways of preventing SQL injection attacks as well.
DELETE Command
Deleting records works very similarly to updating records. You use the DELETE statement to remove selected records.
नोट: Deleting is an irreversible प्रक्रिया। If you don’t use the WHERE clause, then all records from the specified table will be deleted. You’ll need to run the INSERT INTO query again to get back the deleted records.
It’s recommended that you first run a SELECT query with the same filter to make sure that you’re deleting the right records. For example, to remove all ratings given by reviewer_id = 2 , you should first run the corresponding SELECT query:
>>> select_movies_query = """
... SELECT reviewer_id, movie_id FROM ratings
... WHERE reviewer_id = 2
... """
>>> with connection.cursor() as cursor:
...     cursor.execute(select_movies_query)
...     for movie in cursor.fetchall():
...         print(movie)
...
(2, 7)
(2, 8)
(2, 12)
(2, 23)
The above code snippet outputs the reviewer_id and movie_id for records in the ratings table where reviewer_id = 2 . Once you’ve confirmed that these are the records that you need to delete, you can run a DELETE query with the same filter:
delete_query = "DELETE FROM ratings WHERE reviewer_id = 2"
with connection.cursor() as cursor:
    cursor.execute(delete_query)
    connection.commit()
With this query, you remove all ratings given by the reviewer with reviewer_id = 2 from the ratings table.
Other Ways to Connect Python and MySQL
In this tutorial, you saw MySQL Connector/Python, which is the officially recommended means of interacting with a MySQL database from a Python application. There are two other popular connectors:
-
mysqlclient is a library that is a close competitor to the official connector and is actively updated with new features. Because its core is written in C, it has better performance than the pure-Python official connector. A big drawback is that it’s fairly difficult to set up and install, especially on Windows.
-
MySQLdb is a legacy software that’s still used in commercial applications. It’s written in C and is faster than MySQL Connector/Python but is available only for Python 2.
These connectors act as interfaces between your program and a MySQL database, and you send your SQL queries through them. But many developers prefer using an object-oriented paradigm rather than SQL queries to manipulate data.
Object-relational mapping (ORM) is a technique that allows you to query and manipulate data from a database directly using an object-oriented language. An ORM library encapsulates the code needed to manipulate data, which eliminates the need to use even a tiny bit of SQL. Here are the most popular Python ORMs for SQL-based databases:
-
SQLAlchemy is an ORM that facilitates communication between Python and other SQL databases. You can create different engines for different databases like MySQL, PostgreSQL, SQLite, and so on. SQLAlchemy is commonly used alongside the pandas library to provide complete data-handling functionality.
-
peewee is a lightweight and fast ORM that’s quick to set up. This is quite useful when your interaction with the database is limited to extracting a few records. For example, if you need to copy selected records from a MySQL database into a CSV file, then peewee might be your best choice.
-
Django ORM is one of the most powerful features of Django and is supplied alongside the Django web framework. It can interact with a variety of databases such as SQLite, PostgreSQL, and MySQL. Many Django-based applications use the Django ORM for data modeling and basic queries but often switch to SQLAlchemy for more complex requirements.
You might find one of these approaches to be more suitable for your application. If you’re not sure which one to use, then it’s best to go with the officially recommended MySQL Connector/Python that you saw in action in this tutorial.
Conclusion
In this tutorial, you saw how to use MySQL Connector/Python to integrate a MySQL database with your Python application. You also saw some unique features of a MySQL database that differentiate it from other SQL databases.
Along the way, you learned some programming best practices that are worth considering when it comes to establishing a connection, creating tables, and inserting and updating records in a database application. You also developed a sample MySQL database for an online movie rating system and interacted with it directly from your Python application.
In this tutorial, you learned how to:
- Connect your Python app with a MySQL database
- Bring data from a MySQL database into Python for further analysis
- Execute SQL queries from your Python application
- Handle exceptions while accessing the database
- Prevent SQL injection attacks on your application
If you’re interested, Python also has connectors for other DBMSs like MongoDB and PostgreSQL. For more information, check out Python Database Tutorials.