MySql सबसे लोकप्रिय डेटाबेस में से एक है।
हमने अभी-अभी freeCodeCamp.org YouTube चैनल पर एक MySQL डेटाबेस कोर्स प्रकाशित किया है।
एक्ज़िक्यूट ऑन कमांड से भरत राम मनोहरन ने इस पाठ्यक्रम का निर्माण किया। वह एक वरिष्ठ डेटाबेस इंजीनियर और महान शिक्षक हैं।
यह कोर्स SQL बेसिक्स से शुरू होता है। फिर यह डेटा मॉडलिंग, लॉक्स, इंडेक्स, एसक्यूएल एक्सप्लेन, और बहुत कुछ जैसे प्रमुख डेटाबेस अवधारणाओं में भी जाता है।
इस पाठ्यक्रम में शामिल विषय यहां दिए गए हैं:
- AWS EC2 इंस्टेंस कैसे बनाएं
- MySQL डेटाबेस कैसे स्थापित करें
- डेटा मॉडलिंग
- एसक्यूएल बेसिक्स - एक टेबल बनाना
- एसक्यूएल मूल बातें - डेटा सम्मिलित करना
- एसक्यूएल मूल बातें - डेटा अपडेट करना और हटाना
- एसक्यूएल मूल बातें - डेटा पढ़ना (विवरण चुनें)
- एसक्यूएल जॉइन करता है
- लेन-देन अलगाव स्तर
- टेबल लेवल लॉक
- पंक्ति स्तर के ताले
- डेटाबेस गतिरोध
- संकुल अनुक्रमणिका
- एसक्यूएल समझाएं
पूरा कोर्स नीचे देखें या freeCodeCamp.org YouTube चैनल (2 घंटे की घड़ी) पर देखें।
प्रतिलेख
(स्वत:उत्पन्न)
MySQL सबसे लोकप्रिय डेटाबेस में से एक है, एक वरिष्ठ डेटाबेस इंजीनियर से इस पाठ्यक्रम में इसका उपयोग करना सीखें।
इस बुनियादी MySQL पाठ्यक्रम में आपका स्वागत है मैं एक नया कौशल सीखने की कोशिश करने के लिए आपकी सराहना करते हुए शुरू करना चाहता हूं।
मुझे अपना परिचय दें।
मेरा नाम बारबरा है और मैं एक वरिष्ठ डेटाबेस इंजीनियर के रूप में सेल्सफोर्स के लिए काम करता हूं, मेरे पास 12 से अधिक वर्षों का अनुभव है जिसमें विभिन्न प्रकार के डेटाबेस ओरेकल मुख्य हैं, मुझे चेस, पेपाल, वेल्स, फार्गो, स्टबहब जैसी कंपनियों के साथ काम करने का अनुभव है। आदि.
पहले मैं आपके लिए कुछ बुनियादी सवालों का जवाब दूं, और वह कौन, क्या और क्यों है।
तो किसे यह कोर्स करना चाहिए यह कोर्स उन डेटाबेस पेशेवरों के लिए है जो अपने कौशल सेट का विस्तार करना चाहते हैं।
यदि आप एक सॉफ्टवेयर इंजीनियर या पूर्ण स्टैक डेवलपर हैं और आप MySQL डेटाबेस की गहरी समझ हासिल करना चाहते हैं, तो यह कोर्स आपके लिए है।
और अगर आप कॉलेज के छात्र हैं, या कंप्यूटर विज्ञान के छात्र हैं या नए स्नातक हैं, तो यह कोर्स आपको डेटाबेस इंटर्नल पर कुछ ज्ञान देगा।
तो आपको MySQL क्यों सीखना चाहिए, MySQL सबसे लोकप्रिय ओपन सोर्स डेटाबेस है और निश्चित रूप से, Postgres।
SQL निश्चित रूप से ऊपर है।
जैसे-जैसे कंपनियां अपने डेटा को प्रीमियर से क्लाउड पर ले जाती हैं, वे लागत बचाने के लिए आमतौर पर क्लाउड नेटिव डेटाबेस, या ओपन सोर्स डेटाबेस, जैसे MySQL या Postgres सीक्वल में माइग्रेट करना पसंद करती हैं।
तो मान लीजिए कि आप Oracle डेटाबेस विशेषज्ञ हैं।
यदि आप MySQL जैसे डेटाबेस पर ज्ञान प्राप्त करते हैं, तो आप कंपनियों को Oracle से MySQL में अपना डेटा माइग्रेट करने में मदद कर सकते हैं, और यह वास्तव में मूल्यवान हो सकता है।
अब देखते हैं कि इस पाठ्यक्रम में क्या शामिल किया जा रहा है।
अब, सबसे पहले, MySQL से, मेरा मतलब है, इस पूरे पाठ्यक्रम में MySQL InnoDB स्टोरेज इंजन, जिसका उपयोग किसी भी वाणिज्य वेबसाइट, या बैंक या वित्तीय संस्थान आदि के पीछे किया जाता है।
और MySQL विभिन्न प्रकार के स्टोरेज इंजन प्रदान करता है, माई आई सैम, मेमोरी स्टोरेज इंजन में, या कुछ लोकप्रिय स्टोरेज इंजन, जो उपलब्ध हैं, हम MySQL InnoDB के बारे में जानने जा रहे हैं, मैं किसी अन्य प्रकार के स्टोरेज इंजन को कवर नहीं कर रहा हूं।
अब, ये वे विषय हैं जिन्हें मैं इस पाठ्यक्रम में शामिल करने जा रहा हूँ।
और कृपया ध्यान दें कि यह एक डेटाबेस प्रशासन पाठ्यक्रम है।
तो यह 80% डेटाबेस व्यवस्थापन है।
और जो लोग डेटाबेस के लिए पूरी तरह से नए हैं, उनके लिए मैंने SQL मूल बातें शामिल की हैं।
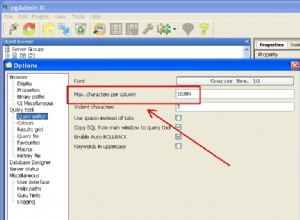
तो आप डेटाबेस इंस्टालेशन, MySQL वर्कबेंच, डेटाबेस इंडेक्स, डेटाबेस लॉग्स के बारे में सीखेंगे, आप थोड़ा परफॉर्मेंस ट्यूनिंग भी सीखेंगे, जो कि SQL एक्सप्लेन है।
तो ये कुछ दिलचस्प विषय हैं जिन्हें मैं कवर करने जा रहा हूँ।
तो इस कोर्स को शुरू करने के लिए आपको वास्तव में क्या चाहिए, आपको एक पीसी या मैक की आवश्यकता है।
इसलिए यदि आप एक पीसी का उपयोग कर रहे हैं, तो मेरा सुझाव है कि आप वास्तव में विवरण में संलग्न वर्कशीट या पूरक सामग्री को देखें।
अगर आपके पास मैक लैपटॉप है, तो आप इस कोर्स को सीखने के लिए सबसे अच्छी स्थिति में हैं।
क्योंकि तब आप देख सकते हैं कि मैं क्या लिख रहा हूँ।
और आप बस वही कमांड टाइप कर सकते हैं और बस अंत से अंत तक अनुसरण कर सकते हैं।
और सबसे बढ़कर, यह मुख्य आवश्यकता है, मैं चाहता हूं कि आप एक एडब्ल्यूएस खाता बनाएं, यह सही है और वेब सेवा खाते पर विस्मित है।
इसलिए यदि आप नहीं जानते कि मैं किस बारे में बात कर रहा हूं, तो कृपया मेरी वर्कशीट देखें जो विवरण में पाई जा सकती है, मैंने कुछ संसाधन संलग्न किए हैं, जो आपको दिखाएगा कि एडब्ल्यूएस खाता कैसे बनाया जाए, मैं इसका उपयोग करूंगा पूरे पाठ्यक्रम में एक एडब्ल्यूएस ईसी दो उदाहरण।
और मैं आपको दिखाऊंगा कि एक कैसे बनाया जाता है।
लेकिन एक मुख्य बात जो मैं आपको याद रखना चाहता हूं वह यह है कि आपके प्रत्येक अध्ययन सत्र के बाद, आप अपने ईसी दो उदाहरणों को बंद कर सकते हैं।
इस तरह आपको कोई अनावश्यक लागत नहीं चुकानी पड़ेगी।
और कृपया याद रखें कि आपको अपना ईसी दो इंस्टेंस 24 सात चालू रखने की ज़रूरत नहीं है।
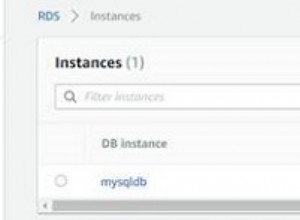
इसलिए एक बार जब आप एक एडब्ल्यूएस खाता बना लेते हैं, और साइन इन कर लेते हैं, तो आप इस डैशबोर्ड या इस पेज पर पहुंच जाएंगे।
और आप यहीं सेवा मेनू पर जा सकते हैं।
और फिर कंप्यूट के अंतर्गत, आप यहाँ पर बाईं ओर इज़ी टू सो ओवर चुन सकते हैं, आप इंस्टेंस चुन सकते हैं।
और फिर यहां हम एक उदाहरण बनाने जा रहे हैं जो हमारा प्रयोगशाला वातावरण होगा।
तो लॉन्च इंस्टेंस पर क्लिक करें।
और फिर हमारे उदाहरण के लिए एक छवि चुनें।
इसलिए मैं Red Hat Enterprise Linux संस्करण 864 बिट चुनने जा रहा हूं और मेरा इंस्टेंस प्रकार T टू माइक्रो होगा जो कि फ्री टियर योग्य है।
और आपको एक उपयुक्त सबनेट चुनना होगा।
यदि आपने अभी-अभी AWS खाता बनाया है, तो आप बस छोड़ सकते हैं।
जो भी डिफ़ॉल्ट सबनेट आपको दिखाई दे, उसे छोड़ दें।
मेरे लिए, मैं मुझे चुनने जा रहा हूँ एक विशिष्ट बनो।
और फिर इस ऑटो असाइन पब्लिक आईपी विकल्प को सक्षम करना सुनिश्चित करें।
क्योंकि यह आपके इंस्टेंस के लिए एक सार्वजनिक आईपी असाइन करेगा जिसके उपयोग से आप अपने लैपटॉप से अपने इंस्टेंस में एसएसएच कर सकते हैं, और अन्य सभी सेटिंग्स को वैसे ही छोड़ सकते हैं।
और डेटाबेस के लिए, या पूरे उदाहरण के लिए, 25 gigs की तरह आवंटित करें।
और आप बाकी ISIS को छोड़ सकते हैं, अगले पेज पर जाकर पढ़ सकते हैं, आप अपने उदाहरण के लिए एक टैग बना सकते हैं।
तो मैं इसे अपना SQL उदाहरण कहूंगा।
एक, सुरक्षा समूह पृष्ठ पर जाएँ।
और फिर यहाँ, जो महत्वपूर्ण है वह यह है कि आपको उदाहरण में SSH करने में सक्षम होना चाहिए।
और आपको इसके लिए उचित फ़ायरवॉल नियम बनाने की आवश्यकता है, मूल रूप से, दुनिया में कोई भी, पोर्ट 22 के माध्यम से इस उदाहरण में लॉग इन कर सकता है।
और यह बिल्कुल भी सुरक्षित नहीं है।
और मैं इस उदाहरण का ध्यान रखूंगा।
क्योंकि एक बार जब मैं रिकॉर्डिंग समाप्त कर लेता हूं, तो मैं आमतौर पर इसे हटा देता हूं।
तो मुझे पता है कि इसे कैसे संभालना है।
लेकिन जब आप नियम बनाते हैं, तो अपने लैपटॉप के आईपी को वहां रखना सुनिश्चित करें, ताकि यह अधिक सुरक्षित हो, फिर अब आप अपने कॉन्फ़िगरेशन की समीक्षा कर सकते हैं, और फिर लॉन्च पर क्लिक कर सकते हैं।
लेकिन अगर आप चाहें, तो आप एक नई कुंजी जोड़ी बना सकते हैं, और फिर उसे कुछ नाम दे सकते हैं।
और फिर इंस्टेंस बनाने से पहले इसे डाउनलोड करें।
मेरे लिए, मैं बस एक मौजूदा कुंजी युग्म चुनने जा रहा हूँ।
शायद यह एक, और मैं कहता हूँ ज्ञान, शायद एक अलग।
ठीक है, यह वाला।
और लॉन्च इंस्टेंस।
अब आपका इंस्टेंस बन रहा है, इस इंस्टेंस को बनाने में शायद कुछ मिनट लगें।
ठीक है, इस तरह से आप EC टू इंस्टेंस बनाते हैं।
और अब जब मेरा उदाहरण चल रहा है, और मैं सार्वजनिक आईपी देख सकता हूं।
बाद में, मैं इस उदाहरण पर MySQL स्थापित करूँगा।
तो यही मैं आपको इस पाठ में दिखाना चाहता था।
तो आप जो देख रहे हैं वह मूल रूप से मेरा सीक्वल दस्तावेज है जो इन सभी विभिन्न इंस्टॉलेशन गाइडों को दिखा रहा है, जैसे कि विंडोज और मैक, और इसी तरह।
इसलिए हम लिनक्स इंस्टॉलेशन में रुचि रखते हैं, मूल रूप से लिनक्स पर MySQL इंस्टॉलेशन हैं।
और वास्तव में कुछ गाइड हैं।
तो यह मूल रूप से जेनेटटेक बाइनरी स्थापित कर रहा है, हम इसे छोड़कर यहां जाएंगे।
और यहां तक कि लिनक्स पर MySQL को स्थापित करने के लिए, गाइड का एक समूह है।
तो स्थापना की अनुशंसित विधि Oracle से RPM संकुल का उपयोग कर रही है।
लेकिन हम इस MySQL यम रिपॉजिटरी आधारित इंस्टॉलेशन का उपयोग करने जा रहे हैं।
और यह वास्तव में काफी सीधा है।
तो इस स्थापना के लिए, हमें MySQL कॉम और डाउनलोड पर जाना होगा।
और हम सामुदायिक संस्करण डाउनलोड कर रहे हैं और यम रिपॉजिटरी में जा रहे हैं।
जैसा कि आप जानते हैं, हमने जो उदाहरण बनाया है उसमें Archie l आठ, Red Hat, Enterprise Linux आठ चल रहे हैं।
और इसलिए हमें यह आरपीएम डाउनलोड करना होगा।
लेकिन फिर हमें उस उदाहरण पर ही आरपीएम डाउनलोड करना होगा, जिसे हमने बनाया था।
तो चलिए वास्तव में इंस्टेंस में लॉग इन करते हैं।
इसलिए मैं SSH का उपयोग करने जा रहा हूँ, और हम अपनी निजी कुंजी का उपयोग करने जा रहे हैं।
और लॉगिंग उपयोगकर्ता के लिए डिफ़ॉल्ट उपयोगकर्ता चुनना आसान है और मूल रूप से मेरे इंस्टेंस लॉगिन का सार्वजनिक आईपी प्राप्त करता है और हम रूट ओके पर स्विच करते हैं।
तो इस RPM को इस Linux इंस्टेंस में डाउनलोड करने के लिए एक चीज़ जो हमें चाहिए वो है W get package.
तो चलिए आगे बढ़ते हैं और पहले उसे इंस्टॉल करते हैं।
ठीक है, तो अब जब w गेट स्थापित हो गया है, तो हमें वह RPM डाउनलोड करना होगा जो हमने अभी देखा था।
तो इस RPM का लिंक प्राप्त करने के लिए, हमें इस डाउनलोड में जाना होगा।
और हमें यहां राइट क्लिक करना है और लिंक को कॉपी करना है।
और यदि आप किसी भिन्न OSS पर इंस्टॉल कर रहे हैं, तो आपको उपयुक्त बटन पर क्लिक करना होगा।
ठीक है, तो हमें लिंक मिल गया है, और चलिए आगे बढ़ते हैं और उस लिंक को यहाँ पेस्ट करते हैं, जैसे w get और लिंक।
और वह आदेश इस पैकेज को डाउनलोड करता है, अब हम इस पैकेज को स्थापित करने के लिए एक RPM कमांड का उपयोग करने जा रहे हैं।
तो यह पैकेज, जैसा कि मैंने पहले उल्लेख किया है, इस MySQL यम रेपो को आपकी स्थानीय सिस्टम रेपो सूची में जोड़ने जा रहा है।
Red Hat Enterprise Linux संस्थापन के साथ, आपको डिफ़ॉल्ट रूप से एक MySQL मॉड्यूल की तरह मिलता है।
तो चलिए इसे अक्षम करते हैं।
यदि आप इसे अक्षम नहीं करते हैं, तो यह हमारे MySQL इंस्टालेशन में हस्तक्षेप करेगा।
तो चलिए आगे बढ़ते हैं और इस कमांड का उपयोग करके इसे अक्षम करते हैं।
और इन आदेशों को लिखने के बारे में चिंता न करें, मैं विवरण में इन सभी टिप्पणियों के साथ अपने गिट रेपो का लिंक डालूंगा।
इसलिए इन सभी को अक्षम कर दिया गया है।
अब आगे बढ़ते हैं और yum install MySQL समुदाय सर्वर का उपयोग करके MySQL समुदाय सर्वर संस्करण स्थापित करते हैं।
और आगे बढ़ने और सभी संकेतों को स्वीकार करने के लिए माइनस y को उसमें डाल दें।
और वह इन सभी पैकेजों को स्थापित कर रहा है।
ठीक है, तो मेरा एसक्यूएल स्थापित कर दिया गया है।
आइए आगे बढ़ते हैं और सिस्टम CTL का उपयोग करके MySQL डेटाबेस को प्रारंभ करते हैं।
कमांड।
और स्थिति की जांच करते हैं।
तो अब, मेरा SQL डेटाबेस तैयार है और चल रहा है।
ठीक है, तो इस MySQL डेटाबेस सॉफ़्टवेयर की लॉग फ़ाइल var log के अंतर्गत है।
और फिर यदि आप इस लॉग फ़ाइल से अस्थायी पकड़ लेते हैं, तो आपको रूट उपयोगकर्ता के लिए अस्थायी पासवर्ड मिल जाएगा।
और आप इसका उपयोग MySQL डेटाबेस में लॉग इन करने के लिए कर सकते हैं।
और आप कैसे लॉग इन करते हैं, आप इस कमांड का उपयोग माय सीक्वल माइनस यू करते हैं, जो रूट होने वाला है और माइनस पी पासवर्ड आधारित लॉगिन के लिए है।
और फिर हम MySQL डेटाबेस में लॉग इन कर रहे हैं।
तो चलिए इस पासवर्ड का उपयोग करते हैं और देखते हैं कि यह लॉग इन करता है या नहीं।
और हम अंदर हैं।
और यदि आप इस बिंदु पर कोई कमांड चलाते हैं, तो मेरा सीक्वल आपको उपयोगकर्ता स्टेटमेंट को बदलकर पासवर्ड रीसेट करने के लिए कहेगा।
हम इसे अलग तरीके से कर सकते हैं।
तो एक निष्पादन योग्य है जिसे MySQL admin कहा जाता है।
और इसके लिए यह आदेश है।
MySQL एडमिन, माइनस यू यूजर नेम और माइनस पी पासवर्ड।
हम रूट उपयोगकर्ता का पासवर्ड रीसेट करने जा रहे हैं।
और आइए पहले वर्तमान पासवर्ड प्रदान करें जो कि यह अस्थायी पासवर्ड है।
और चलिए नया पासवर्ड नंबर प्रदान करते हैं।
ठीक है, पासवर्ड स्वीकार कर लिया गया है।
अब मैं इस नए पासवर्ड के साथ लॉग इन करने की कोशिश करता हूं, पिछले कमांड माई एसक्यूएल माइनस यू साबित और माइनस पी माईएसक्यूएल का उपयोग करके।
मुझे वह पासवर्ड डालने दें जो मैंने कहा था कि अभी हम अंदर हैं।
तो चलिए आगे बढ़ते हैं और एक साधारण शो डेटाबेस कमांड चलाते हैं जो इंस्टॉलेशन के हिस्से के रूप में आने वाले सभी डिफ़ॉल्ट डेटाबेस को दिखाता है।
तो एक और चीज जो हमें इंस्टॉलेशन को पूरा करने के लिए करने की ज़रूरत है वह है टाइमज़ोन फ़ाइल या टाइमज़ोन टेबल लोड करना जैसा कि यहां दिखाया गया है।
तो अगर मैं एक चुनिंदा स्टार करता हूं, जो मूल रूप से इस तालिका से पढ़ने के लिए एक SQL क्वेरी है, तो आप देख सकते हैं कि तालिका अभी खाली है।
तो चलिए बाहर निकलते हैं और एक और कमांड चलाते हैं।
समय क्षेत्र संबंधी डेटा लोड करने के लिए।
तो यह है आदेश।
और चलिए आगे बढ़ते हैं और इसे चलाते हैं।
और मैं आगे बढ़ूंगा और अपना पासवर्ड डालूंगा, और यह डेटा का एक गुच्छा लोड करता है, आप इन सभी चेतावनियों को अनदेखा कर सकते हैं।
आइए अपने MySQL डेटाबेस पर वापस जाएं।
इसलिए यदि आप MySQL डॉट टाइमज़ोन से चुनिंदा स्टार के रूप में करते हैं, तो यह डेटा का एक गुच्छा दिखाता है।
तो अब, आप अच्छे हैं।
और यह MySQL डेटाबेस इंस्टालेशन को पूरा करता है।
ठीक है, दोस्तों, इस खंड में, हम डेटा मॉडलिंग के बारे में बात करने जा रहे हैं।
ठीक है, इसलिए डेटाबेस डिज़ाइन, डेटा मॉडलिंग, स्कीमा डिज़ाइन, ये सभी विनिमेय शब्द हैं, डेटाबेस डिज़ाइन के लिए शर्तें एक सतत प्रक्रिया है।
इसलिए जब आप अपना एप्लिकेशन बनाना पसंद करते हैं, तो आप एक बुनियादी डिज़ाइन के साथ आते हैं।
और फिर, जैसा कि आप जानते हैं, एप्लिकेशन को नई सुविधाएँ, एन्हांसमेंट, सुधार मिलते हैं, आप मूल रूप से इस डिज़ाइन पर पुनरावृति करते हैं, ठीक है, आप अपने डिज़ाइन में नई चीज़ें जोड़ते रहते हैं, और इसी तरह।
इसलिए जब आप डेटाबेस डिज़ाइन या डेटा मॉडलिंग कर रहे होते हैं तो सबसे पहले आप व्यवसाय डेटा को समझते हैं।
और फिर एक बार जब आप व्यावसायिक डेटा को समझ लेते हैं, तो आपको अपने डेटाबेस के तार्किक डिज़ाइन के साथ आना होगा।
उससे मेरा मतलब क्या है? ठीक है, मूल रूप से, आपको अपनी तालिकाओं, स्तंभों को डिज़ाइन करना होगा, जो उन तालिकाओं, अनुक्रमणिकाओं, बाधाओं में जाते हैं, जैसे प्राथमिक कुंजी बाधा, अद्वितीय कुंजी बाधा, शून्य बाधाएं नहीं, डिफ़ॉल्ट मान, विदेशी कुंजी, ये सभी विभिन्न चीजें हैं जो आप बनाने की जरूरत है।
जब आप अपने स्कीमा के तार्किक डिज़ाइन के साथ आते हैं, एक बार जब आपके पास वास्तव में यह मूल तालिका डिज़ाइन या स्कीमा डिज़ाइन होता है, तो आप डेटा अतिरेक की तलाश कर सकते हैं, यानी मूल रूप से आप देखते हैं कि आपका डेटा कहाँ दोहराया जाता है।
और फिर आप वास्तव में अपनी तालिकाओं को सामान्य करके इसे समाप्त करना शुरू कर देते हैं।
और ऐसा इसलिए है क्योंकि डेटा अतिरेक डेटा विसंगतियों का कारण बनता है।
मेरे कहने का मतलब यह है कि, जब आपके पास एक ही डेटा की कई आवृत्तियां होती हैं, जब आप कुछ डेटा को अपडेट कर रहे होते हैं, तो आपको कई जगहों पर अपडेट करना होता है।
और अगर आप एक जगह भी अपडेट करना भूल जाते हैं, तो अब आपके पास अपने डेटाबेस में एक ही डेटा के दो संस्करण हैं।
और यह डेटा विसंगति पैदा करता है डेटा असंगति वास्तव में उसी तर्ज पर है।
और यह सब डेटा अतिरेक के कारण होता है।
तो हम जो देख रहे हैं वह मूल रूप से एक स्प्रेडशीट है और स्प्रेडशीट मूल रूप से एक बड़ी टेबल एक बड़ी टेबल है, है ना? और, और हम जो करने जा रहे हैं वह मूल रूप से एक ई-कॉमर्स वेबसाइट के लिए एक टेबल डिजाइन करना है, एक ई-कॉमर्स वेबसाइट मूल रूप से एक अद्भुत क्षेत्र की तरह है, या ई बे, या जो कुछ भी, ऑनलाइन व्यापार की तरह, ऑनलाइन ई-कॉमर्स वेबसाइट, जैसे अलीबाबा , या कुछ भी, है ना? मान लीजिए, इस डेटाबेस में आपके पास केवल एक टेबल है, है ना? और आप शुरू करते हैं, जैसे ही आदेश आते हैं, इस वेबसाइट के माध्यम से, आप इस तालिका में डेटा डालना शुरू करते हैं, है ना? आपके पास है, आप जानते हैं, आइए उन कुछ चीजों को देखें जिन्हें आप इस तालिका में रिकॉर्ड करेंगे, ठीक है, आपको स्पष्ट रूप से अपने आदेशों की गिनती की आवश्यकता है।
तो आप अपने ऑर्डर को क्रमांकित करना पसंद कर सकते हैं, और फिर यह कैसे आ रहा है, आप जानते हैं, यह डेस्कटॉप है या मोबाइल? या यह कौन सा उत्पाद है? जैसे, आप जानते हैं, यहाँ मुझे कुछ किताबें, किताबों के शीर्षक और फिर उत्पादों की कीमत मिली है।
और फिर ग्राहक ग्राहक कौन है विवरण, भुगतान विवरण, वितरण विवरण, इत्यादि।
तो ये सभी मूल रूप से ई-कॉमर्स शब्द का हिस्सा हैं।
सही? और आपके पास एक विशाल टेबल है।
और अगर आप यहां डेटा देखें, है ना? तो, आप जानते हैं, यहाँ, मुझे कुछ ऐसे ग्राहक मिल गए हैं जो आपको खरीद रहे हैं, दो अलग-अलग उत्पाद उत्पादों की तरह, ठीक है।
तो, और आप देख सकते हैं कि डेटा दोहराया गया है।
मेरा मतलब यह है कि हर बार जब मैं एक ही उत्पाद खरीदता हूं, तो मुझे इस डेटा को दोहराना पड़ता है, जैसे पहला ऑर्डर वेब डेस्कटॉप वेबसाइट के माध्यम से आया था जो जन्म से लाया गया था और फिर आप इसके सभी विवरण देख सकते हैं ग्राहक और उत्पाद और भुगतान के बारे में सभी विवरण, भुगतान विवरण भी।
फिर दूसरा ऑर्डर जो आया वह किसी दूसरे व्यक्ति का था, लेकिन तब वह था, आप जानते हैं, ऑर्डर उसी उत्पाद के लिए था और आपको उत्पाद की जानकारी दोहरानी थी।
सही।
तीसरा पिछले ग्राहक का था।
लेकिन फिर इस बार उन्होंने एक अलग उत्पाद खरीदा, उनकी जानकारी, ग्राहक जानकारी वास्तव में दोहराई गई है।
इसलिए बहुत अधिक डेटा अतिरेक है डेटा दोहराए गए हैं।
तो, यह मूल रूप से एक असामान्य डेटाबेस है, जहां आपके पास केवल एक टेबल या मुट्ठी भर टेबल हैं, हम आपकी वेबसाइट, या आपके व्यवसाय से सभी जानकारी को इन कुछ तालिकाओं में वापस कर देते हैं।
वास्तव में, यह आपके डेटाबेस का एक असामान्य संस्करण है, आइए वास्तव में देखें कि आप और क्या कर सकते हैं।
तो आप क्या कर सकते हैं मूल रूप से, आप इस मूल denormalize तालिका के साथ शुरू कर सकते हैं, और फिर आप अपने डेटाबेस या अपनी तालिका कार्रवाई से सभी अनावश्यक जानकारी निकालना शुरू कर सकते हैं, यह पहली चीज जो मैंने की थी, मैं ग्राहक की जानकारी की तरह निकाला गया था , उन्होंने इसे एक अलग टेबल में रखा है, ठीक है।
और मुझे यहां केवल ग्राहक विवरण मिला है।
और मैंने प्रत्येक ग्राहक आईडी या ग्राहक संख्या के लिए एक आईडी नंबर डालना शुरू कर दिया, चाहे आप इसे कुछ भी कहें।
एक बार जब मैं ग्राहक की जानकारी निकाल लेता हूं, तो मेरे पास ऑर्डर टेबल, प्रारंभिक तालिका होती है, मैं ऑर्डर टेबल को इस तरह दिख रहा हूं, है ना? और आप देख सकते हैं कि मुझे यहां ग्राहक आईडी कॉलम जैसा मिल गया है।
और यह ग्राहक आईडी कॉलम क्या है? आपके अनुमान? सही? तो यह ग्राहक आईडी कॉलम वही है जो आप यहां देख रहे हैं।
सही? तो और मेरे पास ऐसा क्यों है क्योंकि मुझे इन पंक्तियों को जोड़ने का एक तरीका चाहिए।
जैसा कि आप बता सकते हैं, जैसे, आप जानते हैं, ये कॉलम हैं, ये पंक्तियाँ हैं, ये पंक्तियाँ हैं, मुझे एक ग्राहक से संबंधित होने में सक्षम होने की आवश्यकता है, है ना? अगर मैं ग्राहक की जानकारी निकालता हूं, तो मैं कैसे संबंधित हो सकता हूं? तुम्हें पता है, यह टेबल और वह टेबल? यह एक सामान्य स्तंभ, या स्तंभों के समूह के माध्यम से होता है।
दरअसल, इस मामले में, यह सिर्फ एक कॉलम है।
तो ग्राहक आईडी, है ना? मैं यहां आईडी नंबर डालने जैसा हूं।
और वास्तव में हम इस तालिका से और क्या निकाल सकते हैं।
तो यह सामान्यीकरण का एक स्तर है।
सही? तो चलिए सामान्य करते रहते हैं जो उत्पाद विवरण निकालने जैसा है।
सही? इसलिए उत्पाद विवरण भी दोहराया जा रहा है।
तो यहाँ, आपको इतना दर्द महसूस नहीं होता, क्योंकि इस तालिका में केवल तीन रिकॉर्ड हैं।
क्या होगा यदि तालिका में मिलियन रिकॉर्ड हैं, है ना? यही कारण है कि हमें तालिका को सामान्य करने की आवश्यकता है।
अब आप वास्तव में उत्पाद की जानकारी निकालते हैं और उसे एक अलग टेबल पर ले जाते हैं।
और फिर मेरे पास नंबर के लिए एक उत्पाद आईडी कॉलम है, जैसे वास्तव में उत्पादों की आईडी, और आपकी ऑर्डर तालिका इस तरह दिखेगी, फिर आप भुगतान जानकारी को एक अलग तालिका में ले जाते हैं।
और आपकी आदेश तालिका तब इस तरह दिखाई देगी।
यह मूल रूप से एक असामान्य स्कीमा या डेटाबेस से सामान्यीकृत डेटाबेस में जाने की प्रक्रिया है।
जब आपका डेटा एक ही टेबल में होता है, तो आपको कोई जोड़ करने की आवश्यकता नहीं होती है।
तो आप वास्तव में पूछ सकते हैं कि वास्तव में जोड़ क्या होते हैं, जब आप क्वेरी चला रहे होते हैं, जैसे SQL का उपयोग करना, SQL एक भाषा सही है? एक संरचित क्वेरी भाषा, जब आप अपने डेटाबेस में कमांड चला रहे होते हैं, तो आप इस एक टेबल से अपना सारा डेटा प्राप्त कर सकते हैं यदि आपका टेबल डेटाबेस पूरी तरह से असामान्य है।
जबकि यदि आपके पास कई टेबल हैं, तो आपको अस्तबल को मिलाना या उसमें शामिल होना होगा और फिर आपको डेटा निकालना होगा।
तो इसे तालिकाओं में शामिल होना कहते हैं।
इसलिए जब आपके पास एक असामान्य डेटाबेस होता है, तो आपको कई जोड़ों को करने की आवश्यकता नहीं होती है।
और यह एक तरह से अच्छा है क्योंकि आपके डेटाबेस को डेटा प्राप्त करने के लिए इतना सोचने की आवश्यकता नहीं है।
आप कहते हैं कि मुझे यह डेटा चाहिए और यह डेटा इस तालिका में उपलब्ध है।
तो यह बहुत सीधा है।
जबकि एक सामान्यीकृत डेटाबेस की तरह, जब आप कई तालिकाओं में शामिल होते हैं, तो आपका डेटाबेस इंजन जिसके साथ वे ऑप्टिमाइज़र कहते हैं, Oracle में या अधिकांश टेप में अधिकांश डेटाबेस।
तो इस डेटाबेस इंजन को और अधिक सोचना होगा जैसे, ठीक है, मुझे पहले कौन सी तालिका स्कैन करनी चाहिए? और मुझे इस तालिका में डेटा को कैसे फ़िल्टर करना चाहिए।
और फिर ठीक है, मैं उस तालिका से परिणाम सेट लेता हूं और इन अन्य तालिकाओं के साथ जुड़ना होता है।
इसलिए इस डेटाबेस पर जो भी सर्वर चल रहा है, उस पर बहुत अधिक विचार हो रहा है और बहुत अधिक प्रोसेसिंग होनी है।
सही।
और उसके कारण, प्रदर्शन एक प्रकार से लचीला होगा।
निचला दायाँ और यह बहुत सारे संसाधनों का उपभोग करेगा और आपके पास वह सब कुछ है जो बड़े पैमाने पर हो रहा है जैसे कि एक ही समय में कई ऑपरेशन हो रहे हैं, तो आपके पास मूल रूप से धीमा प्रदर्शन है, या कम से कम एक में जो होता है उससे कम होता है डेटाबेस को डीनॉर्मलाइज़ करें, लेकिन साथ ही, हम इतना डेटा दोहराव हटा रहे हैं या डेटा रिडंडेंसी बहुत कम है, इस वजह से, एक सामान्यीकृत डेटाबेस में आवश्यक स्टोरेज बहुत कम है।
इसलिए, आप वास्तव में सामान्यीकृत करना पसंद नहीं कर सकते हैं और कह सकते हैं कि एक सामान्यीकृत डेटाबेस हमेशा धीमा रहेगा या डेटाबेस को डीनॉर्मलाइज़ करना तेज़ होगा, यह सब ऐसा है जैसे यह वास्तव में निर्भर करता है कि आपको डेटा को देखना होगा और देखना होगा कि कितनी पुनरावृत्ति हो रही है, आदि।
तो, लेकिन आम तौर पर ऐसा ही होता है, जैसा कि आप इस डिजाइन प्रक्रिया से गुजरते हैं, ठीक है, आप जानते हैं, देखें कि हमने वास्तव में क्या किया है, ठीक है।
इसलिए, हमने तय किया है, हमें जिन तालिकाओं की आवश्यकता है, जैसा कि आप जानते हैं, हमारे पास ऑर्डर हैं, टेबल उत्पादों को ग्राहक और भुगतान मिलते हैं, और हम कॉलम के नाम तय करते हैं।
और फिर इतना ही नहीं प्रत्येक तालिका के लिए, आपको वास्तव में यह तय करना होगा कि प्राथमिक कुंजी क्या होगी।
प्राथमिक कुंजी के रूप में मेरा मतलब यह है कि एक अद्वितीय कुंजी है और जो शून्य नहीं हो सकती है, वास्तव में, जो बहुत महत्वपूर्ण है।
तो इस प्राथमिक कुंजी का उपयोग करके, आप इस तालिका में किसी भी रिकॉर्ड, इस तालिका में किसी भी पंक्ति की पहचान करने में सक्षम होना चाहिए।
उदाहरण के लिए, अगर मैं यहां कहता हूं, प्राथमिक कुंजी ऑर्डर नंबर है, तो मैं कभी भी, अगर मेरे पास ऑर्डर नंबर है, तो मैं इस टेबल को देख सकता हूं, मान लें कि ऑर्डर नंबर दो के बराबर है, मैं बस यह रिकॉर्ड प्राप्त कर सकता हूं मेरा डेटाबेस।
और फिर आपको वास्तव में कुछ अद्वितीय कुंजियों की तरह होना चाहिए, ठीक है।
इसलिए अद्वितीय कुंजियाँ काफी हद तक प्राथमिक कुंजी की तरह होती हैं।
और एक अद्वितीय कुंजी अब प्राथमिक कुंजी हो सकती है, जैसा कि मैंने उल्लेख किया है, शून्य नहीं हो सकती है।
और फिर आप अपनी टेबल पर इंडेक्स भी रख सकते हैं।
इसलिए इंडेक्स मूल रूप से आपके दिन के डेटा को तेज़ी से चुनने के तरीके हैं।
मान लें कि मैं अक्सर ग्राहक के ईमेल के आधार पर इस तालिका को खोजता हूं, तो मुझे ग्राहक ईमेल कॉलम पर एक अनुक्रमणिका चाहिए, ठीक है, आपको यह तय करने की आवश्यकता है।
और आपको यह तय करना होगा कि कौन से कॉलम रिक्त हो सकते हैं।
सही? यहां, कोई भी कॉलम रिक्त नहीं हो सकता।
मान लें कि आपके पास एक और कॉलम है, जिसे ग्राहक वरीयता कहते हैं, जैसे कि किस प्रकार की शिपिंग या किस प्रकार का या कौन सा फ़ोन नंबर पसंद किया जाता है, या ऐसा ही कुछ।
तो यह एक अशक्त स्तंभ हो सकता है, है ना? तो आपके पास कोई भी कॉलम नहीं हो सकता है।
अन्यथा, आप अपने कॉलम को शून्य नहीं के रूप में परिभाषित करते हैं।
मान लीजिए, आपकी ऑर्डर तालिका में, आपके पास यह डिलीवर कॉलम है, जब कोई ऑर्डर मूल रूप से तब बनाया जाता है जब कोई ग्राहक आपकी वेबसाइट पर कोई उत्पाद खरीदता है।
बेशक, इसे तुरंत डिलीवर नहीं किया जाता है, ऑर्डर निर्माण के समय, डिलीवर किए गए कॉलम में हमेशा नहीं या n, n मान होगा, है ना? ये सभी चीज़ें, ये सभी फ़ैसले जिनकी हम बात कर रहे हैं, स्कीमा डिज़ाइन का हिस्सा हैं।
और एक बार जब आपको यह सब पता चल जाए, तो आप जानकारी को अपने डिज़ाइन टूल इकाई संबंध डिज़ाइन टूल में डाल सकते हैं।
और अगले भाग में, मैं आपको दिखाऊंगा कि मैं इसे कैसे करता हूं सीक्वल वर्कबेंच पर, मेरी सीक्वल वर्ल्ड वर्कबेंच, मूल रूप से, आप वास्तव में अपने डेटाबेस के तार्किक डिजाइन का एक सचित्र प्रतिनिधित्व कर सकते हैं, ठीक है।
और इसे मूल रूप से आप ER डायग्राम कहते हैं।
और निश्चित रूप से, आप दो तालिकाओं के बीच संबंध के बारे में बात कर सकते हैं, मान लें कि आप कह सकते हैं ओह, इस तालिका में यह तालिका, उनका एक से अनेक संबंध हैं, उदाहरण के लिए, प्रत्येक ग्राहक कई ऑर्डर दे सकता है।
तो यह वास्तव में एक से अनेक संबंध है, ठीक है।
लेकिन एक, आप जानते हैं, एक ऑर्डर केवल एक ग्राहक द्वारा किया जा सकता है।
सही? तो, इस तरह की बात।
तो आपके पास एक से एक संबंध है, एक से कई संबंध हैं, या कई तालिकाओं के बीच कई संबंध हैं।
दरअसल, ये सभी डेटा मॉडलिंग का हिस्सा हैं।
लेकिन आपको इसके बारे में इतना चिंतित होने की आवश्यकता नहीं है, जब तक आपको इस बात का स्पष्ट अंदाजा हो कि आपके डेटाबेस में कौन सा डेटा आ रहा है।
और साथ ही, आपको अपने कॉलम के डेटा प्रकार की तरह परिभाषित करने की आवश्यकता है।
दरअसल, यह बहुत महत्वपूर्ण है।
आपके नाम एक जंगली चरित्र होने जा रहे हैं।
आप जानते हैं, फ़ोन नंबर नंबर हो सकते हैं, और फिर ईमेल फिर से एक घड़ी चार्ट की तरह होता है।
और आपका आईडी कॉलम या नंबर कॉलम इंट या नंबर होने वाला है।
ये सभी कुछ निर्णय हैं जो आप आपको करेंगे एक डेटा मॉडलिंग कार्य में, वास्तव में, मैं डेटा मॉडलिंग के बारे में इतना ही कहना चाहता हूं, फिर हम इसके बारे में और भी बहुत कुछ बता सकते हैं।
और परमाणु की तरह, आप की तरह, आपके पास एक कॉलम में पैक किए गए सभी पते, तरह की विशेषताएँ हैं, हमें, हमें उसे भी विभाजित करने की आवश्यकता है।
तो इसे परमाणुता कहते हैं।
आपके पास अलग से पता हो सकता है, शहर अलग से राज्य अलग से, और, आप जानते हैं, ज़िप कोड अलग से, ठीक है।
तो इस प्रकार की चीजें, ऐसी बारीकियां हैं जो आपके डेटाबेस को अधिक से अधिक कुशल बनाती हैं।
और, ज़ाहिर है, हम वहाँ बहुत अधिक विवरण में नहीं जा रहे हैं।
लेकिन यह बुनियादी डेटा मॉडलिंग है जिसे आपको समझने की जरूरत है।
और जैसा कि मैंने पहले कहा, अगले भाग में, मैं आपको दिखाऊंगा कि इसे कैसे लेना है और फिर इसे अपने सीक्वल वर्कबेंच पर इनपुट करना है।
पिछले खंड में मैंने जो किया उसका त्वरित पुनर्कथन, मैंने मूल रूप से एक ई-कॉमर्स वेबसाइट का तार्किक डिज़ाइन बनाया।
तो आप जो देख रहे हैं वह एक टेबल है जिसके साथ मैंने शुरुआत की थी।
यह एक असामान्य तालिका है, और हमने मूल रूप से इस असामान्य तालिका को लिया, और हमने इसे सामान्यीकृत किया।
जैसा कि आप देख सकते हैं, इस तालिका के चार संस्करण हैं, मैं इस तालिका को आदेश तालिका कह रहा हूँ।
तो इसके चार अलग-अलग संस्करण हैं।
और मैं प्रत्येक पुनरावृत्ति के साथ, मैंने दोहराए गए डेटा को निकाल लिया।
तो आखिरकार, हम मूल ऑर्डर टेबल के अलावा चार टेबल के साथ उतरे।
तो अब हमारे पास ग्राहक उत्पाद और भुगतान भी हैं।
इस वीडियो में, मैं अब सभी अस्तबलों को लेने जा रहा हूँ और फिर मैं संरचना लेने जा रहा हूँ, और मैं एक तार्किक डिज़ाइन बनाने जा रहा हूँ।
ठीक है, तो चलिए वास्तव में MySQL वर्कबेंच पर चलते हैं और मैं पहले से ही एक डेटाबेस से जुड़ा हुआ हूं, मैं जो करने जा रहा हूं वह है फाइल पर जाएं और नए मॉडल पर जाएं।
इसलिए यहां हम एक नया ईआर आरेख, एक इकाई संबंध आरेख जोड़ सकते हैं।
और इस डेटाबेस को ईकॉम कहते हैं।
स्टोर करें, ऐसा ही कुछ।
तो चलिए आगे बढ़ते हैं और अपनी टेबल बनाना शुरू करते हैं।
अब, मैं उन सभी चार तालिकाओं का निर्माण नहीं करने जा रहा हूँ जिनमें शायद अधिक समय या अधिक समय लगेगा, और मैं कुछ तालिकाओं का निर्माण करने जा रहा हूँ।
और आपके लिए यह समझने के लिए पर्याप्त होना चाहिए कि हम यह कैसे कर रहे हैं।
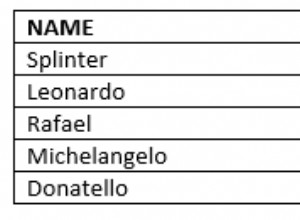
तो चलिए बस ग्राहक तालिका से शुरू करते हैं।
तो ग्राहक तालिका में पांच कॉलम हैं, यह एक नई तालिका बनाने के लिए आइकन है, आप खींच सकते हैं और छोड़ सकते हैं, या आप अब डबल क्लिक करने का प्रयास कर सकते हैं और फिर ग्राहक नामक एक तालिका बना सकते हैं और यहां हम तालिका को कॉलम डालना शुरू कर सकते हैं नाम ग्राहक आईडी, और फिर यह आपके अनुक्रम से पॉप्युलेट होने वाला है।
तो अनुक्रम एक डेटाबेस ऑब्जेक्ट है।
और यह एक पूर्णांक होने जा रहा है।
तो हम इसे वैसे ही छोड़ सकते हैं।
और हम इसे प्राथमिक कुंजी के रूप में प्राप्त कर सकते हैं, यह ठीक है और प्राथमिक कुंजी को पॉप्युलेट करना होगा, यह अभी नहीं हो सकता है।
तो वह स्वतः ही चयनित हो जाता है।
अगला ग्राहक नाम है, हम उसे पहले नाम में विभाजित कर सकते हैं, और फिर हम अपनी घड़ी चुन सकते हैं और शायद नाम की लंबाई और फिर अंतिम नाम के रूप में थोड़ा और कमरा दे सकते हैं, मैं 100 देख सकता हूं और फिर ये सभी अभी नहीं हो सकता इसलिए हम नल बाधा नहीं चुन सकते हैं।
तो ये विभिन्न बाधाएं हैं जो उपलब्ध हैं।
चलिए अगले एक पते के साथ फिर से आगे बढ़ते हैं।
और अगर आपको याद है तो मैंने परमाणुता के बारे में बात की थी।
तो आप चाहते हैं कि आपके कॉलम आप जानते हों, परमाणु में, इस अर्थ में कि यहां, मूल रूप से पूरा पता एक कॉलम में पैक किया गया है।
वास्तव में परमाणु कॉलम में अलग से एक पते के रूप में विभाजित करने के लिए अच्छा अभ्यास, शहर अलग से राज्य अलग से और फिर अलग से ज़िप कोड।
तो हमारे पास ये सब हैं, ज़ाहिर है, इनमें से कोई भी अभी नहीं हो सकता और और क्या है? तो ग्राहक फोन नंबर, फोन नंबर सभी नंबर होने जा रहे हैं।
लेकिन फिर मैं 10 नंबर प्राप्त करना चाहता हूं, निश्चित रूप से शून्य और ग्राहक ईमेल नहीं।
तो मैं सिर्फ ईमेल आईडी कह सकता हूं 100 ठीक है, शून्य नहीं।
इसलिए चूंकि आई आईडी यहां प्राथमिक कुंजी या ग्राहक आईडी है, इसलिए मैं यह सुनिश्चित करना चाहता हूं कि ग्राहक जानकारी को दोहराने से बचने के लिए हमारे पास एक बाधा है।
उदाहरण के लिए, यदि आपके पास आईडी एक के लिए एक ग्राहक डेटा है, तो मैं नहीं चाहता कि एक ही ग्राहक, ग्राहक डेटा एक अलग आईडी के लिए दोहराए, उदाहरण के लिए, आईडी दो।
इसलिए मैं वास्तव में यहां प्रत्येक रिकॉर्ड के लिए ईमेल आईडी को अद्वितीय बनाने वाला हूं।
और फिर फ़ोन नंबर भी हो सकता है या हो सकता है।
तो ये सभी अद्वितीय कुंजी बाधाएं, या अद्वितीय बाधाएं हैं।
बस इतना ही।
इसलिए हमने ग्राहक तालिका बनाई है।
तो चलिए वापस चलते हैं और देखते हैं कि हमारे पास और क्या है।
तो चलिए अब बनाते हैं, मैं कहूंगा कि उत्पाद।
और फिर आप मूल रूप से वही काम करते हैं, चुनें कि एक नई तालिका बनाने के लिए है।
और फिर अब यहाँ, आप बस इसे आकर्षित कर सकते हैं, मैं इसे उत्पाद कहने जा रहा हूँ।
और हम उसी प्रक्रिया से गुजरना चाहते हैं और फिर उत्पाद कॉलम नाम वहां रखना चाहते हैं।
यदि आप सोच रहे हैं, तो यह वही ग्राहक आईडी कॉलम है जिसे हमने यहां जोड़ा है।
और हम इसे एक मिनट में एक विदेशी कुंजी बनाने जा रहे हैं।
तो चलिए आगे बढ़ते हैं और उसे कई कॉलम में विभाजित करते हैं।
क्योंकि, फिर से, सब कुछ एक कॉलम में पैक किया गया है, जो एक अच्छा अभ्यास नहीं है।
तो मान लें कि इसे क्रेडिट कार्ड नंबर कहते हैं।
यदि ग्राहक पेपैल का उपयोग कर रहा है, तो हमें उस ईमेल की आवश्यकता है।
तो यहां ईमेल आईडी का उपयोग कर सकते हैं।
तो किस प्रकार के भुगतान का उपयोग किया जा रहा है, इसके आधार पर यह शून्य या शून्य नहीं हो सकता है।
तो कोई बात नहीं, इसलिए समाप्ति तिथि एक तिथि कॉलम होगी।
तो चलिए वास्तव में इसे बदलते हैं।
इसलिए यदि आप सुनिश्चित नहीं हैं, तो आप उस ड्रॉप डाउन को हिट कर सकते हैं और फिर प्रत्येक के लिए अपना उचित डेटा प्रकार चुन सकते हैं।
दूसरी बात जिसका मैंने उल्लेख किया है, जो मूल रूप से विदेशी कुंजी के बारे में है, यह ग्राहक आईडी वही है जो हमने यहां जोड़ी है।
तो चलिए वास्तव में उस ग्राहक आईडी को एक विदेशी कुंजी बनाते हैं।
इसलिए हम इसे केवल ग्राहक आईडी विदेशी कुंजी कह सकते हैं।
और फिर जिस तालिका को संदर्भित किया जा रहा है वह ग्राहक है।
और कॉलम ग्राहक आईडी होगा।
और बस इतना ही।
तो आप देख सकते हैं कि अब हमारे पास इन दो तालिकाओं के बीच संबंध या संबंध है, मैं वास्तव में केवल ऑर्डर तालिका भी जोड़ूंगा।
मैंने ऑर्डर टेबल भी बनाया है, जो मुख्य टेबल है और अब मैं ऑर्डर के लिए कुछ विदेशी कुंजी बनाने जा रहा हूं।
सब कुछ हो गया है।
अगर आप इस समय कोई इंडेक्स बनाना चाहते हैं, तो आप ऐसा कर सकते हैं।
तो मुझे लगता है कि हम कर चुके हैं।
इसलिए हमने मूल रूप से इन चार तालिकाओं के तार्किक डिजाइन में चार तालिकाओं को जोड़ा है और फिर हमने कॉलम बनाए हैं और फिर उनके डेटा प्रकारों को परिभाषित करते हैं।
और हमने प्रत्येक तालिका के लिए विदेशी कुंजी और निश्चित रूप से प्राथमिक कुंजी और अद्वितीय कुंजी भी बनाई।
And you can see the foreign key relationship you know clearly showing here and that You know, that's what you would do to create a data model.
Alright, so now actually, let's just go ahead and create a SQL script for this data model.
So you go to database, and then do forward engineer.
And then basically, you provide the database details where you want to create this, these tables are the schema.
So this is, these are my details continue, go to the next one, provide the password.
Right now we are connected, I had to try the password two, three times.
And this has basically created SQL script for us to create the schema and the tables with all the primary key unique key and foreign key constraints.
So what we can do is we can just continue and then now the database or the schema is created as it goes through and then executes that script.
And close.
And now you can see the stables are actually created.
So you can even go to your SQL editor, and then you can start reading your can start querying your tables.
There you go.
So you ready came back, of course, there is no data in it.
And you can now start using your database.
So we actually successfully created the basic schema, or designed the data model for this e commerce website.
Table creation or a CREATE TABLE command starts with CREATE TABLE keyword followed by the name of the table and followed by parenthesis.
So within the parenthesis, this pair of parentheses, you have all these column names, followed by the column data types, and followed by the constraints.
And you can also use this auto increment keyword, if you want your column value to be incremented.
Automatically, as you load values to the as you load records to this table, and after the column definition, you have the option of specifying the keys like primary keys, unique keys, foreign keys, and so on, you can also specify the storage engine type as part of your table creation.
And this is a very simple table.
You can also have partition tables or partition tables that have compressed tables, encrypted tables, and all these things require special keywords to be used in your table definition.
And please check my sequel documentation.
If you want more details about the syntax.
As mentioned, I'm using just integer watch char data types, the MySQL documentation shows like all these different data types like numeric, date, and time data types, string data types, like the ones I'm using, and JSON spatial.
So these are all available in MySQL for you to use.
So let's go ahead and create this table.
And before creating the table, I want to run this drop command just to make sure the table doesn't exist.
And I'm going to be creating that table and see if the table has been created.
Yes, the table has been created successfully, I'm going to be running a select star from the table name to see if I can successfully query from this table as well.
And then it returns.
Basically, it doesn't return anything that means no data exists in the stable.
And that's how you create a table using CREATE TABLE syntax.
Finally, there is actually a default keyword which helps you specify default values for a certain or for your columns.
So if you don't specify a value for this quantity column in your insert statements, or when you're loading through procedures, loading data through procedures, it will automatically take this default value.
That's pretty much it.
And I'll see you guys in my next MySQL SQL session.
So I just did a describe on the table that I created and it has product ID product name, product type, price and quantity.
And you can see that product ID is also an auto incrementing column right now there is no data in it a typical insert Statement looks like this, let's go to insert into keyword and the table name a bunch of columns within parenthesis, the ones that you want to populate, followed by the values keyword.
And followed by the actual column values.
If you can realize I haven't actually specified the product ID value because it's an auto incrementing column.
So let's go ahead and execute this and insert statement goes through.
So let me also run the select statement.
As you can see, the product ID table has taken the value one, and that's happened automatically ident supply the value one, so I'll go ahead and commit the change.
And then let's actually move on to the second variation.
So this time, I'm going to specify a value for product ID, nothing else is different.
So just want to show you that it is possible.
So it goes through and then a commit.
And then let's do a select to make sure the value has been inserted.
So let's go to this third variation of this insert statement.
So it's going to be pretty much the same, except Actually, I'm going to just jump some values and then insert the value 10.
For this product ID column, I'll go ahead and do that.
It goes through a comment and select again, then you can see that that is also fine.
So yeah, so that worked.
So you can actually jump a few values.
let's actually look at the next variation.
Again, I'm going to insert a record into the stable, with no product ID specified exclusively.
Or explicitly, the product ID column is missing over here, and I'm going to run the insert statement and commit.
And then I'm going to run the select statement.
So just wanted to show you that wherever the latest value is for this auto incrementing column, I inserted the value 10 for product ID last time, and then the next time I do an insert is auto increment kicks in and then you know increases, increases this value from 10 to 11, right picks up from the value that was inserted last time.
And I'm gonna just take another insert statement, and this time, it's actually insert into the table name.
And instead of the values keyword, specifying the column names, values, etc, we actually select from a different table.
Basically, if the products three table is exactly matching the structure of products, one table, then we can do even a select star from if the columns don't match exactly as in like products, one has a different set of columns, and product three has a different set of columns, then we need to make sure that we actually select the columns.
And then, for example, this product ID from products, three maps to this product ID and products one, and product name from products, three maps to product one in I'm sorry, Product Name and product one, and so on.
Let's go ahead and run this and see what happens.
And then that goes through.
And then if I now select the products, one table, you can see like take all these rows are inserted properly.
And basically the products one table is populated.
And then we got all the data from products three table.
So this time I want to show you the insert statement.
Again, this is kind of like a bulk insert or multiple insert just combined into one statement, you can see the insert into clause is specified only once but in the values spark in this clause, actually, we have two rows specified at the same time.
So we can even use such as syntax and a commit, and then do a select all good.
So these are a few variations of insert statement.
I hope you understood how this works.
I will see you guys in the next session.
Hey, my sequel learners.
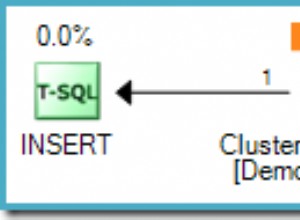
So in this session, actually, I'm going to be talking about update and delete statements.
So as usual, I'm going to be using my eecom store schema.
And I will be using my products table to do this demo.
So just quickly, if we select products table, there's two rows right now.
So the first update is just to show you the syntax of update.
So you have the update keyword followed by the table name followed by set keyword.
And then you can have as many columns as your table contains, but in this case, I've got only one column and I can just run this update.
So let's actually add one more clause to it, which is the where clause and this is to just update the rows that Do you really want to update so we will be updating only the rows with product ID equals one.
So let's go ahead and do that.
And then I'll just come in and do a SELECT FROM products quantity has gone up by 50, it went from 299 to 349.
Now one more thing to realize is actually like you can, you know, you can specify literal values, when you are updating, you know, that happens all the time.
Or you can also like specify a formula, or you can have SQL functions like replace substring, length, and so on, you know, you can look at my SQL documentation to see what kind of functions are available in this update, like, I just wanted to show you the syntax, basically, to let you know that like you can have multiple, you can update multiple rows at once.
In this case, I put like, values one, two, and three, you know, you don't have to do one row at a time or anything.
So when you use the end keyword, and you can say product ID or whatever, call them in and then a bunch of values to select the rows that you want.
And there are other ways to do it.
But the point being, you can update multiple records at once.
And another interesting usage is using the case statement, you know, you can let's say you have a bunch of update statements, one for product ID equals one another for product ID equals two and another for the other product ID values.
And you can combine all that into one UPDATE statement using a case when then and clause or keyword basically, in this case, actually, for product ID equals one, I want to increment the quantity by 50.
And product ID equals two, I want to increment the quantity by 100, and so on.
So then I've got this similar WHERE clause are similar to the one that I showed you before, I'm going to run this you can see the columns are getting incremental, I'm not going to go back and check I'm pretty sure that it's done the right thing.
So the next one is basically when you want to delete records from a table or purge data from a table, then you can just use a simple delete statement.
And if you are wanting to delete a particular row, again, similar to the update, you can use a where clause to actually like narrow down the data that you want to delete this particular statement, which is delete from a table name, and then where column name equals or the column value.
And you can have multiple filters in here.
So here I don't have the row number three, I think I deleted it already.
Alright, so let's keep going products three table, I just wanted to show you it contains a lot more data than my other table.
You can see it contains data about 5849 rows, I wanted to also show you this particular parameter MySQL configuration parameter to basically enable and disable safe updates.
So let's say like if your delete statement or UPDATE statement is not using a primary key column in the where clause, you know, then basically if you enable this particular parameter, let's say by setting this one, and then if you run your delete, you will get like an error code 1175 it mean, and then it says you're using safe update mode, etc, etc.
It's not leading you to the run this kind of add delete statements, because it could be a good cause bad performance.
So if I disable the same thing, and then if I run the Delete statement, and then just run a select again, then it should go through because now the parameter is disabled.
And two more things.
One is actually like if you have a huge table and you want to delete only a few rows at a time, then you can use the limit keyword to limit the number of records that are deleted by the statement, you know, in this case, because I wanted to delete only 10 rows, let's go ahead and do that.
And it should work just fine.
And then if I do a select, you'll see the difference in the row count actually, now it's like 5839, before it was fired four nights.
So that's how the LIMIT clause helps you also in the limit floors, you can also specify the ORDER BY clause.
It basically sorts the data by these columns, first by quantity, then by product ID, then it deletes the top and or 100 or whatever value you put here, actually.
So let's go ahead and do it and then select again.
Yeah, Kearney, seven D is gone.
So the top 10 rows are gone.
And yeah, that's pretty much it.
Actually, those are all a few variations of update and delete statements.
And of course, there's lots of tangents we can get into but I will leave that task to you.
And I hope it was useful.
And if you have any questions, let me know in the comments.
I'll see you guys in the next session.
MySQL learners.
So in this session, we'll look at SELECT statements, not just the syntax But also like some ways you can actually like improve the performance of your queries, I'm going to be using the schema called income store to explain about this SELECT statement in its most simple form will look like this.
So you have the Select and from keywords and then after the Select, you specify the Select list, which is the columns that you want to select.
If you specify a star, or asterik, that actually selects all the column columns from this table, and then after the from keyword, you specify the table names where you want to select the data from.
So if I do a select star from products underscore three, it's going to return all the data from products underscore three table.
But do remember that anytime you are using a star after the Select, or in the Select list, you're basically querying all the columns in this table, you don't need to query all the columns in the table in most of the cases, so you only like specify the columns that you need to query.
So in this next query, let's go line by line and see what changes that have done to this query to make it better.
So let's say I want to select only these columns.
That's why I specified only these columns in the Select list.
In the from clause, I have specified products underscore three table very often you will be selecting from multiple tables, you need to join the tables and then retrieve useful data out of it.
And in the where clause, you specify all the filters, or the conditions based on which your data will be filtered out.
So here I am, including only the data which have quantity less than 25.
So this way, I'm able to actually filter most of the data out of this table, this is very useful in minimizing the amount of data that you retrieve from the database.
And your queries are going to be fast as ordered by is basically going to sort the data that is retrieved based on the columns that we specify here.
So here, I'm just like ordering by product name.
And of course, like when you're sorting data, especially when you're sorting a lot of data, the operation can be expensive, unless your source buffer size, that is actually the memory area where the slots happen.
Unless it is sized properly, the operation can be really slow.
So you need to pay attention to that configuration as well.
And I have this other query, which just goes to show you that like this is a very simple SELECT statement.
Again, in this select, actually, I have only the Select keyword and a function, I'm using the now function.
But there are several other SQL functions that you can use in the script, for example, I can use the database function to return the database that I am actually connected to.
And as you can see, I am actually able to invoke multiple functions in the same query.
So that's pretty much it.
I'll see you guys in the next session.
In this session, I will be teaching about SQL joints, let's dive straight into the demo, I will be using a schema called eecom store.
And I'm creating a table first called T one with one column, the column name is C one, and I'm inserting these two values in this table.
One and two, I'm creating another table called T two with a column called C one and inserting these two values again, into table D two, one and three.
So it's one and two here and one and three, here, we're going to go ahead and run a commit to make my changes permanent.
So I'm going to be just creating these two tables just to show you the records, D one has one and two, D two as one and three.
Of course, a join is an operation that joins two tables.
And we have all these different types of joints, we'll go one by one and understand what they are.
So this is the syntax, so select an a column list that you're selecting.
So we're joining T one and T two.
And then we're specifying the kind of join that we are making.
And then we also have this on keyword.
And then comes the condition on which the table is joined.
So I'm going to go ahead and run this query and see what happens.
As you can see, this query, this inner join has returned the value one, so that means actually, so it returns the values that exist in both the tables that match.
So that's what INNER JOIN does.
So let's just change it to a left to join, go ahead and run it.
Now the left join is gonna return all the values from your left to table which is T one.
So T one has values one and two are the rows one and two, and then T two, it's going to return only the matching values.
And then for this value, which only exists in table T one, it's going to return and now and then I'm going to change it to right join and as you might have guessed it's going to return all the way Use from table t to in the places where there is no matching value, it's going to return a null.
So let's see if that happens.
That's what we expected.
So we got all the rows from T two, and then for three, there is no matching value and T one, you know, that position has no value.
Now we'll jump quickly to a union.
And then we'll come back to a full join, a union is basically going to look like this.
So two queries, and then in between, we have the union keyword, let's see what it returns, you can see that it's written one, two, and three.
So that's actually the rows from both the tables, but it's kind of like combined the data and then smashes them together.
And then you have one, two, and three, and then let's run the same query with a slight difference.
We'll put union all and then we'll see what happens.
That's written one, two, and one, three.
So that's returned all the data from both the tables, but except this time, we have duplicate values, Union gets rid of all the duplicate values, it's almost like a set where you have a unique set of data, a union all returns all the values, including duplicate data.
Jumping back to full join, we don't have a full join keyword.
So rather, we do full join this way in my sequel.
So basically, you have the similar query where you're joining T one and T two, a left join first on this, there's one column that we have, and then you have another query, again, joining T one and T two on this, just one column, but then we are doing a union of these two, and that's going to return the data from both the tables, we have one, two, these two are matching, then for two, there is no matching value.
So it returns and now for three, there is no matching value in T one, it returns a null over here.
So this is a full joint, that's basically all the joints, all different types of joints that you can do in MySQL, I hope this example was clear.
And I'll see you guys in my next session.
All right, my SQL learners.
In this section, we're going to learn about locks.
More specifically, I want to talk about the isolation level section.
So the first thing is just see what I have here, I have two terminal sessions.
One is in black.
The other one is in slight maroon color.
So I'm actually going to log into the database as the root user.
And I'm going to do the same thing over here.
There you go.
I am logged into my SQL database.
So I have a little script here to create a dummy table called T one.
Okay, so let me show you the SQL script.
At this point, actually, you might not understand the SQL syntax and so on.
But then let me explain.
Briefly, first thing I'm doing is setting auto commit to zero or commit is basically a command that you use to save your work.
Basically, the data changes that you're doing is permanently stored in the database.
When you issue a commit command, in my sequel, you have this variable called auto commit, which is turned on by default, meaning all your commands will be automatically committed.
If you don't turn this off, I want to have more control over what I'm doing here.
So basically, I am doing an auto commit, disable first, so and then I'm starting a transaction.
And just to be safe, I'm dropping this table if I had already created it.
So this table doesn't exist.
So it says unknown table.
And the next thing is I'm creating a table called T one in eecom store schema.
And then the column name is C one.
And the data type is int and its primary key.
So and then I'm actually inserting value, just one row into this table called p one, right, the one that we just created.
And I issue a commit command, alter or the alternative to commit is rollback command.
So which basically rolls back rewards the changes that you just done in that session.
So if I just do a select star from the stable, then I'm going to see this value, so which is fine so far.
So this is pretty straightforward.
So far, we haven't talked about the isolation levels.
So what I mean by isolation level is when multiple sessions are trying to modify or access the same data data, then you need locking mechanism to make sure the data is not corrupted, or the database is behaving in a way that you expect to see how you actually set isolation levels.
And this is the command.
So this is the other session I had opened show session variables like isolation.
So that shows like the transaction isolation level is set to read committed.
Right.
So this is one of the possible options action.
So this is read committed, and you have read uncommitted, and you have repetative read, or repeatable read.
And then you have a serializable value, actually, so let's go one by one, right.
In this session, I already started a transaction.
So I'm going to actually try to update this value using an update command.
So basically, I am updating the same table, and I'm updating this column to to where the column value is currently one, right.
So I'm going to do that the auto commit is turned off.
So it's not committed yet for the start a transaction over here.
And let me run a query against the same table and just copy and paste the table name, want to type it, okay, so we see the value one, which is the previous value.
And if I ran the same query over here, in this session, I see the value two, because this is the session where we are modifying the data, right? So and I can see the changes before committing in the same session here.
Actually, since the value of this transaction isolation, or the isolation level is set to read committed, it is possible only to read the committed data.
In other words, when multiple sessions are accessing the same data, in this case, this column right here from this table, apart from the session that is actually modifying the data, the other sessions can only see committed data, any data that is committed just before this select is executed.
So I'm going to go here and run a commit, and come back over here and run a select.
So now you see the latest data because that commit happened before I ran this query.
Now let's talk about read uncommitted isolation, setting actually freshly log in again, because these things can get tricky.
So every time I want to just recreate the tables to remove any confusion.
So let's actually log in again, okay, in here, and I'm actually going to execute the same script that I showed you before.
So just disabling auto command, starting a transaction, dropping the stable and recreating it, inserting this value, and then running the command.
So now here, what we could do is go ahead and update this value to two.
But remember, I haven't committed this data yet.
Let's go to this session.
And here, go ahead and change the setting to the isolation setting to read uncommitted, because by default, it is always set to read committed action.
Right.
So you can see that here.
So and this is a session level setting.
And you can also change it at global level.
But for the purpose of this demo, we just need to change it at the session level.
So session level isolation initially read committed, then I ran the set session transaction, isolation level, read uncommitted, and then checking the value again.
Now it's changed to read uncommitted, if I ran a select star from this table, then I get the value two, and if you remember that I I only updated the value from one to two.
And you can already see this beta even though it is not committed over here.
So that is how read uncommitted works.
So there is not much locking going on here.
Because database is now letting the sessions do dirty reads because one session is able to read and other sessions changes even before the commits happen actually, right.
So those are dirty reads.
Yes, actually.
So let's go on to the next one.
So we have seen read, committed and read Committed so far.
So now let's move on to repeatable reads action.
Right? So exit.
So here I am going to just commit.
And I'm gonna re rerun my initial script just to clear the table.
So drop table and then recreated insert, value one again, and then commit.
So now, the table is back to how it looked before.
So here, let me log in again.
So this is repeatable read setting, right? So remember that the default value for this isolation setting is always read committed.
So if I change it to repeatable read, write, and then check the value again, then you can see this.
So and again, remember, or show variables is the command to check the current value.
And then set is the command to set the configuration right, so I will put all these commands in like a git GitHub repo file, then you can actually grab the commands from there, and then you can try them yourself.
Basically, I'm changing the I'm changing the setting from read committed to repeatable read, right, so I'm going to just start a new transaction over here in here, I'm going to update this value to two.
And over here, I'm going to run the Select query that we saw before just selecting everything from this table.
And you see that the value is currently one.
And that makes sense.
So let me go ahead and run commit.
And if I ran the same query, again, I see the value one.
And this is the same as the value that was read before, even though the data was changed by this other session.
And then committed within this transaction, the data that we are seeing is the same in in other terms, basically, we are, we are reading the same data, or the reads are being repeated.
Right.
So that is the third setting.
And the last one is the most strict locking configuration.
So which is called serializable.
So I'm going to, as usual, I'm going to drop the table and then just recreate them recreated, inserted value one again, they might come in.
So here, we're going to log in again.
And as usual, the default setting is read committed, right? So let's check that first, just to show you, and then I'm going to change it to serial serializable.
So what this means is, basically, I'm going to start a transaction.
So on the first session, I'm going to run an update, basically changing the value from one to two.
And here, I'm going to start a transaction, and I'm going to run a query on that table.
Right.
And now this query, even though it's just a select, select is just a read, it's not updating, it's not deleting or doing anything, it's just a read, it is waiting, because the update is basically updating this data.
And then it's not database, MySQL databases, not even letting this read or the Select query from the other session to see the data.
So this is the most strict setting action.
So if I do a commit over here, then on this other session, you will see that the Gradius return and it's seeing the latest value, right.
So if I go ahead and run another select, of course, it's returning the same thing.
But if I try to update this value from two to three, another update, that is basically going to wait on the Select, basically this transaction that is running right now because the Select again, select is just a read, it is just reading the data.
But still it is locking that row in the database, and it's not letting any updates or modifications to that data.
And then you can see that the update even failed because it waited for some time and then the timeout value exceeded so we don't have to go into those details.
But I'm going to try updating now.
And here.
I'm just going to exit out of this session, which will release all the locks.
And that will help the update to go through.
And then I can commit and exit as well, and how you hope it was clear to you guys.
And if you have any questions, please put it in the comments and reach out to me somehow I know you can figure it out, as you guys are next section.
Hey, MySQL learners.
So welcome back to this new section of my MySQL tutorial.
So in this video, or in this section, we're going to talk about locks.
So what are these locks? Right? So let's actually approach this kind of like logically.
So if you have a database, and if you're the only person working in this database, then you basically need not worry about anything, right? You know what you're doing.
So you will insert data, delete, or update data the way you want.
And there is no one else trying to intervene or interrupt your work.
But unfortunately, that's not the case.
In today's world.
If you think of a busy ecommerce database like Amazon, then then there's like, a lot going on on the on those websites.
There's like multiple people browsing is like, a lot of people buying stuff.
There's the people who are selling stuff on on these websites, they're updating data relevant to their products.
So that is basically concurrency, right? So you have many users trying to do something on this website at the same time, so how do you manage this concurrency, that's why we need locks.
So if I let everyone work on the same data at the same time, then there's going to be a lot of confusion.
And we might end up losing some data.
So let me actually show you a simple example of how that happens.
So I have a table, a product table.
So if you've been following my tutorial, thus far, we talked about this table called products.
So where we store all the product information, right.
So now, there's a couple of records over here.
And let's say that we have a seller and a buyer who are working on these records, especially like this particular record, the first one, which is a book, and the books, prizes, this and the quantity, the thing we didn't have quantity when we talked about it in my previous sections.
But then I added quantity here.
So there's this quantity column.
And there's a there's a seller and buying buyer interested in this record, let's look at this, right, so we have sort of like a time sequence here.
So what the seller of this particular product is trying to do is he's trying to update the quantity of this product at nine one, he is adding 60 more quantity to that product, which is you know, 40 plus 60, which 100.
And that's what we have over here.
So then a buyer comes and he looks at the quantity.
And then he basically wants to order two or these books, that's 100 minus 90 100 minus two, it's 98 and then you have the quantity 98 over here.
So this happened in a sequence.
So but we are worried about concurrency, right? concurrency is like when things happen at the same time.
But what if Okay, first the seller comes and then he reads the quantity of this item.
Initially it was 40 and then buyer comes and he also sees that the quantity is 40.
Right? And at 901.
So the first two operations happen at the same time at nine or one seller comes in he says I want to update I want to add 60 more quantity, like meaning I have 60 more books of this title, but then buyer comes and he says okay, I'm buying two items or two of these books.
So but while you that he saw before was 40.
So 40 minus two is 38.
So he updates the quantity 38.
So the seller updates at 200.
But then, because of this previous look up, the quantity is updated to 38.
due to which this whole thing, this whole operation is lost.
And we end up with sort of like corrupted data for this quantity column.
So this is a simple example of how concurrency when not managed well might cause issue data issues like this.
MySQL learners.
So in this video, we are going to look at basically how table locks works.
In the context of e commerce database, we created a simple database or schema called the column store.
And we created a bunch of tables or used another dummy table to explain our transaction isolation levels.
So if you haven't seen my previous material, go back and check it out.
And come back here.
But then yeah, you have four tables for main tables.
And the main table that we are interested in is products table here.
And in the products table, I inserted a couple of records.
These are dummy records.
So I don't have a front end or application running over here.
So we're just looking at database, right.
So what what's going to happen in this tutorial is, so we, we're going to basically simulate a situation where a seller is trying to update the quantity of the book that he is selling on this website, which is this first book actually, the common path to uncommon success.
And then the right now the quantity of this the quantity available.
You know, for this book is 40, right? So he wants to update this quantity 200.
And also, we'll have a couple of more users, or buyers, basically one buyer is trying to buy the same book, we'll have another buyer Hill, who tried to buy a different book, which is this book, tiny habits, and then the same buyer will also try to browse the website, like of course, like, we are going to have to imagine a little bit because I don't have a front end to show you everything.
So let's actually see how this goes.
So first of all, you know basics first, actually, let's actually turn off the auto commit.
Just so just so actually, we have more control over what's happening.
And let me do that in all the three sessions I have open and the first session is the seller session.
The second session is the buyer one session.
And the third session is the buyer to session, basically.
So I'm going to turn off the auto commit, which is basically a mechanism that commits automatically if it's enabled.
And I don't want that.
So I'm disabling it.
So next is I want to show you the transaction isolation level.
And we talked about it in my previous session.
So right now it's a repeatable read.
And it's the same for all.
So we are going to change that to read committed, because read committed is isolation is the right isolation level for OLTP databases.
So now let's actually start with the first seller session.
So three sessions.
So the first seller session is going to update the quantity of this book that he's interested in or his selling action.
But we are going to take this aggressive approach and log the whole table.
Right.
So let's say the application is returned in a way that it logs the whole product stable for right.
And then the other session, let's say by one second session, buyer one comes and he is going to try to buy two books and and how actually we're going To do that is by running an update.
So we are basically updating the products table and we are subtracting the quantity by two, which means actually the we are buying two books.
And which book is there in the book? Where are the record where product ID equals one, right? So if you remember the data, product ID one is this book, let's go ahead and run this update in the second session.
And it's going to obviously, wait, because the table itself has been locked for right by the seller session, the buyer, one session is waiting.
And let's go to the buyer to session the buyer to Australia trying to buy a different book, which book is it this other book, which is tiny habits book where product ID equals two.
And we're gonna do that.
Of course, even that is hanging or waiting.
And that is actually a little bit crazy, isn't it.
So just sellers trying to update the quantity of this one record with just one book.
And everything is tanking.
And the buyer, too, was trying to buy a different book, he kind of gives up.
So he moves to a different session.
And instead of buying or trying to buy a book, he just tries to browse the website, which is a select query or read query, read a select query, which is also hanging.
So the buyer too is getting frustrated right now.
So you can see how restricted this kind of sequences.
So if someone's using table logs, that's going to basically reduce the concurrency of the operations that can happen in this database.
So that's the main point here in this demo.
Hey, my sequel learners.
So in this session, we are going to take a brief look at row level locks.
In my sequel, I have three sessions, I'm already connected to my ecommerce database, MySQL database, and this is how the data looks now.
So we have a products table which holds you know, this data, only two books now, just dummy data that I created this, this is the price and you have the quantity column showing you how many, how much quantity is left for each of these books.
So the first session is seller session.
The second session is buyer session, we can call this buyer one session.
And the third session is a buyer to session.
So this is the data.
And just for clarity, actually, I wanted to show you the transaction isolation setting, which is read committed.
And the auto commit is turned to turned off basically, it's disabled.
So unless I commit explicitly, my transactions will not be permanent.
So let's actually start with a seller.
He's going on the website or a portal that he has available to update the inventory of, let's say the book one, it or the product one, which is this book.
And so he is going to click some buttons, which is going to translate to an update statement being executed in this database, right? So let's say he wants to increase the number of books available in the inventory.
So that will mean quantity is going to be increased incremented by 50.
So that's the UPDATE statement.
And he's going to run that update.
And we can look at the buyer one session, let's say buyer one is trying to buy the same book.
And and then, so he's going to go on the website and then click on buy now or whatever and then is going to translate into this UPDATE statement in the database, choose quantity equals quantity minus one.
So reducing the quantity by one, meaning he's buying a, buying a book.
And of course, there's going to be, you know, other statements updating other tables.
But then to keep it simple, I'm just showing you the product table changes section.
So as you can see, this is going to wait because seller is updating this particular row action.
And that can be seen using acquittee.
On data locks, so if you're under this greddy, of course, you can modify this query as per your needs.
But then if you query this, you will see that there's bunch of sessions and is, is the lock mode column.
And then the table on which the database on which the locks are happening the table, so it gives you a lot of details.
So, so if you want to understand what's going on here.
So we have products table, and then we have ix lock, which is intention, exclusive lock on the table itself, meaning like a transaction is about to get an exclusive lock.
And this is at the table level, but don't get tricked by that.
There is also another row indicating there is a record level or a row level lock.
And, and that is logging only this data equals one.
So if you remember that UPDATE statement, we are using product ID.
So and data for which is one, actually, so product ID equals one.
So that's what we are seeing over here.
And if you see here, this buyer session has actually timed out already, so he's going to attempt to buy again.
So that's how like, you can actually look at the locking details in this table.
Let's try, let's say like buyer two comes in at this point.
And then he just tries to browse the inventory on this ecommerce website.
So that would mean a select query or read query.
And he's, he's able to do this happy reaction.
Right.
So there is no problem.
So while the rollouts are happening, other sessions can read this table, they can even look at the data for the same product.
But they they just cannot buy this book, because that is being blocked by the seller.
So again, it timed out.
So at this point, buyer two wants to buy a different book, you know, I'm not able to buy this book, let me try buying a different book, that's going to translate to, you know, product ID ID equals two, which is not being locked by the seller.
And then that update goes through.
And at this point, let's say the seller has completed updating the inventory.
And, of course, if you look at the data, now, it's going to look different, because this has been updated to 150.
And of course, this hasn't gone down because buyer, buyer, one is still in the process of buying the book, because the commit has not happened yet in the application.
And then if we look at the data, again, the data has gone down, or the quantity has gone down, then via two, let's say wants to buy the first book that buyer one wanted to buy.
At this point, there are no no locks in this table.
Because everyone's committed, and let's say buyer, who is trying to buy this, this book, and then he goes through with that date, and then commits and look at data.
And then the data is changing actually.
So this is how row level log basically allows for high concurrency.
So only the rows which are logged by your transactions are not available for these other sessions to modify.
Right So the other records which are not touched by your transactions are available for updating, deleting, etc.
and all, of course, you can add new books, that means inserting new records in this table.
So I just wanted to show you the difference between table level logs and row level locks.
So this session and my previous session will, will be useful in understanding that difference.
Thank you, I'll see you in my next session.
In this session, we're going to be talking about deadlocks.
And I just want to show you how deadlocks happen, they do happen in in a busy ecommerce or B.
database often, so it's good to know what they are.
So it's going to be a very short and sweet session.
So here, we have a couple of sessions again, so connecting a connected to the same database has two sessions, two different sessions.
So let's say that we are working with products table, right.
So we have seen the stable before in my previous sessions.
Basically, this table has information about the products that are being sold on, you know, an e commerce website.
So we have a couple of records over here, you know, we're going to first let's say, you know, I seller comes to actually update the quantity of this product, basically, let's say if he wants to increase the quantity by 25.
For this first book, this is the command that he's, you know, that's going to be executed, you know, whatever buttons he is clicking, will be translated to an update command like this.
Right.
And let's say like a different person from the same company wants to update the price of this book, not this book, let's say we have it the other book, I'm just actually using the product ID to update the right product, right.
So we have one session where seller, one is updating the quantity of this item, we have another session where we are updating the price of this item.
And then if you see the prices incremented by two, let's say $2.
And this is fine, right? So now we have row level locks.
So this guy is holding a row level lock on this row.
And this guy is holding a row level lock on this row.
So this is fine, right? So we are operating on two different records, two different locks are independent of each other.
All good.
So now let's say the same seller, the second person who is updating with price, wants to update the price of this other book to actually like he is actually increasing the price.
Again, by $2 of this book, the product ID equals one, which book, this one right here, let's go ahead and try to increment the price.
By running this command, you know, he's waiting on waiting for the lock ECI exclusive lock.
And that's not available, because this seller has not committed actually is not committed.
So let's actually go back here and, and this seller at the same time price to update the price of or quantity of this book.
So two sessions are fighting for pretty much the same resource, you know, we ended up in a deadlock situation.
So my sequel was smart, smart enough to just kill the session.
Otherwise, we would have two sessions waiting for each other endlessly.
Right? So here you can see the error code that is thrown, it says deadlock found when trying to get locks and try restarting that transaction.
So let's go ahead and query the products table and see how it looks.
You can see this, this whole transaction was rolled back.
Correct.
Both the transactions were rolled back.
There's even this one was rolled back.
So I think that Locke was also killed.
So that's why this this one went through.
If you can see the prices have increased by $2.
right because initially For 1699 and 2039, and here 8099 and 20 to 39.
Okay, so that's how it works.
This is a typical deadlock situation, I hope this explanation was clear.
And I will see you guys in my next session.
All right, my sequel learners.
So in this session, we're going to talk about clustered indexes.
So, so clustered index is not a different index type as in, like, you can, you know, directly create a create a clustered index yourself.
So it is a type of index that, that MySQL kind of maintains in the, you know, behind the scenes actually.
So, in also your table data, the data that you insert into your tables or load into your tables are maintained in these indexes.
indexes only what I mean by that is, so let's say this is a B tree index, right, so this is a B tree index.
So you have my sequel, creating this B tree index, as you load the data into these tables.
And then, you know, in the leaf nodes, what you have is actually the data, the data that you're loading into these tables, right? In the clustering, the sorting is based on the primary key that you define, or, you know, in this table, actually, so if you don't define a primary key, MySQL will automatically pick up a non nullable index key, what that means is, so let's say that, in fact, actually, let's jump straight into the example that I have prepared for you guys.
So so this is my MySQL Workbench.
And, you know, I'll show you this table definition.
So this is called products underscore one.
And it's basically a products table that is typically used in a ecommerce store.
And if you've been following my lessons, this is what I've been using, I just changed the name of the table for, you know, demonstrating this concept, this clustering, clustered index concept.
So you have all these like columns, and I'm defining a primary key.
Okay, so let's just start by, you know, I'm just going to switch to a database called eecom, store our schema called the econ store, I'm going to drop, you know, these tables if they exist already, by any chance.
So the table doesn't exist, which is okay, so I'm going to create this table, which I just talked about, called products.
And then this table has primary key in a primary key is product ID.
So product ID is sort of like an integer column.
So this is an auto increment, right? So you don't even have to provide value for this column, actually, when you load the data, so you can just put all this information and load it and then we are good, MySQL will automatically increment the value of this column action.
So and then, of course, like I said, like there is isbm column, which is over here, sort of leg book iasb.
And information if you are, you know, if you remember your school days like this, this is be a number attached with any book, so something like that.
So some kind of ISDN alphanumeric number.
So I'm going to call that like a unique key or a unique constraint.
And let's go ahead and create the stable and this constraint.
So that was successfully created.
And I'm going to create a procedure, which I can use to kind of like populate the stable, right, so don't worry about the details of this procedure.
This is something that I wrote to populate this table.
And then that is successfully created and change the delimiter back to a semi colon.
And then I'm going to call this procedure and which is going to throw some warnings, which is okay with me.
As long as as long as the data gets populated, I'm fine.
So it's going to probably generate some, you know, load some 6000 plus rows into this table.
So we'll see how much we get this awesome.
So it's actually loading a lot of data.
It seems to be done.
So let's go ahead and commit the data and Now Actually, I'm going to select the data in this table, right? Just select all the data, and you will see that the data by default, or the data is actually sorted based on the primary key, which is product ID.
And you can see, we know, I haven't like specified any ordering.
So this is, you know, this is the default ordering of data, right.
And so basically, your table data is sorted based on your clustered index, which is primary key over here, because you have the primary key in the table section.
Right.
So now the next thing is actually, I'm going to create a similar table, which is, you know, so I'm going to call it products too.
But in this case, I'm going to basically not define a primary key, I'm still going to have a unique key called, again, the same thing, you know, it's isbm, it's a unique key.
And let's just give it a different name, just so we have kind of like, we have different names for different constraints.
So let's actually go ahead and create this table.
And so this table is created, I'm going to copy the data from the first table that you know, where I loaded a lot of data.
So I'm going to copy the data from that table into this table, right.
So just very simple.
And then I'm going to commit, right, so that's a board 6455 6455 number of rows inserted into this table.
And I'm going to select all the rows from this table.
And you can see that now, the data is not sorted by product Id rather it is sorted by this iasb.
And it is sorting based on first character first, and then Initially, the first and second characters are the same, then 010 true.
And that keeps going 05 and then 090, a BCD of GE hedge and then having after the zeros, you know, see one, so it is basically sorting data based on iasb.
And and why is being because because of the absence of primary key, it's going to choose this iasb and column, as are the it's going to choose this non nullable unique index key, which is based on iasb and column, right.
So it's starting based on this, but this is actually a terrible, terrible idea.
Because if you're generating random, alphanumeric strings for iasb.
And, you know, then you're not going to be generating the string in sort of like an ascending order or in any type of order, actually.
So in that case, actually, you know, when you're, as you're inserting data into the stable, this B tree is going to be created behind the scenes.
And then my sequel, like whatever program is creating or maintaining this data structure behind the scenes has to work really, really hard to manage this Bre B tree index, actually, right.
That's why this is a terrible idea to have like a you UID or some kind of alphanumeric string as a primary key actually, or in the absence of primary key.
Well, my sequel is going to use this this key for clustering.
And again, it is very bad.
So keep that in mind when you're creating tables actually.
Right.
So finally, what I'm going to do is create another table called product three.
And before that, I'm going to show you the output of this query, which is basically going to come up empty or no, no, no road rows returned.
All I'm doing is actually checking whether this index the index with named Jen flushed index is there in this database, actually.
And then I'm checking the InnoDB tables and information schema I'm joining in odb tables and in odb indexes.
And I'm checking whether this index indeed exists, right? Saying it doesn't exist, which is where the this, this credit, return no rows, and I'm going to create this table and this time, I'm not even going to create the create a unique key.
And I'm going to make all these columns as nullable columns, you know.
So I just want to show you what happens when you have a scenario where you're creating a table with all nullable columns and no primary key index no unique, not nullable index and you know Then I'm going to insert data into this table.
Again, six, the 400 plus rows inserted, commit.
And then I'm going to select from this product three table right now.
And when the data comes up, you can see that there is still some ordering that's happening.
And, you know, we don't have any of these options primary key or a not nullable, unique key available, then how is MySQL able to sort data? What is it using, so it actually uses a hidden, hidden key actually, right, a hidden primary key.
So if you run the same query, again, is ready, you can see that this index has been created on products three table, which is maintained internally by my SQL, for just the purpose of clustering this table, actually.
Okay, so that's a lot of information.
I hope you found this useful.
And I will see you guys in my next video.
Hello, my SQL learners.
So in this session, I want to teach you the basics of using explain or explained plan in MySQL.
Alright, so now let's just let me just show you the table that I'm going to be working with, I'm going to be working with that table called products underscore one.
And it's got some net in a product name, product type price.
And if the product is a book, it will have an ISP a number attached with it.
And then there is a quantity column.
So these are some basic columns that you would see in an e commerce online store.
So let's get started by just looking at the indexes of this table.
So this basically has two indexes.
One is a primary key index, which is on the product ID.
And the other one is an index on the iasb and column.
And this is a unique index, actually.
So let's get started by picking a simple query that we are going to kind of like optimize using explain.
So the query that I'm going to be using is this.
So I'm going to be selecting iasb.
And from this products underscore one table where product name has cat in it.
So the product name is cat.
Okay, so And before I run this query, I'm going to look at the explained plan of it.
And I'm going to put a slash g at the end.
So I get that we'll put in there in a readable format.
So first of all, it gives this output, right, and selectors, just one straights, simple select.
That's what this is showing.
But the main thing is we are working with our this particular row is referring to this table.
And apart from that, actually, you have all these columns, and then they are all null right now, like they don't make much sense apart from this.
So this is a tight column and all means that it is doing a full table scan.
Basically, MySQL is doing a full table scan, it's scanning the whole table.
And how many rows is that it's these many rows.
And we are using a filter over here, it gets all those rows and then it filters the output.
And basically a you know, there's about 600 rows with product name equals cat, right, so the filtered person ages like 10%, basically, and then there is some extra information.
Let's go ahead and create an index on this table.
Create index called, you know, we can give an arbitrary name.
And, and I'm going to create add on products, one table and the column is product name, of course.
This is the column on which I'm creating the index.
Actually, let's just go ahead and run the explain again.
So this is the explained plan.
And that's how it looks.
So basically, you can see that the Again, it's pretty much the same kind of output, but this time, it is also showing some data for all these columns.
So first of all possible keys column shows like all the indexes that this query can use.
And, and out of which, like this is the key or index that it is, you know, it is going to use this particular execution is going to use, and this is the key length in bytes actually write the number of rows that is being scanned in this key, which is 589.
And, you know, since this is index based, we're not really filtering data, rather, we're just going to the index and getting the data.
So there is no filtering over there.
Let's actually create another index, which also includes iasb.
And, and see, like, what happens, actually, we're gonna create the other index and give it a different name.
So let's go ahead and run the explain plan again.
So now, again, the possible keys are these two indexes, but it still chooses to go with this particular index, and the index, key length is the same, and then grows, and etc, etc.
So there's no filtering that happened, right? Because we're choosing an index.
So you might be wondering, like, you know, why it's not using the covering index, right.
So this is supposed to be the covering index and covering indexes are supposed to be better than normal, non clustered index or a secondary index.
So you can actually like, use a format like JSON format to get more information.
So how you can do that is by just specifying like format equals JSON, and use the use that.
And so that's going to give you the output in JSON format.
And you can see that the you know, it gives you a little bit more information as then like the query cost, you know, this is how much it's going to cost for my sequel to execute this query.
And this is a representation of the amount of work MySQL has to do to run this query actually.
So the cost for this one is 7690, right.
And then again, it says these are the possible keys.
And used key is used key parts is product name, which was not given over here.
And then there is a cost and for which is a split of where the cost is going.
So you can read my SQL documentation on all these fields.
You know, you might be wondering why the covering index is not being used.
And we can actually force that index by using this use index.
Syntax or use index keyword.
And then I'm going to put the index name that I want to force which is this one.
And when I ran it, this ran the explained plan this time, it shows the cost of this one is going to be 109 point two seven, you know in comparison to the previous explain plan, where the cost is only 76.
And this is why my sequel is going with this particular plan instead of this guy.
Okay, I hope this session was useful.