बिल्डिंग प्रोजेक्ट यकीनन प्रोग्राम को सीखने के अधिक सुलभ और प्रभावी तरीकों में से एक है। वास्तविक परियोजनाओं के लिए आपको विभिन्न और विविध कोडिंग कौशल लागू करने की आवश्यकता होती है। वे आपको उन विषयों पर शोध करने के लिए भी प्रोत्साहित करते हैं जो आपके द्वारा विकास प्रक्रिया में समस्याओं को हल करने के दौरान सामने आते हैं। इस ट्यूटोरियल में, आप Python, PyQt, और SQLite के साथ एक कॉन्टैक्ट बुक एप्लिकेशन बनाएंगे।
इस ट्यूटोरियल में, आप सीखेंगे कि कैसे:
- एक ग्राफिकल यूजर इंटरफेस (जीयूआई) बनाएं Python और PyQt का उपयोग करके आपके संपर्क पुस्तक एप्लिकेशन के लिए
- एप्लिकेशन को SQLite डेटाबेस से कनेक्ट करें PyQt के SQL समर्थन का उपयोग कर रहे हैं
- PyQt के मॉडल-व्यू आर्किटेक्चर का उपयोग करके संपर्क डेटा प्रबंधित करें
इस परियोजना के अंत में, आपके पास एक कार्यात्मक संपर्क पुस्तक एप्लिकेशन होगा जो आपको अपनी संपर्क जानकारी संग्रहीत और प्रबंधित करने की अनुमति देगा।
एप्लिकेशन के लिए संपूर्ण स्रोत कोड के साथ-साथ इस ट्यूटोरियल में आपके द्वारा जाने वाले प्रत्येक चरण के लिए कोड प्राप्त करने के लिए, नीचे दिए गए लिंक पर क्लिक करें:
स्रोत कोड प्राप्त करें: स्रोत कोड प्राप्त करने के लिए यहां क्लिक करें जिसका उपयोग आप इस ट्यूटोरियल में Python, PyQt, और SQLite के साथ संपर्क पुस्तक बनाने के लिए करेंगे।
डेमो:पायथन के साथ एक संपर्क पुस्तक
संपर्क पुस्तकें एक उपयोगी और व्यापक रूप से उपयोग की जाने वाली एप्लिकेशन हैं। वे हर जगह हैं। आपके पास शायद आपके फोन और आपके कंप्यूटर पर एक संपर्क पुस्तिका है। संपर्क पुस्तक के साथ, आप अपने परिवार के सदस्यों, मित्रों, सहकर्मियों, आदि के लिए संपर्क जानकारी संग्रहीत और प्रबंधित कर सकते हैं।
इस ट्यूटोरियल में, आप Python, SQLite और PyQt के साथ एक कॉन्टैक्ट बुक GUI एप्लिकेशन को कोड करेंगे। इस ट्यूटोरियल के चरणों का पालन करने के बाद आपकी संपर्क पुस्तक कैसी दिखेगी और कैसे काम करेगी, इसका एक डेमो यहां दिया गया है:
आपकी संपर्क पुस्तिका इस प्रकार के अनुप्रयोग के लिए न्यूनतम आवश्यक सुविधाएँ प्रदान करेगी। आप अपनी संपर्क सूची में जानकारी प्रदर्शित करने, बनाने, अपडेट करने और निकालने में सक्षम होंगे।
परियोजना अवलोकन
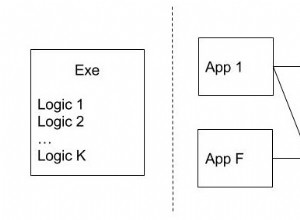
अपनी संपर्क पुस्तक एप्लिकेशन बनाने के लिए, आपको कोड को मॉड्यूल और पैकेज में व्यवस्थित करना होगा और अपनी परियोजना को एक सुसंगत संरचना देना होगा। इस ट्यूटोरियल में, आप निम्न निर्देशिकाओं और फ़ाइल संरचना का उपयोग करेंगे:
rpcontacts_project/
│
├── rpcontacts/
│   ├── __init__.py
│   ├── views.py
│   ├── database.py
│   ├── main.py
│   └── model.py
│
├── requirements.txt
├── README.md
└── rpcontacts.py
यहां आपकी परियोजना निर्देशिका की सामग्री का संक्षिप्त सारांश दिया गया है:
rpcontacts_project/परियोजना की मूल निर्देशिका है। इसमें निम्न फ़ाइलें होंगी:requirements.txtपरियोजना की आवश्यकताओं की सूची प्रदान करता है।README.mdपरियोजना के बारे में सामान्य जानकारी प्रदान करता है।rpcontacts.pyएप्लिकेशन को चलाने के लिए एंट्री-पॉइंट स्क्रिप्ट प्रदान करता है।
rpcontacts/एक उपनिर्देशिका है जो एप्लिकेशन का मुख्य पैकेज प्रदान करती है। यह निम्नलिखित मॉड्यूल प्रदान करता है:__init__.pyviews.pydatabase.pymain.pymodel.py
आप इस ट्यूटोरियल में इनमें से प्रत्येक फाइल को चरण दर चरण कवर करेंगे। प्रत्येक फ़ाइल का नाम अनुप्रयोग में उसकी भूमिका का एक विचार देता है। उदाहरण के लिए, views.py विंडोज़ और संवादों के जीयूआई उत्पन्न करने के लिए कोड होगा, database.py डेटाबेस के साथ काम करने के लिए कोड होगा, और main.py एप्लिकेशन को ही होस्ट करेगा। अंत में, model.py एप्लिकेशन के डेटाबेस में डेटा को प्रबंधित करने के लिए मॉडल को लागू करेगा।
सामान्य तौर पर, एप्लिकेशन में संपर्कों को प्रदर्शित करने, जोड़ने, हटाने और अपडेट करने के लिए एक मुख्य विंडो होगी। इसमें डेटाबेस में नए संपर्क जोड़ने के लिए एक डायलॉग भी होगा।
आवश्यकताएं
इस परियोजना का अधिकतम लाभ उठाने के लिए, Python और PyQt के साथ GUI प्रोग्रामिंग के कुछ पिछले ज्ञान से मदद मिलेगी। इस संबंध में, आपको इसकी मूल बातें जानने की आवश्यकता होगी:
- PyQt और Python के साथ GUI एप्लिकेशन बनाएं
- PyQt के साथ GUI का निर्माण और लेआउट करें
- Python और PyQt के साथ SQL डेटाबेस प्रबंधित करें
- SQLite डेटाबेस के साथ काम करें
इन विषयों पर ब्रश करने के लिए, आप निम्नलिखित संसाधनों को देख सकते हैं:
- पायथन और पीईक्यूटी:जीयूआई डेस्कटॉप कैलकुलेटर बनाना
- पायथन और पीईक्यूटी:मेनू, टूलबार और स्टेटस बार बनाना
- PyQt लेआउट:पेशेवर दिखने वाले GUI एप्लिकेशन बनाएं
- PyQt के साथ SQL डेटाबेस को संभालना:मूल बातें
- पायथन SQL लाइब्रेरी का परिचय
- पायथन, SQLite, और SQLAlchemy के साथ डेटा प्रबंधन
यदि आप इस ट्यूटोरियल को शुरू करने से पहले इन क्षेत्रों के विशेषज्ञ नहीं हैं तो चिंता न करें। आप एक वास्तविक परियोजना पर अपने हाथों को गंदा करने की प्रक्रिया के माध्यम से सीखेंगे। यदि आप फंस जाते हैं, तो अपना समय लें और ऊपर दिए गए संसाधनों की समीक्षा करें। फिर कोड पर वापस जाएं।
इस ट्यूटोरियल में आप जिस कॉन्टैक्ट बुक एप्लिकेशन का निर्माण करने जा रहे हैं, उसकी एक बाहरी निर्भरता है:PyQt।
नोट: इस ट्यूटोरियल में, आप अपनी संपर्क पुस्तक एप्लिकेशन बनाने के लिए PyQt संस्करण 5.15.2 का उपयोग करेंगे। परियोजना के लिए macOS बिग सुर पर काम करने के लिए संस्करण 5.15.2 की आवश्यकता है।
PyQt संस्करण 6.0 4 जनवरी, 2021 को जारी किया गया था। यह पुस्तकालय की पहली रिलीज़ है जो Qt संस्करण 6 से जुड़ती है। हालाँकि, इस ट्यूटोरियल में प्रोजेक्ट का PyQt 6.0 के साथ परीक्षण नहीं किया गया है।
यदि आप PyQt के इस नए संस्करण के साथ प्रोजेक्ट को चलाने की आवश्यकता महसूस करते हैं, तो इसे आज़माएं। एक संकेत के रूप में, आपको pip install PyQt6 . करना चाहिए और फिर PyQt6 . का उपयोग करने के लिए आयात को अपडेट करें PyQt5 . के बजाय ।
अपनी विकास प्रक्रिया में सर्वोत्तम प्रथाओं का पालन करने के लिए, आप एक आभासी वातावरण बनाकर शुरू कर सकते हैं और फिर pip का उपयोग करके PyQt को स्थापित कर सकते हैं। . एक बार जब आप PyQt स्थापित कर लेते हैं, तो आप कोडिंग शुरू करने के लिए तैयार हो जाते हैं!
चरण 1:PyQt के साथ संपर्क पुस्तक का कंकाल ऐप बनाना
इस पहले चरण में, आप उस नींव को प्रदान करने के लिए एक न्यूनतम लेकिन कार्यात्मक PyQt GUI एप्लिकेशन बनाएंगे, जिस पर आप संपर्क पुस्तक का निर्माण शुरू करेंगे। आप प्रोजेक्ट के मुख्य पैकेज और एप्लिकेशन को चलाने के लिए एंट्री-पॉइंट स्क्रिप्ट सहित न्यूनतम आवश्यक प्रोजेक्ट संरचना भी बनाएंगे।
इस अनुभाग में आपके द्वारा संपर्क पुस्तक प्रोजेक्ट में जोड़े जाने वाले सभी कोड और फ़ाइलें source_code_step_1/ के अंतर्गत एकत्रित की जाती हैं निर्देशिका। आप उन्हें नीचे दिए गए लिंक पर क्लिक करके डाउनलोड कर सकते हैं:
स्रोत कोड प्राप्त करें: स्रोत कोड प्राप्त करने के लिए यहां क्लिक करें जिसका उपयोग आप इस ट्यूटोरियल में Python, PyQt, और SQLite के साथ संपर्क पुस्तक बनाने के लिए करेंगे।
इस अनुभाग के अंत तक, आप पहली बार अपनी संपर्क पुस्तक के लिए कंकाल GUI एप्लिकेशन को चलाने में सक्षम होंगे।
संपर्क पुस्तक परियोजना की संरचना करना
एप्लिकेशन को कोड करना शुरू करने के लिए, आगे बढ़ें और rpcontacts_project/ . नामक एक नई निर्देशिका बनाएं . यह प्रोजेक्ट की रूट डायरेक्टरी होगी। अब rpcontacts/ . नामक एक नई उपनिर्देशिका बनाएं अंदर rpcontacts_project/ . इस उपनिर्देशिका में एप्लिकेशन का मुख्य पैकेज होगा। अंत में, अपने कोड एडिटर या IDE को रूट डायरेक्टरी में सक्रिय करें।
निर्देशिका को पैकेज में बदलने के लिए, पायथन को एक __init__.py की आवश्यकता होती है पैकेज को इनिशियलाइज़ करने के लिए मॉड्यूल। इस फ़ाइल को rpcontacts/ . में बनाएं और इसमें निम्न कोड जोड़ें:
# -*- coding: utf-8 -*-

"""This module provides the rpcontacts package."""

__version__ = "0.1.0"
यह फ़ाइल पायथन को बताती है कि rpcontacts एक पैकेज है। फ़ाइल में कोड तब चलता है जब आप पैकेज या उसके कुछ मॉड्यूल आयात करते हैं।
आपको __init__.py . में कोई कोड डालने की आवश्यकता नहीं है पैकेज को इनिशियलाइज़ करने के लिए फ़ाइल। एक खाली __init__.py फ़ाइल काम करेगी। हालांकि, इस मामले में, आप एक मॉड्यूल-स्तरीय स्थिरांक को परिभाषित करते हैं जिसे __version__ . कहा जाता है अपने आवेदन की संस्करण संख्या रखने के लिए।
एप्लिकेशन की मुख्य विंडो बनाना
अब आपकी संपर्क पुस्तक की मुख्य विंडो बनाने का समय आ गया है। ऐसा करने के लिए, views.py . नामक एक मॉड्यूल बनाएं आपके rpcontacts . में पैकेट। फिर मॉड्यूल में निम्न कोड जोड़ें और इसे सहेजें:
# -*- coding: utf-8 -*-

"""This module provides views to manage the contacts table."""

from PyQt5.QtWidgets import (
    QHBoxLayout,
    QMainWindow,
    QWidget,
)

class Window(QMainWindow):
    """Main Window."""
    def __init__(self, parent=None):
        """Initializer."""
        super().__init__(parent)
        self.setWindowTitle("RP Contacts")
        self.resize(550, 250)
        self.centralWidget = QWidget()
        self.setCentralWidget(self.centralWidget)
        self.layout = QHBoxLayout()
        self.centralWidget.setLayout(self.layout)
सबसे पहले, आप PyQt5.QtWidgets . से आवश्यक कक्षाएं आयात करते हैं . फिर आप Window create बनाएं . यह वर्ग QMainWindow . से इनहेरिट करता है और एप्लिकेशन की मुख्य विंडो उत्पन्न करने के लिए कोड प्रदान करता है। इनिशियलाइज़र विधि में, आप विंडो के शीर्षक को "RP Contacts" . पर सेट करते हैं , विंडो का आकार बदलें 550 द्वारा 250 पिक्सेल, परिभाषित करें और केंद्रीय विजेट को QWidget . का उपयोग करके सेट करें , और अंत में क्षैतिज बॉक्स लेआउट का उपयोग करके केंद्रीय विजेट के लिए एक लेआउट परिभाषित करें।
एप्लिकेशन को कोड करना और चलाना
चूंकि आपके पास पहले से ही संपर्क पुस्तक के लिए एक मुख्य विंडो है, इसलिए QApplication का उपयोग करके एक कार्यात्मक PyQt एप्लिकेशन बनाने के लिए कोड लिखने का समय आ गया है। . ऐसा करने के लिए, main.py . नामक एक नया मॉड्यूल बनाएं आपके rpcontacts . में पैकेज करें और उसमें निम्न कोड जोड़ें:
# -*- coding: utf-8 -*-
# rpcontacts/main.py

"""This module provides RP Contacts application."""

import sys

from PyQt5.QtWidgets import QApplication

from .views import Window

def main():
    """RP Contacts main function."""
    # Create the application
    app = QApplication(sys.argv)
    # Create the main window
    win = Window()
    win.show()
    # Run the event loop
    sys.exit(app.exec())
इस मॉड्यूल में, आप sys import आयात करते हैं exit() तक पहुंच प्राप्त करने के लिए , जो आपको उपयोगकर्ता द्वारा मुख्य विंडो बंद करने पर एप्लिकेशन से सफाई से बाहर निकलने की अनुमति देता है। फिर आप QApplication import आयात करते हैं PyQt5.QtWidgets . से और Window views . से . अंतिम चरण main() . को परिभाषित करना है आपके आवेदन के मुख्य कार्य के रूप में।
अंदर main() , आप तत्काल QApplication और Window . फिर आप .show() . पर कॉल करें Window . पर , और अंत में आप एप्लिकेशन का मुख्य लूप . चलाते हैं , या ईवेंट लूप , .exec() . का उपयोग करके ।
अब प्रोजेक्ट रूट डायरेक्टरी पर जाएँ rpcontacts_project/ और rpcontacts.py . नामक फ़ाइल बनाएं . यह फ़ाइल एप्लिकेशन को चलाने के लिए एंट्री-पॉइंट स्क्रिप्ट प्रदान करती है। फ़ाइल में निम्न कोड जोड़ें और इसे सहेजें:
#!/usr/bin/env python3
# -*- coding: utf-8 -*-
# rpcontacts_project/rpcontacts.py

"""This module provides RP Contacts entry point script."""

from rpcontacts.main import main

if __name__ == "__main__":
    main()
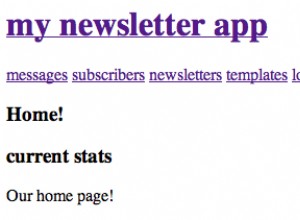
यह फ़ाइल आयात करती है main() आपके main.py . से मापांक। फिर आप पारंपरिक सशर्त कथन को लागू करते हैं जो main() . को कॉल करता है यदि उपयोगकर्ता इस मॉड्यूल को पायथन लिपि के रूप में चलाता है। अब python rpcontacts.py . कमांड चलाकर एप्लिकेशन लॉन्च करें आपके पायथन पर्यावरण में। आपको अपनी स्क्रीन पर निम्न विंडो मिलेगी:
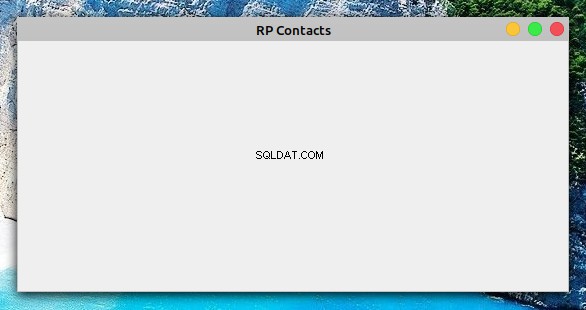
इतना ही! आपने एक न्यूनतम लेकिन कार्यात्मक PyQt GUI एप्लिकेशन बनाया है जिसका उपयोग आप अपनी संपर्क पुस्तक बनाने के लिए शुरुआती बिंदु के रूप में कर सकते हैं। इस बिंदु पर, आपके प्रोजेक्ट में निम्न संरचना होनी चाहिए:
./rpcontacts_project/
│
├── rpcontacts/
│   ├── __init__.py
│   ├── views.py
│   └── main.py
│
└── rpcontacts.py
इस खंड में, आपने पायथन मॉड्यूल और पैकेज का उपयोग करके अपनी संपर्क पुस्तक परियोजना के लिए न्यूनतम आवश्यक संरचना बनाई है। आपने एप्लिकेशन की मुख्य विंडो बनाई है और एक PyQt GUI एप्लिकेशन बनाने के लिए बॉयलरप्लेट कोड को एक साथ रखा है। आपने पहली बार एप्लिकेशन भी चलाया है। इसके बाद, आप अपने GUI में सुविधाओं को जोड़ना शुरू करेंगे।
चरण 2:पायथन के साथ संपर्क पुस्तक के GUI का निर्माण करना
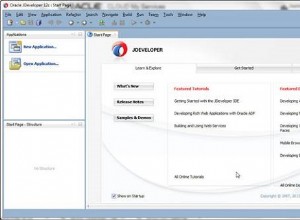
अब जब आपने अपने संपर्क पुस्तक एप्लिकेशन का कंकाल बना लिया है, तो आप मुख्य विंडो के GUI को कोड करना शुरू कर सकते हैं। इस खंड के अंत में, आपने Python और PyQt का उपयोग करके अपनी संपर्क पुस्तक का GUI बनाने के लिए आवश्यक चरणों को पूरा कर लिया होगा। जीयूआई इस तरह दिखेगा:
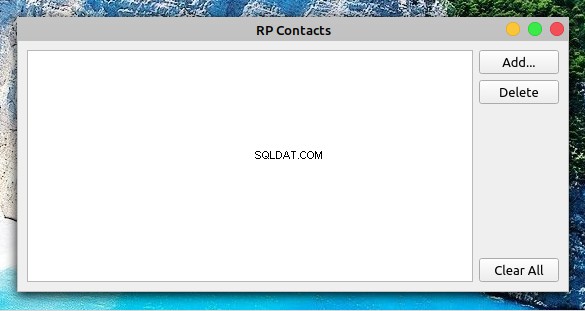
विंडो के केंद्र में, आपकी संपर्क सूची प्रदर्शित करने के लिए आपके पास एक तालिका दृश्य है। फ़ॉर्म के दाईं ओर, आपके पास तीन बटन हैं:
- जोड़ें सूची में एक नया संपर्क जोड़ने के लिए
- हटाएं किसी चयनित संपर्क को सूची से हटाने के लिए
- सभी मिटाएं सूची से सभी संपर्कों को हटाने के लिए
इस अनुभाग में आपके द्वारा जोड़े या संशोधित किए जाने वाले सभी कोड और फ़ाइलें source_code_step_2/ के अंतर्गत एकत्रित की जाती हैं निर्देशिका। आप उन्हें नीचे दिए गए लिंक पर क्लिक करके डाउनलोड कर सकते हैं:
स्रोत कोड प्राप्त करें: स्रोत कोड प्राप्त करने के लिए यहां क्लिक करें जिसका उपयोग आप इस ट्यूटोरियल में Python, PyQt, और SQLite के साथ संपर्क पुस्तक बनाने के लिए करेंगे।
views.py पर वापस जाएं मॉड्यूल और Window . का कोड अपडेट करें उपरोक्त GUI उत्पन्न करने के लिए:
 1# -*- coding: utf-8 -*-
 2# rpcontacts/views.py
 3
 4"""This module provides views to manage the contacts table."""
 5
 6from PyQt5.QtWidgets import (
 7    QAbstractItemView,
 8    QHBoxLayout,
 9    QMainWindow,
10    QPushButton,
11    QTableView,
12    QVBoxLayout,
13    QWidget,
14)
15
16class Window(QMainWindow):
17    """Main Window."""
18    def __init__(self, parent=None):
19        """Initializer."""
20        # Snip...
21
22        self.setupUI()
23
24    def setupUI(self):
25        """Setup the main window's GUI."""
26        # Create the table view widget
27        self.table = QTableView()
28        self.table.setSelectionBehavior(QAbstractItemView.SelectRows)
29        self.table.resizeColumnsToContents()
30        # Create buttons
31        self.addButton = QPushButton("Add...")
32        self.deleteButton = QPushButton("Delete")
33        self.clearAllButton = QPushButton("Clear All")
34        # Lay out the GUI
35        layout = QVBoxLayout()
36        layout.addWidget(self.addButton)
37        layout.addWidget(self.deleteButton)
38        layout.addStretch()
39        layout.addWidget(self.clearAllButton)
40        self.layout.addWidget(self.table)
41        self.layout.addLayout(layout)
आप पहले GUI में उपयोग करने के लिए कुछ अतिरिक्त PyQt कक्षाएं आयात करते हैं। यहाँ कुछ अधिक प्रासंगिक हैं:
QPushButtonजोड़ें . बनाने के लिए , हटाएं , और सभी साफ़ करें बटनQTableViewतालिका जैसा दृश्य प्रदान करने के लिए जो संपर्क सूची प्रदर्शित करता हैQAbstractItemViewतालिका दृश्य चयन व्यवहार नीति तक पहुंच प्रदान करने के लिए
इस कोड में, Window . के लिए पहला जोड़ .setupUI() . के लिए एक कॉल है __init__() . के अंत में . जब आप एप्लिकेशन चलाते हैं तो यह कॉल मुख्य विंडो का GUI उत्पन्न करता है।
.setupUI() के अंदर का कोड यहां दिया गया है करता है:
- पंक्ति 27 एक
QTableViewबनाता है संपर्क सूची प्रदर्शित करने के लिए उदाहरण। - पंक्ति 28
.selectionBehaviorसेट करता हैQAbstractItemView.SelectRows. के लिए संपत्ति . यह सुनिश्चित करता है कि जब कोई उपयोगकर्ता तालिका दृश्य के किसी भी सेल पर क्लिक करता है, तो पूरी पंक्ति का चयन किया जाएगा। तालिका दृश्य की पंक्तियाँ संपर्कों की सूची में एकल संपर्क से संबंधित सभी जानकारी रखती हैं। - लाइन 31 से 33 GUI में तीन बटन जोड़ें:जोड़ें , हटाएं , और सभी साफ़ करें . ये बटन अभी तक कोई कार्य नहीं करते हैं।
- पंक्ति 35 से 41 GUI में सभी विजेट्स के लिए एक सुसंगत लेआउट बनाएं और सेट करें।
Window में इन परिवर्धन के साथ , आप एप्लिकेशन को फिर से चला सकते हैं। आपकी स्क्रीन की विंडो उस विंडो की तरह दिखेगी, जिसे आपने अनुभाग की शुरुआत में देखा था।
नोट: उपरोक्त कोड में लाइन नंबर और इस ट्यूटोरियल में कोड के बाकी नमूने स्पष्टीकरण की सुविधा के लिए हैं। वे अंतिम मॉड्यूल या स्क्रिप्ट में पंक्तियों के क्रम से मेल नहीं खाते।
इस खंड में, आपने अपनी संपर्क पुस्तक की मुख्य विंडो का GUI बनाने के लिए सभी आवश्यक चरण चलाए हैं। अब आप इस पर काम करना शुरू करने के लिए तैयार हैं कि आपका एप्लिकेशन आपके संपर्क डेटा को कैसे प्रबंधित और संग्रहीत करेगा।
चरण 3:संपर्क पुस्तक का डेटाबेस सेट करना
इस बिंदु पर, आपने अपना संपर्क पुस्तक प्रोजेक्ट बनाने के लिए एक PyQt एप्लिकेशन और इसकी मुख्य विंडो का GUI बनाया है। इस खंड में, आप यह परिभाषित करने के लिए कोड लिखेंगे कि एप्लिकेशन संपर्क डेटाबेस से कैसे जुड़ता है। इस चरण को पूरा करने के लिए, आप डेटाबेस को संभालने के लिए SQLite का उपयोग करेंगे और एप्लिकेशन को डेटाबेस से जोड़ने और अपने संपर्क डेटा के साथ काम करने के लिए PyQt के SQL समर्थन का उपयोग करेंगे।
इस अनुभाग में आप जो स्रोत कोड और फ़ाइलें जोड़ेंगे या संशोधित करेंगे, वे source_code_step_3/ के अंतर्गत संग्रहीत हैं निर्देशिका। आप उन्हें नीचे दिए गए लिंक पर क्लिक करके डाउनलोड कर सकते हैं:
स्रोत कोड प्राप्त करें: स्रोत कोड प्राप्त करने के लिए यहां क्लिक करें जिसका उपयोग आप इस ट्यूटोरियल में Python, PyQt, और SQLite के साथ संपर्क पुस्तक बनाने के लिए करेंगे।
सबसे पहले, main.py पर वापस जाएं rpcontacts/ . में निर्देशिका और डेटाबेस से कनेक्शन बनाने के लिए कोड को अपडेट करें:
# -*- coding: utf-8 -*-
# rpcontacts/main.py

"""This module provides RP Contacts application."""

import sys

from PyQt5.QtWidgets import QApplication

from .database import createConnection
from .views import Window

def main():
    """RP Contacts main function."""
    # Create the application
    app = QApplication(sys.argv)
    # Connect to the database before creating any window
    if not createConnection("contacts.sqlite"):
        sys.exit(1)
    # Create the main window if the connection succeeded
    win = Window()
    win.show()
    # Run the event loop
    sys.exit(app.exec_())
इस मामले में, आप पहले आयात करते हैं createConnection() database.py . से . इस फ़ंक्शन में संपर्क डेटाबेस से कनेक्शन बनाने और खोलने के लिए कोड होगा। आप database.py बनाएंगे और लिखें createConnection() अगले भाग में।
अंदर main() , पहली हाइलाइट की गई लाइन createConnection() . का उपयोग करके डेटाबेस से कनेक्शन बनाने का एक प्रयास है . यदि किसी कारण से एप्लिकेशन कनेक्शन बनाने में सक्षम नहीं है, तो sys.exit(1) पर कॉल करें ग्राफ़िकल तत्व बनाए बिना एप्लिकेशन को बंद कर देगा और यह इंगित करेगा कि कोई त्रुटि हुई है।
आपको कनेक्शन को इस तरह से संभालना होगा क्योंकि एप्लिकेशन ठीक से काम करने के लिए डेटाबेस पर निर्भर करता है। यदि आपके पास कार्यात्मक कनेक्शन नहीं है, तो आपका एप्लिकेशन बिल्कुल भी काम नहीं करेगा।
यह अभ्यास आपको त्रुटियों को संभालने और कोई समस्या होने पर एप्लिकेशन को साफ-साफ बंद करने की अनुमति देता है। आप उपयोगकर्ता को उस त्रुटि के बारे में प्रासंगिक जानकारी के साथ प्रस्तुत करने में भी सक्षम होंगे जिसमें डेटाबेस से कनेक्ट करने का प्रयास करते समय एप्लिकेशन चला था।
इन परिवर्धन के साथ, यह createConnection() . के कोड में गोता लगाने का समय है ।
PyQt और SQLite के साथ डेटाबेस से कनेक्ट करना
अपने संपर्क पुस्तक एप्लिकेशन को इसके संबद्ध डेटाबेस से जोड़ना एप्लिकेशन को विकसित करने में एक मौलिक कदम है। ऐसा करने के लिए, आप createConnection() . नामक एक फ़ंक्शन को कोड करेंगे , जो डेटाबेस से कनेक्शन बनाएगा और खोलेगा। यदि कनेक्शन सफल होता है, तो फ़ंक्शन वापस आ जाएगा True . अन्यथा, यह कनेक्शन विफलता के कारण के बारे में जानकारी प्रदान करेगा।
rpcontacts/ पर वापस जाएं निर्देशिका और database.py . नामक एक नया मॉड्यूल बनाएं इसके अंदर। फिर उस मॉड्यूल में निम्न कोड जोड़ें:
 1# -*- coding: utf-8 -*-
 2# rpcontacts/database.py
 3
 4"""This module provides a database connection."""
 5
 6from PyQt5.QtWidgets import QMessageBox
 7from PyQt5.QtSql import QSqlDatabase
 8
 9def createConnection(databaseName):
10    """Create and open a database connection."""
11    connection = QSqlDatabase.addDatabase("QSQLITE")
12    connection.setDatabaseName(databaseName)
13
14    if not connection.open():
15        QMessageBox.warning(
16            None,
17            "RP Contact",
18            f"Database Error: {connection.lastError().text()}",
19        )
20        return False
21
22    return True
यहां, आप पहले कुछ आवश्यक पीईक्यूटी कक्षाएं आयात करते हैं। फिर आप परिभाषित करते हैं createConnection() . यह फ़ंक्शन एक तर्क लेता है:databaseName आपके फ़ाइल सिस्टम में भौतिक SQLite डेटाबेस फ़ाइल का नाम या पथ रखता है।
createConnection() के अंदर का कोड यहां दिया गया है करता है:
- पंक्ति 11
QSQLITE. का उपयोग करके डेटाबेस कनेक्शन बनाता है ड्राइवर। - पंक्ति 12 फ़ाइल नाम या डेटाबेस का पथ सेट करता है।
- पंक्ति 14 कनेक्शन खोलने का प्रयास यदि
.open(). पर कॉल के दौरान कोई समस्या आती है , तोifकोड ब्लॉक एक त्रुटि संदेश दिखाता है और फिरFalseदेता है यह इंगित करने के लिए कि कनेक्शन का प्रयास विफल रहा। - पंक्ति 22 रिटर्न
Trueयदि कनेक्शन का प्रयास सफल होता है।
आपने पहले ही कोड कर दिया है createConnection() . अब आप contacts . बनाने के लिए कोड लिख सकते हैं डेटाबेस में टेबल।
contacts बनाना टेबल
उस फ़ंक्शन के साथ जो डेटाबेस से कनेक्शन बनाता और खोलता है, आप contacts बनाने के लिए एक सहायक फ़ंक्शन को कोड करने के लिए आगे बढ़ सकते हैं टेबल। आप इस तालिका का उपयोग अपने संपर्कों के बारे में जानकारी संग्रहीत करने के लिए करेंगे।
यहां वह कोड है जो _createContactsTable() . को लागू करता है :
# -*- coding: utf-8 -*-
# rpcontacts/database.py

# Snip...
from PyQt5.QtSql import QSqlDatabase, QSqlQuery

def _createContactsTable():
    """Create the contacts table in the database."""
    createTableQuery = QSqlQuery()
    return createTableQuery.exec(
        """
        CREATE TABLE IF NOT EXISTS contacts (
            id INTEGER PRIMARY KEY AUTOINCREMENT UNIQUE NOT NULL,
            name VARCHAR(40) NOT NULL,
            job VARCHAR(50),
            email VARCHAR(40) NOT NULL
        )
        """
    )

def createConnection(databaseName):
    # Snip...
    _createContactsTable()
    return True
यहां, आप पहले एक नया आयात जोड़ें। आप QSqlQuery आयात करते हैं SQL कथनों को निष्पादित और हेरफेर करने के लिए।
अंदर _createContactsTable() , आप एक QSqlQuery बनाते हैं उदाहरण। फिर आप .exec() . पर कॉल करें स्ट्रिंग-आधारित SQL के साथ क्वेरी ऑब्जेक्ट पर CREATE TABLE तर्क के रूप में बयान। यह कथन contacts नामक एक नई तालिका बनाता है आपके डेटाबेस में। तालिका में निम्नलिखित स्तंभ हैं:
| कॉलम | सामग्री |
|---|---|
id | तालिका की प्राथमिक कुंजी के साथ एक पूर्णांक |
name | संपर्क के नाम वाली एक स्ट्रिंग |
job | एक संपर्क के कार्य शीर्षक के साथ एक स्ट्रिंग |
email | एक संपर्क के ईमेल के साथ एक स्ट्रिंग |
contacts आपके डेटाबेस में तालिका आपके संपर्कों के बारे में प्रासंगिक जानकारी संग्रहीत करेगी।
कोडिंग समाप्त करने का अंतिम चरण database.py _createContactsTable() में कॉल जोड़ना है अंदर से createConnection() , अंतिम return . से ठीक पहले बयान। यह सुनिश्चित करता है कि एप्लिकेशन contacts . बनाता है डेटाबेस पर कोई भी ऑपरेशन करने से पहले टेबल।
एक बार जब आप contacts बना लेते हैं तालिका, आप डेटाबेस पर कुछ परीक्षण चला सकते हैं और आगे के परीक्षण के लिए कुछ नमूना डेटा भी जोड़ सकते हैं।
संपर्क पुस्तक के डेटाबेस का परीक्षण
अब तक, आपने संपर्क पुस्तक के डेटाबेस से कनेक्शन को संभालने के लिए आवश्यक कोड लिखना समाप्त कर दिया है। इस खंड में, आप यह सुनिश्चित करने के लिए कुछ परीक्षण करेंगे कि यह कोड और डेटाबेस स्वयं ठीक से काम करते हैं। आप इस ट्यूटोरियल में बाद में और परीक्षण करने के लिए डेटाबेस में कुछ नमूना डेटा भी जोड़ेंगे।
अब एक टर्मिनल या कमांड लाइन खोलें और प्रोजेक्ट की रूट डायरेक्टरी में जाएँ, rpcontacts_project/ . वहां पहुंचने के बाद, पायथन इंटरएक्टिव सत्र शुरू करें और निम्नलिखित कोड टाइप करें:
>>> from rpcontacts.database import createConnection

>>> # Create a connection
>>> createConnection("contacts.sqlite")
True

>>> # Confirm that contacts table exists
>>> from PyQt5.QtSql import QSqlDatabase
>>> db = QSqlDatabase.database()
>>> db.tables()
['contacts', 'sqlite_sequence']
यहां, आप सबसे पहले createConnection() import आयात करें database.py . से मापांक। फिर आप संपर्क डेटाबेस से कनेक्शन बनाने और खोलने के लिए इस फ़ंक्शन को कॉल करते हैं। डेटाबेस फ़ाइल नाम contacts.sqlite है . चूंकि यह फ़ाइल प्रोजेक्ट की रूट डायरेक्टरी में मौजूद नहीं है, इसलिए SQLite इसे आपके लिए बनाता है। आप अपनी वर्तमान निर्देशिका पर एक नज़र डालकर इसकी जांच कर सकते हैं।
इसके बाद, आप पुष्टि करते हैं कि डेटाबेस में contacts . नामक एक तालिका है . ऐसा करने के लिए, आप .database() . पर कॉल करें QSqlDatabase . पर . यह वर्ग विधि वर्तमान डेटाबेस कनेक्शन के लिए एक सूचक लौटाती है। इस कनेक्शन के संदर्भ में, आप .tables() . पर कॉल कर सकते हैं डेटाबेस में तालिकाओं की सूची प्राप्त करने के लिए। ध्यान दें कि सूची में पहली तालिका है contacts , तो अब आप सुनिश्चित हैं कि सब कुछ ठीक चल रहा है।
अब आप contacts . में नमूना डेटा डालने के लिए SQL क्वेरी तैयार कर सकते हैं तालिका:
>>> # Prepare a query to insert sample data
>>> from PyQt5.QtSql import QSqlQuery

>>> insertDataQuery = QSqlQuery()
>>> insertDataQuery.prepare(
...     """
...     INSERT INTO contacts (
...         name,
...         job,
...         email
...     )
...     VALUES (?, ?, ?)
...     """
... )
True
उपरोक्त क्वेरी आपको name . में विशिष्ट मान डालने की अनुमति देती है , job , और email विशेषताएँ और उन मानों को डेटाबेस में सहेजने के लिए। इसे कैसे करें इसका एक उदाहरण नीचे दिया गया है:
>>> # Sample data
>>> data = [
...     ("Linda", "Technical Lead", "linda@example.com"),
...     ("Joe", "Senior Web Developer", "joe@example.com"),
...     ("Lara", "Project Manager", "lara@example.com"),
...     ("David", "Data Analyst", "david@example.com"),
...     ("Jane", "Senior Python Developer", "jane@example.com"),
... ]

>>> # Insert sample data
>>> for name, job, email in data:
...     insertDataQuery.addBindValue(name)
...     insertDataQuery.addBindValue(job)
...     insertDataQuery.addBindValue(email)
...     insertDataQuery.exec()
...
True
True
True
True
True
कोड के इस भाग में, आप सबसे पहले data . को परिभाषित करते हैं लोगों की सूची की संपर्क जानकारी रखने के लिए। इसके बाद, आप for . का उपयोग करते हैं .addBindValue() . पर कॉल करके डेटा डालने के लिए लूप . फिर आप .exec() . पर कॉल करें डेटाबेस पर SQL क्वेरी को प्रभावी ढंग से चलाने के लिए क्वेरी ऑब्जेक्ट पर।
चूंकि .exec() . को सभी कॉल्स वापसी True , आप यह निष्कर्ष निकाल सकते हैं कि डेटा सफलतापूर्वक डेटाबेस में डाला गया था। यदि आप इसकी पुष्टि करना चाहते हैं, तो निम्न कोड चलाएँ:
>>> query = QSqlQuery()
>>> query.exec("SELECT name, job, email FROM contacts")
True

>>> while query.next():
...     print(query.value(0), query.value(1), query.value(2))
...
Linda Technical Lead linda@example.com
Joe Senior Web Developer joe@example.com
Lara Project Manager lara@example.com
David Data Analyst david@example.com
Jane Senior Python Developer jane@example.com
इतना ही! आपका डेटाबेस ठीक काम करता है! अब आपके पास एप्लिकेशन का परीक्षण करने के लिए कुछ नमूना डेटा है, और आप अपनी संपर्क पुस्तक की मुख्य विंडो में संपर्क जानकारी को लोड और प्रदर्शित करने के तरीके पर ध्यान केंद्रित कर सकते हैं।
चरण 4:मौजूदा संपर्कों को प्रदर्शित करना और अपडेट करना
एप्लिकेशन की मुख्य विंडो में अपना संपर्क डेटा प्रदर्शित करने के लिए, आप QTableView . का उपयोग कर सकते हैं . यह वर्ग PyQt के मॉडल-व्यू आर्किटेक्चर का हिस्सा है और PyQt मॉडल ऑब्जेक्ट से आइटम प्रदर्शित करने का एक मजबूत और कुशल तरीका प्रदान करता है।
इस अनुभाग में आप जो फ़ाइलें और कोड जोड़ेंगे या संशोधित करेंगे, वे source_code_step_4/ के अंतर्गत संग्रहीत हैं निर्देशिका। उन्हें डाउनलोड करने के लिए, नीचे दिए गए लिंक पर क्लिक करें:
स्रोत कोड प्राप्त करें: स्रोत कोड प्राप्त करने के लिए यहां क्लिक करें जिसका उपयोग आप इस ट्यूटोरियल में Python, PyQt, और SQLite के साथ संपर्क पुस्तक बनाने के लिए करेंगे।
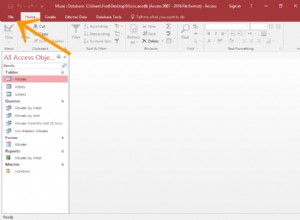
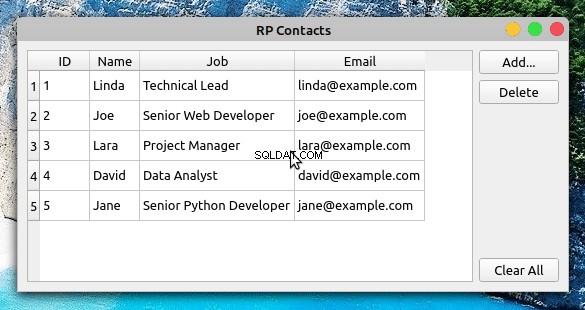
इस चरण को पूरा करने के बाद, आपकी संपर्क पुस्तिका इस तरह दिखेगी:
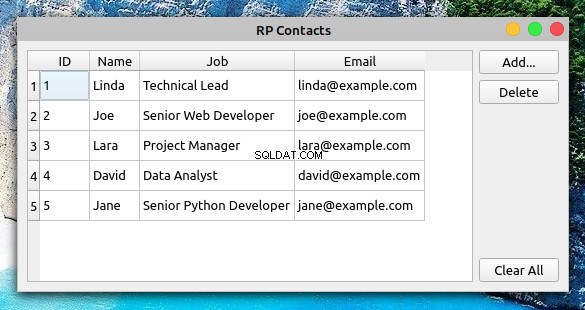
मुख्य विंडो में टेबल व्यू ऑब्जेक्ट आपको संपर्क जानकारी को जल्दी से संशोधित और अपडेट करने की अनुमति देने के लिए आवश्यक कार्यक्षमता प्रदान करता है।
उदाहरण के लिए, किसी संपर्क का नाम अपडेट करने के लिए, आप नाम वाले सेल पर डबल-क्लिक कर सकते हैं, नाम अपडेट कर सकते हैं और फिर Enter दबा सकते हैं। डेटाबेस में परिवर्तनों को स्वचालित रूप से सहेजने के लिए। लेकिन इससे पहले कि आप ऐसा कर सकें, आपको एक मॉडल बनाना होगा और उसे तालिका दृश्य से जोड़ना होगा।
संपर्क डेटा को संभालने के लिए एक मॉडल बनाना
PyQt SQL डेटाबेस के साथ काम करने के लिए कक्षाओं का एक समृद्ध सेट प्रदान करता है। अपने संपर्क पुस्तक आवेदन के लिए, आप QSqlTableModel . का उपयोग करेंगे , जो एकल डेटाबेस तालिका के लिए संपादन योग्य डेटा मॉडल प्रदान करता है। यह काम के लिए एकदम सही है क्योंकि आपके डेटाबेस में एक ही टेबल है, contacts ।
अपने कोड संपादक पर वापस जाएं और model.py . नामक एक नया मॉड्यूल बनाएं rpcontacts/ . के अंदर निर्देशिका। फ़ाइल में निम्न कोड जोड़ें और इसे सहेजें:
 1# -*- coding: utf-8 -*-
 2# rpcontacts/model.py
 3
 4"""This module provides a model to manage the contacts table."""
 5
 6from PyQt5.QtCore import Qt
 7from PyQt5.QtSql import QSqlTableModel
 8
 9class ContactsModel:
10    def __init__(self):
11        self.model = self._createModel()
12
13    @staticmethod
14    def _createModel():
15        """Create and set up the model."""
16        tableModel = QSqlTableModel()
17        tableModel.setTable("contacts")
18        tableModel.setEditStrategy(QSqlTableModel.OnFieldChange)
19        tableModel.select()
20        headers = ("ID", "Name", "Job", "Email")
21        for columnIndex, header in enumerate(headers):
22            tableModel.setHeaderData(columnIndex, Qt.Horizontal, header)
23        return tableModel
इस कोड में, आप पहले कुछ आवश्यक आयात करते हैं, फिर आप ContactsModel . बनाते हैं . क्लास इनिशियलाइज़र में, आप .model . नामक एक इंस्टेंस एट्रिब्यूट को परिभाषित करते हैं डेटा मॉडल को होल्ड करने के लिए।
इसके बाद, आप मॉडल ऑब्जेक्ट बनाने और सेट करने के लिए एक स्थिर विधि जोड़ते हैं। Here’s what the code in ._createModel() does:
- Line 16 creates an instance of
QSqlTableModel()calledtableModel। - Line 17 associates the model object with the
contactstable in your database. - Line 18 sets the
.editStrategyproperty of the model toQSqlTableModel.OnFieldChange. With this, you ensure that the changes on the model get saved into the database immediately. - Line 19 loads the table into the model by calling
.select()। - Lines 20 to 22 define and set user-friendly headers for the
contactstable’s columns. - Line 23 returns the newly created model.
At this point, you have your data model ready to use. Now you need to connect the table view widget to the model so you can present your users with the contact information.
Connecting the Model to the View
To display contact data in your contact book’s main window, you need to connect the table view with the data model. To perform this connection, you need to call .setModel() on the table view object and pass the model as an argument:
# -*- coding: utf-8 -*-
# rpcontacts/views.py

# Snip...
from .model import ContactsModel

class Window(QMainWindow):
    """Main Window."""
    def __init__(self, parent=None):
        # Snip...
        self.contactsModel = ContactsModel()
        self.setupUI()

    def setupUI(self):
        """Setup the main window's GUI."""
        # Create the table view widget
        self.table = QTableView()
        self.table.setModel(self.contactsModel.model)
        self.table.setSelectionBehavior(QAbstractItemView.SelectRows)
        # Snip...
In this code, you first import ContactsModel from model.py . This class provides the model that manages the data in your contact database.
In the initializer of Window , you create an instance of ContactsModel . Then inside .setupUI() , you call .setModel() on .table to connect the model with the table view. If you run the application after this update, then you’ll get the window you saw at the beginning of step 4.
Displaying and Updating Contacts
PyQt’s Model-View architecture provides a robust and user-friendly way to create GUI applications that manage databases. Models communicate with and access the data in the database. Any change in a model updates the database immediately. Views are responsible for displaying the data to the user and also for providing editable widgets to allow the user to modify the data directly in the view.
If the user modifies the data through the view, then the view internally communicates with and updates the model, which saves the changes to the physical database:
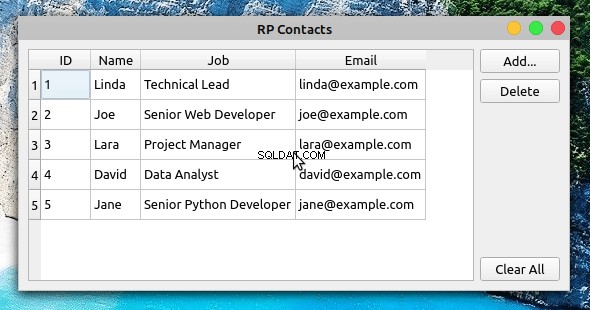
In this example, you double-click Joe’s Job खेत। This gives you access to an editable widget that allows you to modify the value in the cell. Then you update the job description from Senior Web Developer to Web Developer . When you hit Enter , the table view communicates the change to the model, and the model saves the change to the database immediately.
To confirm that the changes were successfully saved into the database, you can close the application and run it again. The table view should reflect your updates.
Step 5:Creating New Contacts
At this step, your contact book application provides functionality to load, display, and update the information about your contacts. Even though you’re able to modify and update the contact information, you can neither add nor remove contacts from the list.
All the files and the code you’ll add or modify in this section are collected in the source_code_step_5/ निर्देशिका। To download them, click the link below:
Get the Source Code: Click here to get the source code you’ll use to build a contact book with Python, PyQt, and SQLite in this tutorial.
In this section, you’ll provide the required functionality to add new contacts to the database, using a pop-up dialog to enter the new information. The first step is to create the Add Contact dialog.
Creating the Add Contact Dialog
Dialogs are small windows that you can use to communicate with your users. In this section, you’ll code the contact book’s Add Contact dialog to allow your users add new contacts to their current list of contacts.
To code the Add Contact dialog, you’ll subclass QDialog . This class provides a blueprint to build dialogs for your GUI applications.
Now open the views.py module and update the import section like this:
# -*- coding: utf-8 -*-
# rpcontacts/views.py

# Snip...
from PyQt5.QtCore import Qt
from PyQt5.QtWidgets import (
    QAbstractItemView,
    QDialog,
    QDialogButtonBox,
    QFormLayout,
    QHBoxLayout,
    QLineEdit,
    QMainWindow,
    QMessageBox,
    QPushButton,
    QTableView,
    QVBoxLayout,
    QWidget,
)
The highlighted lines in the above code import the required classes to build the Add Contact dialog. With these classes in your namespace, add the following class at the end of views.py :
 1# -*- coding: utf-8 -*-
 2# rpcontacts/views.py
 3
 4# Snip...
 5class AddDialog(QDialog):
 6    """Add Contact dialog."""
 7    def __init__(self, parent=None):
 8        """Initializer."""
 9        super().__init__(parent=parent)
10        self.setWindowTitle("Add Contact")
11        self.layout = QVBoxLayout()
12        self.setLayout(self.layout)
13        self.data = None
14
15        self.setupUI()
16
17    def setupUI(self):
18        """Setup the Add Contact dialog's GUI."""
19        # Create line edits for data fields
20        self.nameField = QLineEdit()
21        self.nameField.setObjectName("Name")
22        self.jobField = QLineEdit()
23        self.jobField.setObjectName("Job")
24        self.emailField = QLineEdit()
25        self.emailField.setObjectName("Email")
26        # Lay out the data fields
27        layout = QFormLayout()
28        layout.addRow("Name:", self.nameField)
29        layout.addRow("Job:", self.jobField)
30        layout.addRow("Email:", self.emailField)
31        self.layout.addLayout(layout)
32        # Add standard buttons to the dialog and connect them
33        self.buttonsBox = QDialogButtonBox(self)
34        self.buttonsBox.setOrientation(Qt.Horizontal)
35        self.buttonsBox.setStandardButtons(
36            QDialogButtonBox.Ok | QDialogButtonBox.Cancel
37        )
38        self.buttonsBox.accepted.connect(self.accept)
39        self.buttonsBox.rejected.connect(self.reject)
40        self.layout.addWidget(self.buttonsBox)
There are a lot of things happening in this code. Here’s a summary:
- Line 5 defines a new class that inherits from
QDialog। - Lines 7 to 15 define the class initializer. In this case, the most relevant addition is
.data, which is an instance attribute that you’ll use to hold the data your users provide.
In .setupUI() , you define the dialog’s GUI:
- Lines 20 to 25 add three
QLineEditobjects:name,job, andemail. You’ll use these line edits to take the user’s input for the name, job description, and email of the contact to add. They represent the corresponding fields in the database. - Lines 27 to 30 create a
QFormLayoutinstance that arranges the line edits in a form. This layout manager also provides user-friendly labels for each line edit or field. - Lines 33 to 37 add a
QDialogButtonBoxobject that provides two standard buttons:OK and Cancel . The OK button accepts the user’s input and the Cancel button rejects it. - Lines 38 and 39 connect the dialog’s built-in
.accepted()and.rejected()signals with the.accept()andreject()slots, respectively. In this case, you’ll rely on the dialog’s built-in.reject()slot, which closes the dialog without processing the input. Other than that, you just need to code the.accept()slot.
To code the dialog’s .accept() slot, you need to consider that any user input needs validation to make sure that it’s correct and safe. This is especially true when you’re working with SQL databases because of the risk of an SQL injection attack.
In this example, you’ll add a minimal validation rule just to make sure that the user provides data for each input field in the dialog. However, adding your own, more robust validation rules would be a good exercise.
Without further ado, get back to AddDialog and add the following code for its .accept() slot:
 1# -*- coding: utf-8 -*-
 2# rpcontacts/views.py
 3
 4# Snip...
 5class AddDialog(QDialog):
 6    def __init__(self, parent=None):
 7        # Snip...
 8
 9    def setupUI(self):
10        # Snip...
11
12    def accept(self):
13        """Accept the data provided through the dialog."""
14        self.data = []
15        for field in (self.nameField, self.jobField, self.emailField):
16            if not field.text():
17                QMessageBox.critical(
18                    self,
19                    "Error!",
20                    f"You must provide a contact's {field.objectName()}",
21                )
22                self.data = None  # Reset .data
23                return
24
25            self.data.append(field.text())
26
27        if not self.data:
28            return
29
30        super().accept()
The code within .accept() does the following:
- Line 14 initializes
.datato an empty list ([]) This list will store the user’s input data. - Line 15 defines a
forloop that iterates over the three line edits, or fields, in the dialog. - Lines 16 to 23 define a conditional statement that checks if the user has provided data for each field in the dialog. If not, then the dialog shows an error message that warns the user about the missing data.
- Line 25 adds the user’s input for each field to
.data। - Line 30 calls the superclass’s
.accept()slot to provide the standard behavior that closes the dialog after the user clicks OK ।
With this code, you’re ready to add a new slot to the contact book’s main window. This slot will launch the dialog, and if the user provides valid input, then the slot will use the model to save the newly added contact to the database.
Launching the Add Contact Dialog
Now that you’ve coded the Add Contact dialog, it’s time to add a new slot to Window so you can launch the dialog by clicking Add and process the user’s input once they click OK ।
Go to the definition of Window and add the following code:
 1# -*- coding: utf-8 -*-
 2# rpcontacts/views.py
 3
 4# Snip...
 5class Window(QMainWindow):
 6    # Snip...
 7
 8    def setupUI(self):
 9        # Snip...
10        self.addButton = QPushButton("Add...")
11        self.addButton.clicked.connect(self.openAddDialog)
12        # Snip...
13
14    def openAddDialog(self):
15        """Open the Add Contact dialog."""
16        dialog = AddDialog(self)
17        if dialog.exec() == QDialog.Accepted:
18            self.contactsModel.addContact(dialog.data)
19            self.table.resizeColumnsToContents()
Here’s a summary of what’s happening in the above code:
- Line 11 connects the
.clicked()signal of the Add button to the newly created slot,.openAddDialog(). This way, a click on the button will automatically call the slot. - Line 14 defines the
.openAddDialog()slot. - Line 16 creates an instance of
AddDialog। - Lines 17 to 19 define a conditional statement to check if the dialog was accepted. If so, then line 14 calls
.addContact()on the data model with the dialog’s.dataattribute as an argument. The final statement in theifcode block resizes the table view to fit the size of its updated content.
Now that you have a way to launch the Add Contact dialog and to process its data, you need to provide the code for .addContact() in your data model. That’s a topic for the next section.
Processing the Add Dialog’s Data in the Model
In this section, you’ll add a method called .addContact() to your data model, ContactsModel . Open model.py in your code editor, go to the definition of ContactsModel , and add the following code:
 1# -*- coding: utf-8 -*-
 2# rpcontacts/model.py
 3
 4# Snip...
 5class ContactsModel:
 6    # Snip...
 7
 8    def addContact(self, data):
 9        """Add a contact to the database."""
10        rows = self.model.rowCount()
11        self.model.insertRows(rows, 1)
12        for column, field in enumerate(data):
13            self.model.setData(self.model.index(rows, column + 1), field)
14        self.model.submitAll()
15        self.model.select()
Inside .addContact() , the code does the following:
- Line 10 gets the current number of rows in the data model.
- Line 11 inserts a new row at the end of the data model.
- Lines 12 and 13 run a
forloop that inserts every item indatainto the corresponding cell in the data model. To do this, line 9 calls.setData()on the model, with the index of the cell and the current datafieldas arguments. - Line 14 submits the changes to the database by calling
.submitAll()on the model. - Line 15 reloads the data from the database into the model.
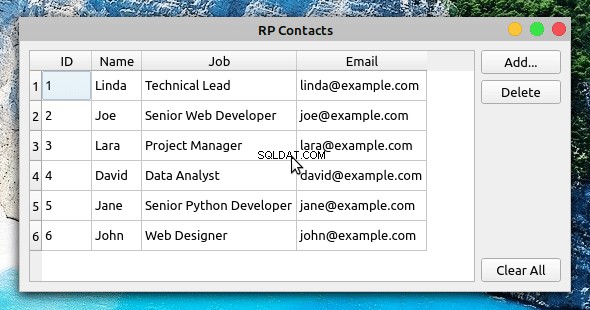
If you run the application with these new additions, then you’ll get the following behavior:
Now when you click Add , the Add Contact dialog appears on your screen. You can use the dialog to provide the required information for a new contact and to add the contact to the database by clicking OK ।
Step 6:Deleting Existing Contacts
The final feature you’ll add to the contact book application is the ability to remove contacts from the database using the GUI.
Again, you’ll find all the files and the code added or modified in this section under the source_code_step_6/ निर्देशिका। You can download them by clicking the link below:
Get the Source Code: Click here to get the source code you’ll use to build a contact book with Python, PyQt, and SQLite in this tutorial.
In this section, you’ll first add the capability to delete a single contact at a time. Then you’ll add code to remove all the contacts from the database.
Deleting Selected Contacts
To remove a single contact from the contact database, you need to select the desired contact in the table view on the contact book’s main window. Once you’ve selected the contact, you can click Delete to perform the operation on the database.
Go to the model.py module and add the following code to implement .deleteContact() inside ContactsModel :
# -*- coding: utf-8 -*-
# rpcontacts/model.py

# Snip...
class ContactsModel:
    # Snip...

    def deleteContact(self, row):
        """Remove a contact from the database."""
        self.model.removeRow(row)
        self.model.submitAll()
        self.model.select()
This method has three lines of code. The first line removes the selected row . The second line submits the change to the database. Finally, the third line reloads the data into the model.
Next, get back to the views.py module and add the code behind the Delete button in Window :
# -*- coding: utf-8 -*-
# rpcontacts/views.py

# Snip...
class Window(QMainWindow):
    # Snip...

    def setupUI(self):
        """Setup the main window's GUI."""
        # Snip...
        self.deleteButton = QPushButton("Delete")
        self.deleteButton.clicked.connect(self.deleteContact)
        # Snip...

    def deleteContact(self):
        """Delete the selected contact from the database."""
        row = self.table.currentIndex().row()
        if row < 0:
            return

        messageBox = QMessageBox.warning(
            self,
            "Warning!",
            "Do you want to remove the selected contact?",
            QMessageBox.Ok | QMessageBox.Cancel,
        )

        if messageBox == QMessageBox.Ok:
            self.contactsModel.deleteContact(row)
In the first highlighted line, you connect the .clicked() signal of the Delete button to the .deleteContact() slot. This connection triggers a call to .deleteContact() every time the user clicks the button.
In .deleteContact() , you first get the index of the currently selected row in the table view. The if statement checks if the index is lower than 0 , which would mean that there are no contacts in the table view. If so, then the method returns immediately without performing any further actions.
Then the method shows a warning message confirming that the user wants to delete the selected contact. If the user accepts the operation, then .deleteContact(row) gets called. In this case, row represents the index of the currently selected row in the table.
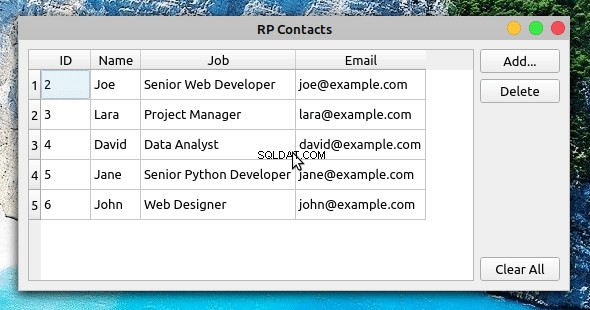
After these additions, you can run the application again to get the following behavior:
Now when you select a contact from the table view and click Delete , you’re presented with a warning message. If you click the message dialog’s OK button, then the application removes the selected contact from the database, updating the table view accordingly.
Clearing the Contact Database
To remove all the contacts from the database, you’ll start by adding a method called .clearContacts() to ContactsModel . Open your model.py module and add the following method at the end of the class:
 1# -*- coding: utf-8 -*-
 2# rpcontacts/model.py
 3
 4# Snip...
 5class ContactsModel:
 6    # Snip...
 7
 8    def clearContacts(self):
 9        """Remove all contacts in the database."""
10        self.model.setEditStrategy(QSqlTableModel.OnManualSubmit)
11        self.model.removeRows(0, self.model.rowCount())
12        self.model.submitAll()
13        self.model.setEditStrategy(QSqlTableModel.OnFieldChange)
14        self.model.select()
Here’s what each line of code does:
- Line 10 sets the data model’s
.editStrategyproperty toQSqlTableModel.OnManualSubmit. This allows you to cache all the changes until you call.submitAll()later on. You need to do this because you’re changing several rows at the same time. - Line 11 removes all the rows from the model.
- Line 12 saves changes to the database.
- Line 13 resets the model’s
.editStrategyproperty to its original value,QSqlTableModel.OnFieldChange. If you don’t reset this property to its original value, then you won’t be able to update the contacts directly in the table view. - Line 14 reloads the data into the model.
Once you’ve coded .clearContacts() , you can get back to the views.py file and update Window with the following code:
# -*- coding: utf-8 -*-
# rpcontacts/views.py

# Snip...
class Window(QMainWindow):
    # Snip...

    def setupUI(self):
        """Setup the main window's GUI."""
        # Snip...
        self.clearAllButton = QPushButton("Clear All")
        self.clearAllButton.clicked.connect(self.clearContacts)
        # Snip...

    def clearContacts(self):
        """Remove all contacts from the database."""
        messageBox = QMessageBox.warning(
            self,
            "Warning!",
            "Do you want to remove all your contacts?",
            QMessageBox.Ok | QMessageBox.Cancel,
        )

        if messageBox == QMessageBox.Ok:
            self.contactsModel.clearContacts()
The first highlighted line in this code connects the .clicked() signal of the Clear All button to the .clearContacts() slot below.
In .clearContacts() , you first create a message dialog, messageBox , to ask the user to confirm the removing operation. If the user confirms the operation by clicking OK , then .clearContacts() gets called on the model to remove all the contacts from the database:
इतना ही! With this last piece of code, your contact book application is complete. The application provides features that allow your users to display, add, update, and remove contacts from the database.
Conclusion
Building a contact book GUI application with Python, PyQt, and SQLite is an excellent exercise for you to expand your skills with these tools and as a developer in general. Coding projects like this allows you to apply the knowledge and skills you already have and also pushes you to research and learn about new topics every time you encounter a new programming problem.
In this tutorial, you learned how to:
- Build the GUI for a contact book application using PyQt
- Use PyQt’s SQL support to connect the application to an SQLite database
- Use PyQt’s Model-View architecture to work with the application’s database
You can download the complete source code for the contact book application and also the code to complete each step in this tutorial by clicking the link below:
Get the Source Code: Click here to get the source code you’ll use to build a contact book with Python, PyQt, and SQLite in this tutorial.
Next Steps
At this point, you’ve completed a fully functional contact book project. The application provides minimal functionality, but it’s a good starting point to continue adding features and take your Python and PyQt skills to the next level. Here are some next step ideas that you can implement:
-
Add new data fields: Adding new data fields to store more information about your contacts would be great. For example, you can add the contact’s photo, phone number, web page, Twitter handle, and so on. To do this, you might need to create new tables and set up relations between them. PyQt provides the
QSqlRelationalTableModel, which defines an editable data model for a single table and provides foreign key support. -
Provide search capability: Giving your users a way to search for a contact in the database is arguably a must-have feature in this kind of application. To implement it, you can use PyQt’s
QSqlQueryandQSqlQueryModel। -
Add back-up capability: Providing a way of backing up contact information is another interesting feature. Users might face problems with their computers and lose their data. You can provide options to upload the data to a cloud service or to back it up to an external disk.
These are just a few ideas for how you can continue adding features to your contact book. Take the challenge and build something amazing on top of this!