इस श्रृंखला के भाग 2 में, आपने REST API के माध्यम से किए गए परिवर्तनों को SQLAlchemy का उपयोग करके डेटाबेस में सहेजने की क्षमता को जोड़ा और मार्शमैलो का उपयोग करके REST API के लिए उस डेटा को क्रमबद्ध करना सीखा। REST API को डेटाबेस से कनेक्ट करना ताकि एप्लिकेशन मौजूदा डेटा में बदलाव कर सके और नया डेटा बना सके और एप्लिकेशन को अधिक उपयोगी और मजबूत बना सके।
हालाँकि, डेटाबेस द्वारा प्रदान की जाने वाली शक्ति का यह केवल एक हिस्सा है। एक और अधिक शक्तिशाली विशेषता है R RDBMS . का हिस्सा सिस्टम:रिश्ते . एक डेटाबेस में, एक संबंध दो या दो से अधिक तालिकाओं को एक साथ सार्थक तरीके से जोड़ने की क्षमता है। इस लेख में, आप सीखेंगे कि रिश्तों को कैसे लागू किया जाए और अपना Person डेटाबेस को मिनी-ब्लॉगिंग वेब एप्लिकेशन में बदल दें।
इस लेख में, आप सीखेंगे:
- डेटाबेस में एक से अधिक टेबल उपयोगी और महत्वपूर्ण क्यों हैं
- टेबल एक दूसरे से कैसे संबंधित हैं
- कैसे SQLAlchemy रिश्तों को प्रबंधित करने में आपकी मदद कर सकता है
- संबंध कैसे आपको एक मिनी-ब्लॉगिंग एप्लिकेशन बनाने में मदद करते हैं
यह लेख किसके लिए है
इस श्रृंखला के भाग 1 ने आपको REST API बनाने में मार्गदर्शन किया, और भाग 2 ने आपको दिखाया कि REST API को डेटाबेस से कैसे जोड़ा जाए।
यह आलेख आपके प्रोग्रामिंग टूल बेल्ट को और विस्तृत करता है। आप सीखेंगे कि SQLAlchemy द्वारा एक-से-कई संबंधों के रूप में प्रदर्शित पदानुक्रमित डेटा संरचनाएँ कैसे बनाई जाती हैं। इसके अलावा, आप इस पदानुक्रमित संरचना में तत्वों के लिए सीआरयूडी (बनाएं, पढ़ें, अपडेट करें और हटाएं) समर्थन प्रदान करने के लिए पहले से बनाए गए आरईएसटी एपीआई का विस्तार करेंगे।
भाग 2 में प्रस्तुत वेब एप्लिकेशन में इसकी HTML और जावास्क्रिप्ट फाइलें प्रमुख तरीकों से संशोधित होंगी ताकि अधिक पूर्ण रूप से कार्यात्मक मिनी-ब्लॉगिंग एप्लिकेशन बनाया जा सके। आप उस लेख के लिए GitHub रिपॉजिटरी में भाग 2 से कोड के अंतिम संस्करण की समीक्षा कर सकते हैं।
जैसे ही आप संबंध बनाना शुरू करते हैं और अपना मिनी-ब्लॉगिंग एप्लिकेशन शुरू करते हैं, रुको!
अतिरिक्त निर्भरता
भाग 2 लेख के लिए जो आवश्यक था, उससे परे कोई नई पायथन निर्भरता नहीं है। हालांकि, चीजों को आसान और अधिक सुसंगत बनाने के लिए आप वेब एप्लिकेशन में दो नए जावास्क्रिप्ट मॉड्यूल का उपयोग करेंगे। दो मॉड्यूल निम्नलिखित हैं:
- Handlebars.js जावास्क्रिप्ट के लिए एक टेम्पलेट इंजन है, बहुत कुछ फ्लास्क के लिए Jinja2 की तरह।
- Moment.js एक डेटाटाइम पार्सिंग और स्वरूपण मॉड्यूल है जो यूटीसी टाइमस्टैम्प को प्रदर्शित करना आसान बनाता है।
आपको इनमें से किसी को भी डाउनलोड करने की आवश्यकता नहीं है, क्योंकि वेब एप्लिकेशन उन्हें सीधे क्लाउडफ्लेयर सीडीएन (कंटेंट डिलीवरी नेटवर्क) से प्राप्त करेगा, जैसा कि आप पहले से ही jQuery मॉड्यूल के लिए कर रहे हैं।
ब्लॉगिंग के लिए विस्तारित लोगों का डेटा
भाग 2 में, People डेटा build_database.py . में एक शब्दकोश के रूप में मौजूद था पायथन कोड। यह वही है जो आपने कुछ प्रारंभिक डेटा के साथ डेटाबेस को पॉप्युलेट करने के लिए उपयोग किया था। आप People . को संशोधित करने जा रहे हैं प्रत्येक व्यक्ति को उनके साथ जुड़े नोट्स की एक सूची देने के लिए डेटा संरचना। नया People डेटा संरचना इस तरह दिखेगी:
# Data to initialize database with
PEOPLE = [
    {
        "fname": "Doug",
        "lname": "Farrell",
        "notes": [
            ("Cool, a mini-blogging application!", "2019-01-06 22:17:54"),
            ("This could be useful", "2019-01-08 22:17:54"),
            ("Well, sort of useful", "2019-03-06 22:17:54"),
        ],
    },
    {
        "fname": "Kent",
        "lname": "Brockman",
        "notes": [
            (
                "I'm going to make really profound observations",
                "2019-01-07 22:17:54",
            ),
            (
                "Maybe they'll be more obvious than I thought",
                "2019-02-06 22:17:54",
            ),
        ],
    },
    {
        "fname": "Bunny",
        "lname": "Easter",
        "notes": [
            ("Has anyone seen my Easter eggs?", "2019-01-07 22:47:54"),
            ("I'm really late delivering these!", "2019-04-06 22:17:54"),
        ],
    },
]
People . में प्रत्येक व्यक्ति शब्दकोश में अब एक कुंजी शामिल है जिसे notes . कहा जाता है , जो डेटा के टुपल्स वाली सूची से जुड़ा है। notes . में प्रत्येक टपल सूची एकल नोट . का प्रतिनिधित्व करती है सामग्री और एक टाइमस्टैम्प युक्त। आरईएसटी एपीआई में बाद में ऑर्डरिंग प्रदर्शित करने के लिए टाइमस्टैम्प को प्रारंभ किया जाता है (गतिशील रूप से बनाए जाने के बजाय)।
प्रत्येक एकल व्यक्ति अनेक नोटों से संबद्ध है, और प्रत्येक एकल नोट केवल एक व्यक्ति से संबद्ध है। डेटा के इस पदानुक्रम को एक-से-अनेक संबंध के रूप में जाना जाता है, जहां एक एकल मूल वस्तु कई चाइल्ड ऑब्जेक्ट्स से संबंधित होती है। आप देखेंगे कि SQLAlchemy के साथ डेटाबेस में यह एक-से-अनेक संबंध कैसे प्रबंधित किया जाता है।
क्रूर फ़ोर्स अप्रोच
आपके द्वारा बनाया गया डेटाबेस डेटा को एक तालिका में संग्रहीत करता है, और एक तालिका पंक्तियों और स्तंभों की एक द्वि-आयामी सरणी है। क्या People . कर सकते हैं ऊपर दिए गए शब्दकोश को पंक्तियों और स्तंभों की एक ही तालिका में दर्शाया जा सकता है? यह निम्नलिखित तरीके से आपके Person . में हो सकता है डेटाबेस तालिका। दुर्भाग्य से उदाहरण में सभी वास्तविक डेटा को शामिल करने से तालिका के लिए एक स्क्रॉल बार बन जाता है, जैसा कि आप नीचे देखेंगे:
person_id | <थ> fname | timestamp | content | note_timestamp | |
|---|---|---|---|---|---|
| 1 | फैरेल | डौग | 2018-08-08 21:16:01 | कूल, एक मिनी-ब्लॉगिंग एप्लिकेशन! | 2019-01-06 22:17:54 |
| 2 | फैरेल | डौग | 2018-08-08 21:16:01 | यह उपयोगी हो सकता है | 2019-01-08 22:17:54 |
| 3 | फैरेल | डौग | 2018-08-08 21:16:01 | खैर, उपयोगी की तरह | 2019-03-06 22:17:54 |
| 4 | ब्रॉकमैन | केंट | 2018-08-08 21:16:01 | मैं वास्तव में गहन अवलोकन करने जा रहा हूं | 2019-01-07 22:17:54 |
| 5 | ब्रॉकमैन | केंट | 2018-08-08 21:16:01 | हो सकता है कि वे मेरे विचार से अधिक स्पष्ट हों | 2019-02-06 22:17:54 |
| 6 | ईस्टर | बनी | 2018-08-08 21:16:01 | क्या किसी ने मेरे ईस्टर अंडे देखे हैं? | 2019-01-07 22:47:54 |
| 7 | ईस्टर | बनी | 2018-08-08 21:16:01 | मुझे इन्हें डिलीवर करने में बहुत देर हो रही है! | 2019-04-06 22:17:54 |
उपरोक्त तालिका वास्तव में काम करेगी। सभी डेटा का प्रतिनिधित्व किया जाता है, और एक ही व्यक्ति विभिन्न नोटों के संग्रह से जुड़ा होता है।
फायदे
वैचारिक रूप से, उपरोक्त तालिका संरचना को समझने में अपेक्षाकृत सरल होने का लाभ है। आप यह भी कह सकते हैं कि डेटा को डेटाबेस के बजाय एक फ्लैट फ़ाइल में रखा जा सकता है।
द्वि-आयामी तालिका संरचना के कारण, आप इस डेटा को एक स्प्रेडशीट में संग्रहीत और उपयोग कर सकते हैं। स्प्रैडशीट्स को डेटा संग्रहण के रूप में सेवा में काफी हद तक दबाया गया है।
नुकसान
जबकि उपरोक्त तालिका संरचना काम करेगी, इसके कुछ वास्तविक नुकसान हैं।
नोटों के संग्रह का प्रतिनिधित्व करने के लिए, प्रत्येक अद्वितीय नोट के लिए प्रत्येक व्यक्ति के सभी डेटा को दोहराया जाता है, इसलिए व्यक्ति डेटा बेमानी है। यह आपके व्यक्तिगत डेटा के लिए इतनी बड़ी बात नहीं है क्योंकि इसमें बहुत सारे कॉलम नहीं हैं। लेकिन कल्पना कीजिए कि अगर किसी व्यक्ति के पास कई और कॉलम हों। बड़ी डिस्क ड्राइव के साथ भी, यदि आप डेटा की लाखों पंक्तियों के साथ काम कर रहे हैं, तो यह एक भंडारण चिंता का विषय हो सकता है।
इस तरह से अनावश्यक डेटा होने से समय बीतने के साथ रखरखाव के मुद्दे हो सकते हैं। उदाहरण के लिए, क्या होगा यदि ईस्टर बनी ने नाम बदलने का फैसला किया तो यह एक अच्छा विचार था। ऐसा करने के लिए, डेटा को सुसंगत रखने के लिए ईस्टर बनी के नाम वाले प्रत्येक रिकॉर्ड को अपडेट करना होगा। डेटाबेस के खिलाफ इस तरह के काम से डेटा असंगति हो सकती है, खासकर अगर काम हाथ से SQL क्वेरी चलाने वाले व्यक्ति द्वारा किया जाता है।
नामकरण कॉलम अजीब हो जाता है। ऊपर दी गई तालिका में एक timestamp है तालिका में किसी व्यक्ति के निर्माण और अद्यतन समय को ट्रैक करने के लिए उपयोग किया जाने वाला कॉलम। आप नोट के निर्माण और अद्यतन समय के लिए भी समान कार्यक्षमता चाहते हैं, लेकिन क्योंकि timestamp पहले से ही प्रयोग किया जाता है, note_timestamp . का एक काल्पनिक नाम उपयोग किया जाता है।
क्या होगा यदि आप Person . में अतिरिक्त एक-से-अनेक संबंध जोड़ना चाहते हैं? टेबल? उदाहरण के लिए, किसी व्यक्ति के बच्चे या फ़ोन नंबर शामिल करना। प्रत्येक व्यक्ति के कई बच्चे और कई फोन नंबर हो सकते हैं। यह अपेक्षाकृत आसानी से Python People . के लिए किया जा सकता है children . जोड़कर ऊपर शब्दकोश और phone_numbers डेटा युक्त नई सूचियों वाली कुंजियाँ।
हालांकि, आपके Person . में उन नए एक-से-अनेक संबंधों का प्रतिनिधित्व करना ऊपर डेटाबेस तालिका काफी अधिक कठिन हो जाती है। प्रत्येक नया एक-से-अनेक संबंध नाटकीय रूप से चाइल्ड डेटा में प्रत्येक प्रविष्टि के लिए इसका प्रतिनिधित्व करने के लिए आवश्यक पंक्तियों की संख्या को बढ़ाता है। इसके अलावा, डेटा अतिरेक से जुड़ी समस्याएं बड़ी हो जाती हैं और उन्हें संभालना अधिक कठिन हो जाता है।
अंत में, उपरोक्त तालिका संरचना से आपको जो डेटा मिलेगा वह बहुत पाइथोनिक नहीं होगा:यह केवल सूचियों की एक बड़ी सूची होगी। SQLAlchemy आपकी बहुत मदद नहीं कर पाएगा क्योंकि संबंध नहीं है।
संबंधपरक डेटाबेस दृष्टिकोण
आपने ऊपर जो देखा है उसके आधार पर, यह स्पष्ट हो जाता है कि एक ही तालिका में मामूली जटिल डेटासेट का प्रतिनिधित्व करने का प्रयास बहुत जल्दी अप्रबंधनीय हो जाता है। यह देखते हुए, डेटाबेस किस विकल्प की पेशकश करता है? यहीं पर R RDBMS . का हिस्सा डेटाबेस खेल में आता है। रिश्तों का प्रतिनिधित्व करने से ऊपर बताए गए नुकसान दूर हो जाते हैं।
एक तालिका में पदानुक्रमित डेटा का प्रतिनिधित्व करने की कोशिश करने के बजाय, डेटा को एक दूसरे से संबंधित करने के लिए एक तंत्र के साथ कई तालिकाओं में विभाजित किया जाता है। तालिकाएँ संग्रह पंक्तियों के साथ टूटी हुई हैं, इसलिए आपके People . के लिए ऊपर शब्दकोश, इसका मतलब है कि लोगों का प्रतिनिधित्व करने वाली एक तालिका होगी और दूसरा नोट्स का प्रतिनिधित्व करेगा। यह आपके मूल Person को वापस लाता है तालिका, जो इस तरह दिखती है:
person_id | <थ> fname | timestamp | |
|---|---|---|---|
| 1 | फैरेल | डौग | 2018-08-08 21:16:01.888444 |
| 2 | ब्रॉकमैन | केंट | 2018-08-08 21:16:01.889060 |
| 3 | ईस्टर | बनी | 2018-08-08 21:16:01.886834 |
नोट की नई जानकारी का प्रतिनिधित्व करने के लिए, आप note . नामक एक नई तालिका बनाएंगे . (हमारी एकवचन तालिका नामकरण परंपरा याद रखें।) तालिका इस तरह दिखती है:
note_id | person_id | content | timestamp |
|---|---|---|---|
| 1 | 1 | कूल, एक मिनी-ब्लॉगिंग एप्लिकेशन! | 2019-01-06 22:17:54 |
| 2 | 1 | यह उपयोगी हो सकता है | 2019-01-08 22:17:54 |
| 3 | 1 | खैर, उपयोगी की तरह | 2019-03-06 22:17:54 |
| 4 | 2 | मैं वास्तव में गहन अवलोकन करने जा रहा हूं | 2019-01-07 22:17:54 |
| 5 | 2 | हो सकता है कि वे मेरे विचार से अधिक स्पष्ट हों | 2019-02-06 22:17:54 |
| 6 | 3 | क्या किसी ने मेरे ईस्टर अंडे देखे हैं? | 2019-01-07 22:47:54 |
| 7 | 3 | मुझे इन्हें डिलीवर करने में बहुत देर हो रही है! | 2019-04-06 22:17:54 |
ध्यान दें, जैसे Person तालिका, note तालिका में एक विशिष्ट पहचानकर्ता होता है जिसे note_id . कहा जाता है , जो note . के लिए प्राथमिक कुंजी है टेबल। एक बात जो स्पष्ट नहीं है वह है person_id . का समावेश तालिका में मूल्य। इसका उपयोग किस लिए किया जाता है? यह वही है जो Person . के साथ संबंध बनाता है टेबल। जबकि note_id तालिका के लिए प्राथमिक कुंजी है, person_id जिसे विदेशी कुंजी के रूप में जाना जाता है।
विदेशी कुंजी प्रत्येक प्रविष्टि को note . में देती है Person . की प्राथमिक कुंजी तालिका रिकॉर्ड इससे जुड़ा है। इसका उपयोग करके, SQLAlchemy person.person_id को जोड़कर प्रत्येक व्यक्ति से जुड़े सभी नोट्स एकत्र कर सकता है note.person_id . की प्राथमिक कुंजी विदेशी कुंजी, संबंध बनाना।
फायदे
डेटा सेट को दो तालिकाओं में तोड़कर, और एक विदेशी कुंजी की अवधारणा को पेश करके, आपने डेटा को सोचने के लिए थोड़ा और जटिल बना दिया है, आपने एकल तालिका प्रतिनिधित्व के नुकसान को हल किया है। SQLAlchemy आपको बढ़ी हुई जटिलता को आसानी से एन्कोड करने में मदद करेगा।
डेटाबेस में डेटा अब बेमानी नहीं है। प्रत्येक व्यक्ति के लिए केवल एक व्यक्ति प्रविष्टि है जिसे आप डेटाबेस में संग्रहीत करना चाहते हैं। यह भंडारण की चिंता को तुरंत हल करता है और रखरखाव संबंधी चिंताओं को नाटकीय रूप से सरल करता है।
यदि ईस्टर बनी अभी भी नाम बदलना चाहता है, तो आपको Person में केवल एक पंक्ति बदलनी होगी तालिका, और उस पंक्ति से संबंधित कुछ भी (जैसे note तालिका) तुरंत परिवर्तन का लाभ उठाएगी।
कॉलम नामकरण अधिक सुसंगत और सार्थक है। चूंकि व्यक्ति और नोट डेटा अलग-अलग तालिकाओं में मौजूद होते हैं, इसलिए निर्माण और अद्यतन टाइमस्टैम्प को दोनों तालिकाओं में लगातार नाम दिया जा सकता है, क्योंकि तालिकाओं में नामों के लिए कोई विरोध नहीं है।
इसके अलावा, अब आपको नए एक-से-अनेक संबंधों के लिए प्रत्येक पंक्ति के क्रमपरिवर्तन बनाने की आवश्यकता नहीं होगी, जिनका आप प्रतिनिधित्व करना चाहते हैं। हमारे children को लें और phone_numbers पहले से उदाहरण। इसे लागू करने के लिए child की आवश्यकता होगी और phone_numbers टेबल। प्रत्येक तालिका में person_id . की एक विदेशी कुंजी होगी इसे वापस Person से संबंधित करना टेबल।
SQLAlchemy का उपयोग करते हुए, उपरोक्त तालिकाओं से आपको जो डेटा मिलेगा, वह तुरंत अधिक उपयोगी होगा, क्योंकि आपको जो मिलेगा वह प्रत्येक व्यक्ति पंक्ति के लिए एक वस्तु है। उस ऑब्जेक्ट ने तालिका में कॉलम के बराबर विशेषताओं का नाम दिया है। उन विशेषताओं में से एक पायथन सूची है जिसमें संबंधित नोट ऑब्जेक्ट शामिल हैं।
नुकसान
जहां पाशविक बल दृष्टिकोण को समझना आसान था, विदेशी कुंजी और संबंधों की अवधारणा डेटा के बारे में कुछ और अधिक सारगर्भित है। तालिकाओं के बीच आपके द्वारा स्थापित प्रत्येक संबंध के लिए इस अमूर्तता के बारे में सोचा जाना चाहिए।
संबंधों का उपयोग करने का अर्थ है डेटाबेस सिस्टम का उपयोग करने के लिए प्रतिबद्ध होना। यह वास्तव में डेटा का उपयोग करने वाले एप्लिकेशन के ऊपर और बाहर स्थापित करने, सीखने और बनाए रखने के लिए एक और उपकरण है।
SQLAlchemy मॉडल
उपरोक्त दो तालिकाओं और उनके बीच संबंध का उपयोग करने के लिए, आपको SQLAlchemy मॉडल बनाने की आवश्यकता होगी जो दोनों तालिकाओं और उनके बीच संबंध से अवगत हों। यह रहा SQLAlchemy Person भाग 2 से मॉडल, notes . के संग्रह के साथ संबंध शामिल करने के लिए अद्यतन किया गया :
 1class Person(db.Model):
 2    __tablename__ = 'person'
 3    person_id = db.Column(db.Integer, primary_key=True)
 4    lname = db.Column(db.String(32))
 5    fname = db.Column(db.String(32))
 6    timestamp = db.Column(
 7        db.DateTime, default=datetime.utcnow, onupdate=datetime.utcnow
 8    )
 9    notes = db.relationship(
10        'Note',
11        backref='person',
12        cascade='all, delete, delete-orphan',
13        single_parent=True,
14        order_by='desc(Note.timestamp)'
15    )
उपरोक्त पायथन वर्ग की पंक्तियाँ 1 से 8 बिल्कुल वैसी ही दिखती हैं जैसी आपने पहले भाग 2 में बनाई थीं। पंक्तियाँ 9 से 16 तक Person में एक नई विशेषता का निर्माण करती हैं। notes नामक वर्ग . यह नया notes विशेषताओं को कोड की निम्नलिखित पंक्तियों में परिभाषित किया गया है:
-
पंक्ति 9: कक्षा की अन्य विशेषताओं की तरह, यह पंक्ति
notes. नामक एक नई विशेषता बनाती है और इसेdb.relationship. नामक ऑब्जेक्ट के इंस्टेंस के बराबर सेट करता है . यह ऑब्जेक्ट वह संबंध बनाता है जिसे आपPerson. में जोड़ रहे हैं वर्ग और अनुसरण करने वाली पंक्तियों में परिभाषित सभी मापदंडों के साथ बनाया गया है। -
पंक्ति 10: स्ट्रिंग पैरामीटर
'Note'SQLAlchemy वर्ग को परिभाषित करता है किPersonवर्ग से संबंधित होगा।noteclass अभी तक परिभाषित नहीं है, यही वजह है कि यह यहाँ एक स्ट्रिंग है। यह एक आगे का संदर्भ है और उन समस्याओं को संभालने में मदद करता है जो परिभाषाओं के क्रम का कारण बन सकती हैं जब किसी ऐसी चीज की आवश्यकता होती है जिसे बाद में कोड में परिभाषित नहीं किया जाता है।'Note'स्ट्रिंगPerson. को अनुमति देता हैnoteखोजने के लिए कक्षा रनटाइम पर क्लास, जो दोनोंPerson. के बाद है औरnoteपरिभाषित किया गया है। -
पंक्ति 11:
backref='person'पैरामीटर पेचीदा है। यह वह बनाता है जिसेnote. में बैकवर्ड रेफरेंस के रूप में जाना जाता है वस्तुओं।note. का प्रत्येक उदाहरण ऑब्जेक्ट मेंPerson. नामक एक विशेषता होगी .Personविशेषता मूल वस्तु का संदर्भ देती है कि एक विशेषnoteउदाहरण से जुड़ा है। मूल वस्तु का संदर्भ होना (Personइस मामले में) बच्चे में बहुत उपयोगी हो सकता है यदि आपका कोड नोट्स पर पुनरावृत्त होता है और इसमें माता-पिता के बारे में जानकारी शामिल होती है। यह आश्चर्यजनक रूप से अक्सर डिस्प्ले रेंडरिंग कोड में होता है। -
पंक्ति 12:
cascade='all, delete, delete-orphan'पैरामीटर निर्धारित करता है कि जब पैरेंटPerson. में परिवर्तन किए जाते हैं तो नोट ऑब्जेक्ट इंस्टेंस का इलाज कैसे करें उदाहरण। उदाहरण के लिए, जब कोईPersonऑब्जेक्ट हटा दिया गया है, SQLAlchemyPersonको हटाने के लिए आवश्यक SQL बनाएगा डेटाबेस से। इसके अतिरिक्त, यह पैरामीटर इसे सभीnote. को भी हटाने के लिए कहता है इससे जुड़े मामले। आप SQLAlchemy दस्तावेज़ में इन विकल्पों के बारे में अधिक पढ़ सकते हैं। -
पंक्ति 13:
single_parent=Trueपैरामीटर आवश्यक है यदिdelete-orphanपिछलेcascadeका हिस्सा है पैरामीटर। यह SQLAlchemy को अनाथnote. को अनुमति नहीं देने के लिए कहता है उदाहरण (एकnoteमाता-पिता के बिनाPersonobject) मौजूद है क्योंकि प्रत्येकnoteएक ही माता पिता है। -
पंक्ति 14:
order_by='desc(Note.timestamp)'पैरामीटर SQLAlchemy कोnoteको सॉर्ट करने का तरीका बताता हैPerson. से जुड़े उदाहरण . जब कोईPersonऑब्जेक्ट पुनर्प्राप्त किया जाता है, डिफ़ॉल्ट रूप सेnotesविशेषता सूची में शामिल होंगेnoteअज्ञात क्रम में वस्तुएँ। SQLAlchemydesc(...)फ़ंक्शन नोटों को अवरोही क्रम में नवीनतम से सबसे पुराने क्रम में सॉर्ट करेगा। अगर इसके बजाय यह लाइन होतीorder_by='Note.timestamp', SQLAlchemy डिफ़ॉल्ट रूप सेasc(...). का उपयोग करेगा कार्य करें, और नोटों को आरोही क्रम में क्रमबद्ध करें, पुराने से नवीनतम तक।
अब जबकि आपका Person मॉडल में नए notes हैं विशेषता, और यह note . के साथ एक-से-अनेक संबंध का प्रतिनिधित्व करता है ऑब्जेक्ट्स के लिए, आपको note . के लिए SQLAlchemy मॉडल को परिभाषित करने की आवश्यकता होगी :
 1class Note(db.Model):
 2    __tablename__ = 'note'
 3    note_id = db.Column(db.Integer, primary_key=True)
 4    person_id = db.Column(db.Integer, db.ForeignKey('person.person_id'))
 5    content = db.Column(db.String, nullable=False)
 6    timestamp = db.Column(
 7        db.DateTime, default=datetime.utcnow, onupdate=datetime.utcnow
 8    )
note क्लास नोट बनाने वाली विशेषताओं को परिभाषित करता है जैसा कि हमारे नमूने में देखा गया है note ऊपर से डेटाबेस तालिका। विशेषताएँ यहाँ परिभाषित की गई हैं:
-
पंक्ति 1
noteबनाता है वर्ग,db.Model. से विरासत में मिला है , ठीक वैसे ही जैसे आपनेPerson. बनाते समय पहले किया था कक्षा। -
पंक्ति 2 क्लास को बताता है कि
noteको स्टोर करने के लिए किस डेटाबेस टेबल का उपयोग करना है वस्तुओं। -
पंक्ति 3
note_idबनाता है विशेषता, इसे एक पूर्णांक मान के रूप में परिभाषित करना, औरnote. के लिए प्राथमिक कुंजी के रूप में परिभाषित करना वस्तु। -
पंक्ति 4
person_idबनाता है विशेषता, और इसेnote. से संबंधित विदेशी कुंजी के रूप में परिभाषित करता हैPerson. को वर्गperson.person_id. का उपयोग कर वर्ग प्राथमिक कुंजी। यह, औरPerson.notesविशेषता, यह है कि SQLAlchemy कैसे जानता है किPerson. के साथ बातचीत करते समय क्या करना है औरnoteवस्तुओं। -
पंक्ति 5
contentबनाता है विशेषता, जिसमें नोट का वास्तविक पाठ होता है।nullable=Falseपैरामीटर इंगित करता है कि बिना सामग्री वाले नए नोट बनाना ठीक है। -
पंक्ति 6
timestampबनाता है विशेषता, और बिल्कुलPerson. की तरह वर्ग, इसमें किसी विशेषnote. के लिए निर्माण या अद्यतन समय शामिल है उदाहरण।
डेटाबेस को इनिशियलाइज़ करें
अब जबकि आपने Person . को अपडेट कर दिया है और note बनाया मॉडल, आप उनका उपयोग परीक्षण डेटाबेस के पुनर्निर्माण के लिए करेंगे people.db . आप build_database.py . को अपडेट करके ऐसा करेंगे भाग 2 से कोड। यहां बताया गया है कि कोड कैसा दिखेगा:
 1import os
 2from datetime import datetime
 3from config import db
 4from models import Person, Note
 5
 6# Data to initialize database with
 7PEOPLE = [
 8    {
 9        "fname": "Doug",
10        "lname": "Farrell",
11        "notes": [
12            ("Cool, a mini-blogging application!", "2019-01-06 22:17:54"),
13            ("This could be useful", "2019-01-08 22:17:54"),
14            ("Well, sort of useful", "2019-03-06 22:17:54"),
15        ],
16    },
17    {
18        "fname": "Kent",
19        "lname": "Brockman",
20        "notes": [
21            (
22                "I'm going to make really profound observations",
23                "2019-01-07 22:17:54",
24            ),
25            (
26                "Maybe they'll be more obvious than I thought",
27                "2019-02-06 22:17:54",
28            ),
29        ],
30    },
31    {
32        "fname": "Bunny",
33        "lname": "Easter",
34        "notes": [
35            ("Has anyone seen my Easter eggs?", "2019-01-07 22:47:54"),
36            ("I'm really late delivering these!", "2019-04-06 22:17:54"),
37        ],
38    },
39]
40
41# Delete database file if it exists currently
42if os.path.exists("people.db"):
43    os.remove("people.db")
44
45# Create the database
46db.create_all()
47
48# Iterate over the PEOPLE structure and populate the database
49for person in PEOPLE:
50    p = Person(lname=person.get("lname"), fname=person.get("fname"))
51
52    # Add the notes for the person
53    for note in person.get("notes"):
54        content, timestamp = note
55        p.notes.append(
56            Note(
57                content=content,
58                timestamp=datetime.strptime(timestamp, "%Y-%m-%d %H:%M:%S"),
59            )
60        )
61    db.session.add(p)
62
63db.session.commit()
ऊपर दिया गया कोड भाग 2 से आया है, जिसमें Person के बीच एक-से-अनेक संबंध बनाने के लिए कुछ परिवर्तन किए गए हैं और note . कोड में जोड़े गए अपडेट या नई लाइनें यहां दी गई हैं:
-
पंक्ति 4
note. आयात करने के लिए अपडेट कर दिया गया है पहले से परिभाषित वर्ग। -
पंक्ति 7 से 39 अपडेट किए गए
Peopleको शामिल करें प्रत्येक व्यक्ति के साथ जुड़े नोट्स की सूची के साथ हमारे व्यक्ति डेटा युक्त शब्दकोश। यह डेटा डेटाबेस में डाला जाएगा। -
पंक्तियां 49 से 61
People. पर पुनरावृति शब्दकोश, प्रत्येकPersonप्राप्त करना बदले में और एकPerson. बनाने के लिए इसका उपयोग करना वस्तु। -
पंक्ति 53
person.notes. पर पुनरावृति करता है सूची, प्रत्येकnoteप्राप्त करना बदले में। -
पंक्ति 54
contentको अनपैक करता है औरtimestampप्रत्येकnote. से टपल। -
पंक्ति 55 से 60 एक
noteबनाता है ऑब्जेक्ट करता है और इसेp.notes.append(). का उपयोग करके व्यक्ति नोट संग्रह में जोड़ता है । -
पंक्ति 61
Personजोड़ता है वस्तुpडेटाबेस सत्र के लिए। -
पंक्ति 63 सत्र में सभी गतिविधियों को डेटाबेस में करता है। इस बिंदु पर सारा डेटा
Person. को लिखा जाता है औरnotepeople.dbमें टेबल डेटाबेस फ़ाइल।
आप देख सकते हैं कि notes . के साथ काम करना Person . में संग्रह ऑब्जेक्ट इंस्टेंस p पाइथन में किसी अन्य सूची के साथ काम करने जैसा ही है। जब db.session.commit() कॉल किया जाता है।
उदाहरण के लिए, बिलकुल एक Person . की तरह इंस्टेंस की प्राथमिक कुंजी फ़ील्ड है person_id SQLAlchemy द्वारा प्रारंभ किया गया जब यह डेटाबेस के लिए प्रतिबद्ध है, note . के उदाहरण उनके प्राथमिक कुंजी फ़ील्ड प्रारंभ हो जाएंगे। इसके अलावा, note विदेशी कुंजी person_id Person . के प्राथमिक कुंजी मान के साथ भी प्रारंभ किया जाएगा उदाहरण के साथ यह संबद्ध है।
यहां एक Person का उदाहरण उदाहरण दिया गया है db.session.commit() . से पहले ऑब्जेक्ट एक तरह के स्यूडोकोड में:
Person (
    person_id = None
    lname = 'Farrell'
    fname = 'Doug'
    timestamp = None
    notes = [
        Note (
            note_id = None
            person_id = None
            content = 'Cool, a mini-blogging application!'
            timestamp = '2019-01-06 22:17:54'
        ),
        Note (
            note_id = None
            person_id = None
            content = 'This could be useful'
            timestamp = '2019-01-08 22:17:54'
        ),
        Note (
            note_id = None
            person_id = None
            content = 'Well, sort of useful'
            timestamp = '2019-03-06 22:17:54'
        )
    ]
)
यहाँ उदाहरण है Person db.session.commit() . के बाद ऑब्जेक्ट :
Person (
    person_id = 1
    lname = 'Farrell'
    fname = 'Doug'
    timestamp = '2019-02-02 21:27:10.336'
    notes = [
        Note (
            note_id = 1
            person_id = 1
            content = 'Cool, a mini-blogging application!'
            timestamp = '2019-01-06 22:17:54'
        ),
        Note (
            note_id = 2
            person_id = 1
            content = 'This could be useful'
            timestamp = '2019-01-08 22:17:54'
        ),
        Note (
            note_id = 3
            person_id = 1
            content = 'Well, sort of useful'
            timestamp = '2019-03-06 22:17:54'
        )
    ]
)
दोनों के बीच महत्वपूर्ण अंतर यह है कि Person . की प्राथमिक कुंजी और note ऑब्जेक्ट्स को इनिशियलाइज़ किया गया है। डेटाबेस इंजन ने इसका ध्यान रखा क्योंकि भाग 2 में चर्चा की गई प्राथमिक कुंजियों की ऑटो-इंक्रीमेंटिंग सुविधा के कारण ऑब्जेक्ट बनाए गए थे।
इसके अतिरिक्त, person_id सभी note में विदेशी कुंजी उदाहरणों को अपने माता-पिता को संदर्भित करने के लिए प्रारंभ किया गया है। ऐसा उस क्रम के कारण होता है जिसमें Person और note ऑब्जेक्ट डेटाबेस में बनाए जाते हैं।
SQLAlchemy Person के बीच के संबंध से अवगत है और note वस्तुओं। जब कोई Person ऑब्जेक्ट Person . के लिए प्रतिबद्ध है डेटाबेस तालिका, SQLAlchemy को person_id मिलता है प्राथमिक कुंजी मान। उस मान का उपयोग person_id . के विदेशी कुंजी मान को प्रारंभ करने के लिए किया जाता है एक note . में डेटाबेस के लिए प्रतिबद्ध होने से पहले ऑब्जेक्ट।
SQLAlchemy इस डेटाबेस हाउसकीपिंग कार्य का ध्यान रखता है क्योंकि Person.notes द्वारा आपके द्वारा पास की गई जानकारी के कारण एट्रिब्यूट को db.relationship(...) . के साथ इनिशियलाइज़ किया गया था वस्तु।
इसके अलावा, Person.timestamp विशेषता को वर्तमान टाइमस्टैम्प के साथ आरंभ किया गया है।
build_database.py चल रहा है कमांड लाइन से प्रोग्राम (आभासी वातावरण में नए परिवर्धन के साथ डेटाबेस को फिर से बनाएगा, इसे वेब एप्लिकेशन के साथ उपयोग के लिए तैयार करेगा। यह कमांड लाइन डेटाबेस का पुनर्निर्माण करेगी:
$ python build_database.py
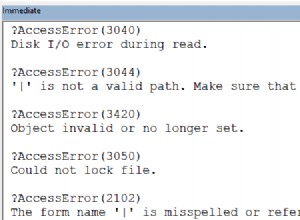
build_database.py यदि यह सफलतापूर्वक चलता है तो उपयोगिता प्रोग्राम किसी भी संदेश को आउटपुट नहीं करता है। अगर यह एक अपवाद फेंकता है, तो स्क्रीन पर एक त्रुटि मुद्रित की जाएगी।
REST API अपडेट करें
आपने SQLAlchemy मॉडल को अपडेट किया है और उनका उपयोग people.db . को अपडेट करने के लिए किया है डेटाबेस। अब नए नोटों की जानकारी तक पहुंच प्रदान करने के लिए REST API को अपडेट करने का समय आ गया है। यहां आपके द्वारा भाग 2 में बनाया गया REST API है:
| कार्रवाई | HTTP क्रिया | <थ>यूआरएल पथ <थ>विवरण||
|---|---|---|---|
| बनाएं | POST | /api/people | नया व्यक्ति बनाने के लिए URL |
| पढ़ें | GET | /api/people | लोगों के संग्रह को पढ़ने के लिए URL |
| पढ़ें | GET | /api/people/{person_id} | एक व्यक्ति को person_id द्वारा पढ़ने के लिए URL |
| अपडेट करें | PUT | /api/people/{person_id} | किसी मौजूदा व्यक्ति को person_id द्वारा अपडेट करने के लिए URL |
| हटाएं | DELETE | /api/people/{person_id} | किसी मौजूदा व्यक्ति को person_id द्वारा मिटाने के लिए URL |
उपरोक्त आरईएसटी एपीआई चीजों के संग्रह और चीजों के लिए HTTP यूआरएल पथ प्रदान करता है। आप लोगों की सूची प्राप्त कर सकते हैं या उस सूची से किसी एक व्यक्ति के साथ बातचीत कर सकते हैं। यह पथ शैली बाएं से दाएं तरीके से लौटाई गई चीज़ों को परिशोधित करती है, जैसे-जैसे आप आगे बढ़ते हैं, और अधिक बारीक होती जाती है।
अधिक विवरण प्राप्त करने और नोट्स संग्रह तक पहुँचने के लिए आप इस बाएँ से दाएँ पैटर्न को जारी रखेंगे। मिनी-ब्लॉग वेब एप्लिकेशन को नोट्स प्रदान करने के लिए आप यहां विस्तारित REST API बनाएंगे:
| कार्रवाई | HTTP क्रिया | <थ>यूआरएल पथ <थ>विवरण||
|---|---|---|---|
| बनाएं | POST | /api/people/{person_id}/notes | नया नोट बनाने के लिए URL |
| पढ़ें | GET | /api/people/{person_id}/notes/{note_id} | एक व्यक्ति के एकल नोट को पढ़ने के लिए URL |
| अपडेट करें | PUT | api/people/{person_id}/notes/{note_id} | एक व्यक्ति के एकल नोट को अपडेट करने के लिए URL |
| हटाएं | DELETE | api/people/{person_id}/notes/{note_id} | एक व्यक्ति के एकल नोट को हटाने के लिए URL |
| पढ़ें | GET | /api/notes | सभी लोगों के लिए सभी नोट प्राप्त करने के लिए URL note.timestamp . के अनुसार क्रमित करें |
notes . में दो भिन्नताएं हैं People . में उपयोग किए गए सम्मेलन की तुलना में REST API का हिस्सा अनुभाग:
-
सभी
notes. प्राप्त करने के लिए कोई URL परिभाषित नहीं है एक व्यक्ति के साथ संबद्ध, केवल एक नोट प्राप्त करने के लिए एक यूआरएल। इसने REST API को एक तरह से पूरा कर दिया होगा, लेकिन बाद में आप जो वेब एप्लिकेशन बनाएंगे, उसे इस कार्यक्षमता की आवश्यकता नहीं है। इसलिए, इसे छोड़ दिया गया है। -
अंतिम URL
/api/notes. का समावेश है . यह वेब एप्लिकेशन के लिए बनाई गई एक सुविधा विधि है। It will be used in the mini-blog on the home page to show all the notes in the system. There isn’t a way to get this information readily using the REST API pathing style as designed, so this shortcut has been added.
As in Part 2, the REST API is configured in the swagger.yml फ़ाइल।
नोट:
The idea of designing a REST API with a path that gets more and more granular as you move from left to right is very useful. Thinking this way can help clarify the relationships between different parts of a database. Just be aware that there are realistic limits to how far down a hierarchical structure this kind of design should be taken.
For example, what if the Note object had a collection of its own, something like comments on the notes. Using the current design ideas, this would lead to a URL that went something like this:/api/people/{person_id}/notes/{note_id}/comments/{comment_id}
There is no practical limit to this kind of design, but there is one for usefulness. In actual use in real applications, a long, multilevel URL like that one is hardly ever needed. A more common pattern is to get a list of intervening objects (like notes) and then use a separate API entry point to get a single comment for an application use case.
Implement the API
With the updated REST API defined in the swagger.yml file, you’ll need to update the implementation provided by the Python modules. This means updating existing module files, like models.py and people.py , and creating a new module file called notes.py to implement support for Notes in the extended REST API.
Update Response JSON
The purpose of the REST API is to get useful JSON data out of the database. Now that you’ve updated the SQLAlchemy Person and created the Note models, you’ll need to update the Marshmallow schema models as well. As you may recall from Part 2, Marshmallow is the module that translates the SQLAlchemy objects into Python objects suitable for creating JSON strings.
The updated and newly created Marshmallow schemas are in the models.py module, which are explained below, and look like this:
 1class PersonSchema(ma.ModelSchema):
 2    class Meta:
 3        model = Person
 4        sqla_session = db.session
 5    notes = fields.Nested('PersonNoteSchema', default=[], many=True)
 6
 7class PersonNoteSchema(ma.ModelSchema):
 8    """
 9    This class exists to get around a recursion issue
10    """
11    note_id = fields.Int()
12    person_id = fields.Int()
13    content = fields.Str()
14    timestamp = fields.Str()
15
16class NoteSchema(ma.ModelSchema):
17    class Meta:
18        model = Note
19        sqla_session = db.session
20    person = fields.Nested('NotePersonSchema', default=None)
21
22class NotePersonSchema(ma.ModelSchema):
23    """
24    This class exists to get around a recursion issue
25    """
26    person_id = fields.Int()
27    lname = fields.Str()
28    fname = fields.Str()
29    timestamp = fields.Str()
There are some interesting things going on in the above definitions. The PersonSchema class has one new entry:the notes attribute defined in line 5. This defines it as a nested relationship to the PersonNoteSchema . It will default to an empty list if nothing is present in the SQLAlchemy notes संबंध। The many=True parameter indicates that this is a one-to-many relationship, so Marshmallow will serialize all the related notes ।
The PersonNoteSchema class defines what a Note object looks like as Marshmallow serializes the notes सूची। The NoteSchema defines what a SQLAlchemy Note object looks like in terms of Marshmallow. Notice that it has a person attribute. This attribute comes from the SQLAlchemy db.relationship(...) definition parameter backref='person' . The person Marshmallow definition is nested, but because it doesn’t have the many=True parameter, there is only a single person जुड़े हुए।
The NotePersonSchema class defines what is nested in the NoteSchema.person attribute.
नोट:
You might be wondering why the PersonSchema class has its own unique PersonNoteSchema class to define the notes collection attribute. By the same token, the NoteSchema class has its own unique NotePersonSchema class to define the person attribute. You may be wondering whether the PersonSchema class could be defined this way:
class PersonSchema(ma.ModelSchema):
    class Meta:
        model = Person
        sqla_session = db.session
    notes = fields.Nested('NoteSchema', default=[], many=True)
Additionally, couldn’t the NoteSchema class be defined using the PersonSchema to define the person attribute? A class definition like this would each refer to the other, and this causes a recursion error in Marshmallow as it will cycle from PersonSchema to NoteSchema until it runs out of stack space. Using the unique schema references breaks the recursion and allows this kind of nesting to work.
People
Now that you’ve got the schemas in place to work with the one-to-many relationship between Person and Note , you need to update the person.py and create the note.py modules in order to implement a working REST API.
The people.py module needs two changes. The first is to import the Note class, along with the Person class at the top of the module. Then only read_one(person_id) needs to change in order to handle the relationship. That function will look like this:
 1def read_one(person_id):
 2    """
 3    This function responds to a request for /api/people/{person_id}
 4    with one matching person from people
 5
 6    :param person_id:   Id of person to find
 7    :return:            person matching id
 8    """
 9    # Build the initial query
10    person = (
11        Person.query.filter(Person.person_id == person_id)
12        .outerjoin(Note)
13        .one_or_none()
14    )
15
16    # Did we find a person?
17    if person is not None:
18
19        # Serialize the data for the response
20        person_schema = PersonSchema()
21        data = person_schema.dump(person).data
22        return data
23
24    # Otherwise, nope, didn't find that person
25    else:
26        abort(404, f"Person not found for Id: {person_id}")
The only difference is line 12:.outerjoin(Note) . An outer join (left outer join in SQL terms) is necessary for the case where a user of the application has created a new person object, which has no notes related to it. The outer join ensures that the SQL query will return a person object, even if there are no note rows to join with.
At the start of this article, you saw how person and note data could be represented in a single, flat table, and all of the disadvantages of that approach. You also saw the advantages of breaking that data up into two tables, person and note , with a relationship between them.
Until now, we’ve been working with the data as two distinct, but related, items in the database. But now that you’re actually going to use the data, what we essentially want is for the data to be joined back together. This is what a database join does. It combines data from two tables together using the primary key to foreign key relationship.
A join is kind of a boolean and operation because it only returns data if there is data in both tables to combine. If, for example, a person row exists but has no related note row, then there is nothing to join, so nothing is returned. This isn’t what you want for read_one(person_id) .
This is where the outer join comes in handy. It’s a kind of boolean or कार्यवाही। It returns person data even if there is no associated note data to combine with. This is the behavior you want for read_one(person_id) to handle the case of a newly created Person object that has no notes yet.
You can see the complete people.py in the article repository.
Notes
You’ll create a notes.py module to implement all the Python code associated with the new note related REST API definitions. In many ways, it works like the people.py module, except it must handle both a person_id and a note_id as defined in the swagger.yml configuration file. As an example, here is read_one(person_id, note_id) :
 1def read_one(person_id, note_id):
 2    """
 3    This function responds to a request for
 4    /api/people/{person_id}/notes/{note_id}
 5    with one matching note for the associated person
 6
 7    :param person_id:       Id of person the note is related to
 8    :param note_id:         Id of the note
 9    :return:                json string of note contents
10    """
11    # Query the database for the note
12    note = (
13        Note.query.join(Person, Person.person_id == Note.person_id)
14        .filter(Person.person_id == person_id)
15        .filter(Note.note_id == note_id)
16        .one_or_none()
17    )
18
19    # Was a note found?
20    if note is not None:
21        note_schema = NoteSchema()
22        data = note_schema.dump(note).data
23        return data
24
25    # Otherwise, nope, didn't find that note
26    else:
27        abort(404, f"Note not found for Id: {note_id}")
The interesting parts of the above code are lines 12 to 17:
- Line 13 begins a query against the
NoteSQLAlchemy objects and joins to the relatedPersonSQLAlchemy object comparingperson_idfrom bothPersonandNote। - Line 14 filters the result down to the
Noteobjects that has aPerson.person_idequal to the passed inperson_idparameter. - Line 15 filters the result further to the
Noteobject that has aNote.note_idequal to the passed innote_idparameter. - Line 16 returns the
Noteobject if found, orNoneif nothing matching the parameters is found.
You can check out the complete notes.py ।
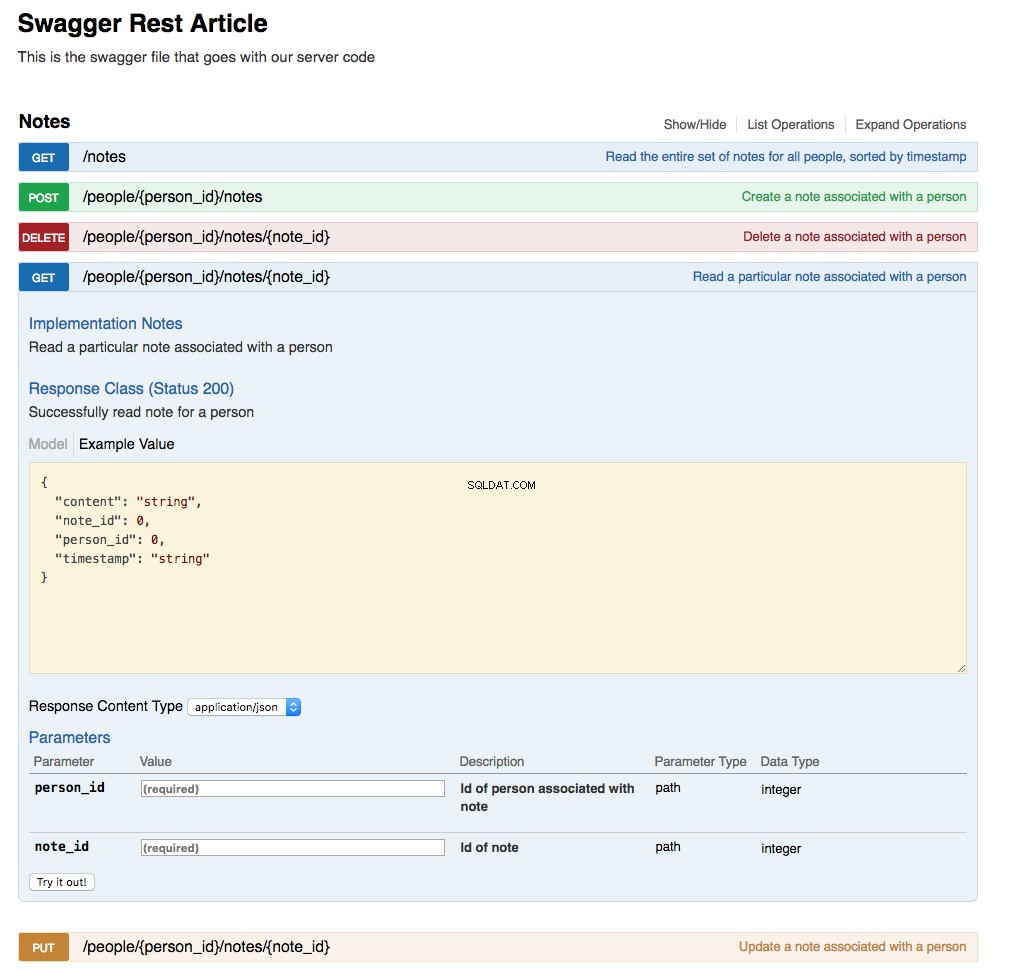
Updated Swagger UI
The Swagger UI has been updated by the action of updating the swagger.yml file and creating the URL endpoint implementations. Below is a screenshot of the updated UI showing the Notes section with the GET /api/people/{person_id}/notes/{note_id} expanded:
Mini-Blogging Web Application
The web application has been substantially changed to show its new purpose as a mini-blogging application. It has three pages:
-
The home page (
localhost:5000/) , which shows all of the blog messages (notes) sorted from newest to oldest -
The people page (
localhost:5000/people) , which shows all the people in the system, sorted by last name, and also allows the user to create a new person and update or delete an existing one -
The notes page (
localhost:5000/people/{person_id}/notes) , which shows all the notes associated with a person, sorted from newest to oldest, and also allows the user to create a new note and update or delete an existing one
Navigation
There are two buttons on every page of the application:
- The Home button will navigate to the home screen.
- The People button navigates to the
/peoplescreen, showing all people in the database.
These two buttons are present on every screen in the application as a way to get back to a starting point.
Home Page
Below is a screenshot of the home page showing the initialized database contents:
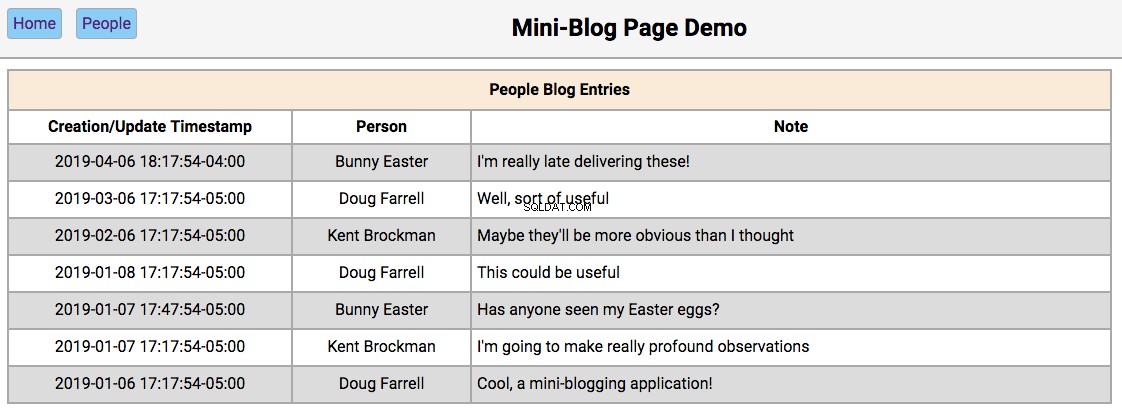
The functionality of this page works like this:
-
Double-clicking on a person’s name will take the user to the
/people/{person_id}page, with the editor section filled in with the person’s first and last names and the update and reset buttons enabled. -
Double-clicking on a person’s note will take the user to the
/people/{person_id}/notes/{note_id}page, with the editor section filled in with the note’s contents and the Update and Reset buttons enabled.
People Page
Below is a screenshot of the people page showing the people in the initialized database:
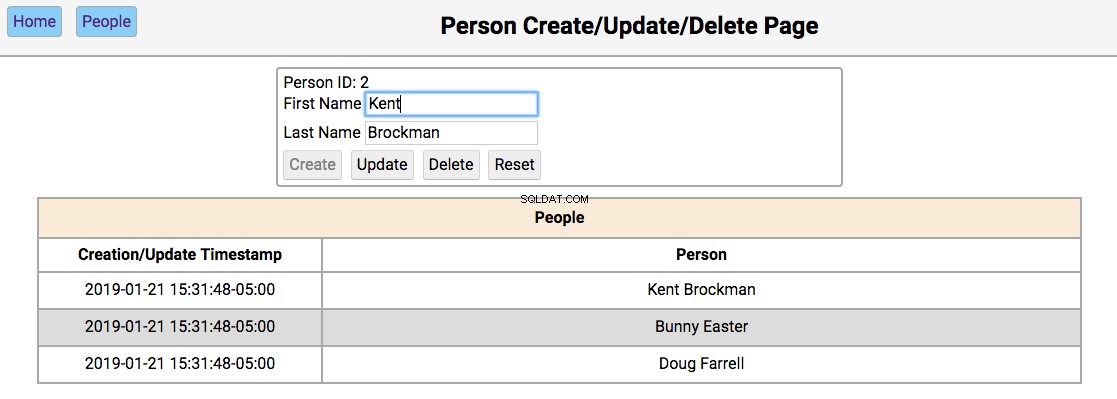
The functionality of this page works like this:
-
Single-clicking on a person’s name will populate the editor section of the page with the person’s first and last name, disabling the Create button, and enabling the Update and Delete बटन।
-
Double clicking on a person’s name will navigate to the notes pages for that person.
The functionality of the editor works like this:
-
If the first and last name fields are empty, the Create and Reset buttons are enabled. Entering a new name in the fields and clicking Create will create a new person and update the database and re-render the table below the editor. Clicking Reset will clear the editor fields.
-
If the first and last name fields have data, the user navigated here by double-clicking the person’s name from the home screen. In this case, the Update , Delete , and Reset buttons are enabled. Changing the first or last name and clicking Update will update the database and re-render the table below the editor. Clicking Delete will remove the person from the database and re-render the table.
Notes Page
Below is a screenshot of the notes page showing the notes for a person in the initialized database:
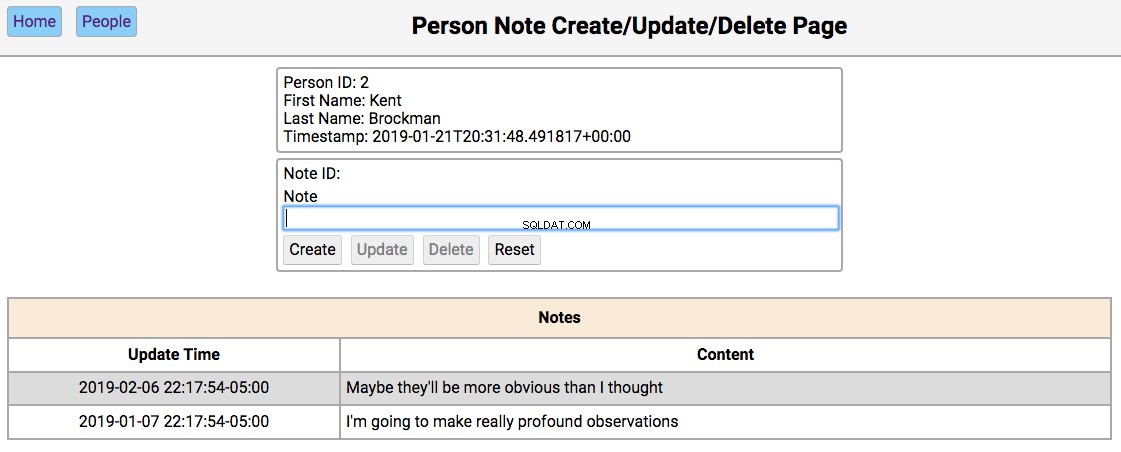
The functionality of this page works like this:
-
Single-clicking on a note will populate the editor section of the page with the notes content, disabling the Create button, and enabling the Update and Delete बटन।
-
All other functionality of this page is in the editor section.
The functionality of the editor works like this:
-
If the note content field is empty, then the Create and Reset buttons are enabled. Entering a new note in the field and clicking Create will create a new note and update the database and re-render the table below the editor. Clicking Reset will clear the editor fields.
-
If the note field has data, the user navigated here by double-clicking the person’s note from the home screen. In this case, the Update , Delete , and Reset buttons are enabled. Changing the note and clicking Update will update the database and re-render the table below the editor. Clicking Delete will remove the note from the database and re-render the table.
Web Application
This article is primarily focused on how to use SQLAlchemy to create relationships in the database, and how to extend the REST API to take advantage of those relationships. As such, the code for the web application didn’t get much attention. When you look at the web application code, keep an eye out for the following features:
-
Each page of the application is a fully formed single page web application.
-
Each page of the application is driven by JavaScript following an MVC (Model/View/Controller) style of responsibility delegation.
-
The HTML that creates the pages takes advantage of the Jinja2 inheritance functionality.
-
The hardcoded JavaScript table creation has been replaced by using the Handlebars.js templating engine.
-
The timestamp formating in all of the tables is provided by Moment.js.
You can find the following code in the repository for this article:
- The HTML for the web application
- The CSS for the web application
- The JavaScript for the web application
All of the example code for this article is available in the GitHub repository for this article. This contains all of the code related to this article, including all of the web application code.
निष्कर्ष
Congratulations are in order for what you’ve learned in this article! Knowing how to build and use database relationships gives you a powerful tool to solve many difficult problems. There are other relationship besides the one-to-many example from this article. Other common ones are one-to-one, many-to-many, and many-to-one. All of them have a place in your toolbelt, and SQLAlchemy can help you tackle them all!
For more information about databases, you can check out these tutorials. You can also set up Flask to use SQLAlchemy. You can check out Model-View-Controller (MVC) more information about the pattern used in the web application JavaScript code.
In Part 4 of this series, you’ll focus on the HTML, CSS, and JavaScript files used to create the web application.
« Part 2:Database PersistencePart 3:Database RelationshipsPart 4:Simple Web Applications »